
Thursday, January 10, 2013


Monday, January 7, 2013
How to unhide hidden files and folder in flash drive?
When I try to use my flash drive I never seen any files of folders inside my flash drive..when i check the property some space was used. anyone could help me on this matter? i want to restore all my files inside my flash drive...anyone pls...>>>> tnx.
Solution:
1. click start>>run>>type in "cmd"
2. type the location of your flash drive.. e.g. "d:", "e:", "f:", etc..
3. type "dir /ah"
*you will now see the files/folders with hidden attributes
4. type "attrib [name of file/folder] -r -a -s -h"
*if you're going to unhide files, you should type the whole name plus the extension (format).. example "attrib party.jpg -r -a -s -h"
**if you have folders with 6 characters and above, type the first 6 characters then "~1".. example for folder named "birthday"
"attrib birthd~1 -r -a -s -h"
5. you should repeatedly type dir /ah after unhiding some files/folders so you'll know if they're now working or not..
6. now check you flash drive.. it should be there..
When I try to use my flash drive I never seen any files of folders inside my flash drive..when i check the property some space was used. anyone could help me on this matter? i want to restore all my files inside my flash drive...anyone pls...>>>> tnx.
Solution:
1. click start>>run>>type in "cmd"
2. type the location of your flash drive.. e.g. "d:", "e:", "f:", etc..
3. type "dir /ah"
*you will now see the files/folders with hidden attributes
4. type "attrib [name of file/folder] -r -a -s -h"
*if you're going to unhide files, you should type the whole name plus the extension (format).. example "attrib party.jpg -r -a -s -h"
**if you have folders with 6 characters and above, type the first 6 characters then "~1".. example for folder named "birthday"
"attrib birthd~1 -r -a -s -h"
5. you should repeatedly type dir /ah after unhiding some files/folders so you'll know if they're now working or not..
6. now check you flash drive.. it should be there..
How to Install a Printer Without a CD
Many people have become frustrated over a lack of CD to install a printer. Now installing a printer without a CD does not have to be a difficult task. Just follow a few simple instructions and the printer can be installed.
Instructions
1.Place the computer and printer next to each other and make sure that all the wires are connected to both the printer and the computer.
2.Turn the computer on and wait for it to boot up.
We support: Wireless, EVDO, USB, Firewire, ACPI hibernate, BlueTooth
3.Plug the printer into the wall and then take the USB cord that is attached to the printer and plug it into the appropriate port on the computer.
4.Turn the printer on.
5.Click on "Start menu" and go to the "Control panel".
6.Find "Printers and hardware" box and click on it.
7.Take mouse and click "Add printer".
8.When you see "Welcome to the add printer wizard," hit "Next."
9.Click "Automatically detect and install plug and play printer" on the add printer wizard page. Click "Next."
10.Installing the printer will begin if the network can automatically detect it. Otherwise, the message unable to detect will pop up and you will be prompted to install the printer manually. Click "Next."
11.Select printer port. Use the recommended port for best set up options. Click "Next."
12.Pick manufacturer and printer. Click "Next."
13.Type a name or confirm name if it appears in the box and set printer as default printer if wish. Click "Next."
14.Print a test page to be sure printer is set up and online. Click "Next."
15.Receive a successful completion of installation of printer message. Click "Finish."
Many people have become frustrated over a lack of CD to install a printer. Now installing a printer without a CD does not have to be a difficult task. Just follow a few simple instructions and the printer can be installed.
Instructions
1.Place the computer and printer next to each other and make sure that all the wires are connected to both the printer and the computer.
2.Turn the computer on and wait for it to boot up.
We support: Wireless, EVDO, USB, Firewire, ACPI hibernate, BlueTooth
3.Plug the printer into the wall and then take the USB cord that is attached to the printer and plug it into the appropriate port on the computer.
4.Turn the printer on.
5.Click on "Start menu" and go to the "Control panel".
6.Find "Printers and hardware" box and click on it.
7.Take mouse and click "Add printer".
8.When you see "Welcome to the add printer wizard," hit "Next."
9.Click "Automatically detect and install plug and play printer" on the add printer wizard page. Click "Next."
10.Installing the printer will begin if the network can automatically detect it. Otherwise, the message unable to detect will pop up and you will be prompted to install the printer manually. Click "Next."
11.Select printer port. Use the recommended port for best set up options. Click "Next."
12.Pick manufacturer and printer. Click "Next."
13.Type a name or confirm name if it appears in the box and set printer as default printer if wish. Click "Next."
14.Print a test page to be sure printer is set up and online. Click "Next."
15.Receive a successful completion of installation of printer message. Click "Finish."
How to Add a Printer to a Laptop
Adding a printer to your laptop is a simple process. Printers come with unique driver and installation software that is particular to the printer brand and model number. Because printers are often used by multiple computers, most printer manufacturers have made it easy for users to access the software necessary for installation. You can also easily add a printer to a laptop by connecting with a shared printer on a network.
Instructions
1.If you have you have the installation CD that came with your printer, insert it into the CD-drive of your laptop and complete the installation process.
2.If you do not have the installation CD, go to the printer manufacturer's website and find the support section for your printer model number. Download the driver for your printer and install it onto your laptop.
3 .Once you have installed the driver and software for your printer, plug the printer cable into your laptop's USB port, and the laptop should immediately recognize the printer.
4 .If the printer you want to add is attached to another computer on the same network as the laptop, you can share the printer without actually adding it. Go to the computer that the printer is attached to. Click the "Start" button, select "Control Panel," then select "Network and Internet" and click "Network and Sharing Center." Click the arrow next to "Printer Sharing." Select "Turn On Printer Sharing" and then click the "Apply" button. Make sure the shared printer is turned on.
5 .Go to your laptop and click the "Start" button. In the search box, type "\\" and the name of the computer with the attached shared printer (for example, enter "\\mydesktop"). Click "Enter."
6.In the folder that opens on your screen, double-click "Printers." You should see the shared printer on your network. Double-click the shared printer. Windows automatically adds it to your laptop and installs the driver software. Click the "Next" button. The printer is successfully added to your laptop and should be visible in your "Printers" folder.
Adding a printer to your laptop is a simple process. Printers come with unique driver and installation software that is particular to the printer brand and model number. Because printers are often used by multiple computers, most printer manufacturers have made it easy for users to access the software necessary for installation. You can also easily add a printer to a laptop by connecting with a shared printer on a network.
Instructions
1.If you have you have the installation CD that came with your printer, insert it into the CD-drive of your laptop and complete the installation process.
2.If you do not have the installation CD, go to the printer manufacturer's website and find the support section for your printer model number. Download the driver for your printer and install it onto your laptop.
3 .Once you have installed the driver and software for your printer, plug the printer cable into your laptop's USB port, and the laptop should immediately recognize the printer.
4 .If the printer you want to add is attached to another computer on the same network as the laptop, you can share the printer without actually adding it. Go to the computer that the printer is attached to. Click the "Start" button, select "Control Panel," then select "Network and Internet" and click "Network and Sharing Center." Click the arrow next to "Printer Sharing." Select "Turn On Printer Sharing" and then click the "Apply" button. Make sure the shared printer is turned on.
5 .Go to your laptop and click the "Start" button. In the search box, type "\\" and the name of the computer with the attached shared printer (for example, enter "\\mydesktop"). Click "Enter."
6.In the folder that opens on your screen, double-click "Printers." You should see the shared printer on your network. Double-click the shared printer. Windows automatically adds it to your laptop and installs the driver software. Click the "Next" button. The printer is successfully added to your laptop and should be visible in your "Printers" folder.
Sunday, January 6, 2013
How can we remove the the virus "Lord Rahul cool "
(JOMBINO ANSWER)
OK
Click Start
Run
Then type Msconfig
click on start up
then untick the box that show Lord Rahul cool from start up items
then apply and restart
ok
Second step1.
Click on Any folder.
2. Click Tools - Folder Options - View - Hidden Files & Folders
3. Mark Show hidden files and folders
4. Unmark Hide extensions of Known file types
5. Unmark Hide protected Operating system files (Recommended)
6. First two files will be seen on hdd drive : Rahulísvirusprotection.vbe & autorun.inf
7. Click on the properties of both file and unmarked Read only.
8. Clicked Apply & deleted both files.
9. Searched for Rahul*.* on hard drives.
10. Click on the properties file and unmarked Read only deleted the file.
11. Now LORD RAHUL COOL is out of my browser
ok
Third step and most easy is to use malwarebyte.
(JOMBINO ANSWER)
OK
Click Start
Run
Then type Msconfig
click on start up
then untick the box that show Lord Rahul cool from start up items
then apply and restart
ok
Second step1.
Click on Any folder.
2. Click Tools - Folder Options - View - Hidden Files & Folders
3. Mark Show hidden files and folders
4. Unmark Hide extensions of Known file types
5. Unmark Hide protected Operating system files (Recommended)
6. First two files will be seen on hdd drive : Rahulísvirusprotection.vbe & autorun.inf
7. Click on the properties of both file and unmarked Read only.
8. Clicked Apply & deleted both files.
9. Searched for Rahul*.* on hard drives.
10. Click on the properties file and unmarked Read only deleted the file.
11. Now LORD RAHUL COOL is out of my browser
ok
Third step and most easy is to use malwarebyte.
How to Repair a Faulty Windows Installation Without Reformatting
Corrupted system files don't have to ruin your day
Nothing will put a crimp in your computing style quite like a Windows error. Although Microsoft's OS has gotten exponentially more stable over the years, it's still very possible for Windows system files to become corrupt, which can cause your system to slow down, freeze, or (in the worst case) refuse to load your operating system at all.
When you encounter a Windows error, your first instinct may be to back up your data, grab the ol' installation disk, and weep silently as you press the Reformat button. We're here to tell you there's another way. Still back up your data, of course, but by following this guide, you might well be able to repair your Windows install without dropping the nuke.
Note: Though these guides are written for Windows 7, a very similar process will work for Vista or XP.
Method 1: Repair Windows Even If You Can't Get To Your Desktop
The first method will allow you to repair corrupt system files, even if the problem is so severe that you can't boot all the way to your desktop. For this method, you'll need a Windows installation DVD, so track down yours or borrow one from a friend—it doesn't matter if the DVD's version matches your license, as long as it's the correct bit count.
Step 1: Insert the Install Disc and Reboot
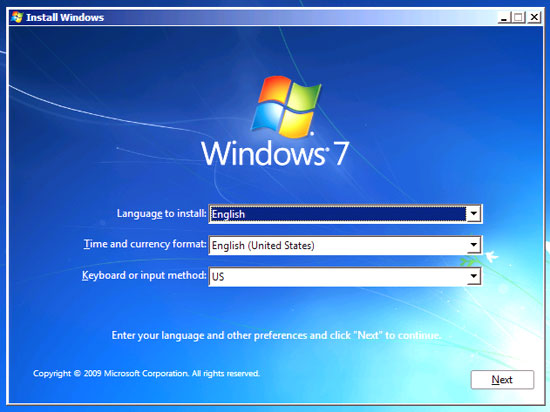
If your system won't boot into Windows, you'll need to boot from somewhere else—in this case, the installation DVD. Your computer should be set up to boot from your optical drive before your hard drive, but if it's not, you can always change the boot priority in the BIOS. When the system starts up, make sure you press a key when prompted to boot from the Windows installation disc. When you do, you'll see the familiar Windows installation language-selection screen (image below)
Step 2: Get to the Command Prompt
The recovery tool we're going to use is run from the command prompt, which can (thankfully) be accessed through the Windows installation disc. To get there, don't click Install Now in the middle of the screen, but instead click Repair Your Computer in the lower left. Click Next on the first menu that pops up.
 The next menu will have two radio buttons. Make sure the first one is selected, and note that in the text box, your System drive might not have the drive letter C. If that's the case, make a note of the drive letter used. Click Next, and on the following screen (image above), select the bottom option, marked Command Prompt.
Step 3: Scan Your System
Finally you're ready to scan your system files for errors. To do that simply run the following command:
sfc /scannow /offbootdir=[DRIVELETTER]:\ /offwindir=[DRIVELETTER]:\windows
Substitute the drive letter you noted earlier for [DRIVELETTER]. There should be no square brackets in the command (image below).
 Windows will now attempt to find and repair any errors in your system files. If the scan finds errors, you may need to repeat the steps in this guide until it finds no more errors. To restart your computer, enter the exit command, then click the Restart button. When you're ready to try booting into Windows again, remove the install disc and restart one final time.
Method 2: Reinstall Windows Without Losing Any Data
If you are still able to get to your desktop, you've got additional options. You can still use the command prompt to scan as in the previous method, but there's another way that may be more thorough: reinstall Windows.
Wait, didn't we say you wouldn't have to reformat? We did, and you don't. It's possible to do an in-place, nondestructive reinstall of Windows, which will restore all your system files to pristine condition without damaging any of your personal data or installed programs. All you'll need is a Windows install DVD and your Windows CD key. Hopefully you still have your key written down somewhere, but if you don't, you're not out of luck. You can use a program like ProduKey, available for free, to quickly recover your Windows product key from the registry.
Important: Before continuing this process, note that it can cause problems with your installed programs, so don't do it just for fun, and make sure to back up your important data and create a restore point before continuing.
Step 1: Do Some Prep Work
Before you can get started, there's one important consideration: You can't repair a Windows 7 SP1 install with a pre-SP1 install disc. The ideal solution is to borrow a newer install disc with SP1 included (or download it, if you have access to a TechNet account), but it's also possible to uninstall SP1. To do this, open the Control Panel, select Uninstall a Program, and then choose the option to view updates (image below). You can right-click the Service Pack update to uninstall it.
 Step 2: Insert the Install Disc
We're once again using the Windows install disc, but this time we're not going to boot from it. Simply insert the disc, and when the autorun menu pops up, choose to run setup.exe. Once again, you'll find yourself staring at the Windows 7 install screen. This time, do click the Install now button (image below).
 Step 3: Reinstall Windows
Finally, it's time to get down to business. After the installer gets past the Copying Temporary Files… screen, you'll be asked about getting updates for installation files. Go ahead and do this, as long as your computer's network connection is still working.
When the installer asks what sort of installation you'd like to perform (image below), ignore your natural instinct to choose Custom, and instead click Upgrade. Sure, you're not technically upgrading from one version of Windows to another, but we do want to do the kind of nondestructive install that the update option performs. Think of it as upgrading from a broken version to a non-broken version, if you must.
 After that, all that's left is to sit through the usual Windows 7 installation process, with its multiple reboots and endless progress bars. When it's done, you'll have to reactivate Windows by entering the product key that you found or wrote down earlier.
All that's left to do is to let Windows install any security updates or service packs that it's missing, and reboot. All your system files should now be fully restored!
Corrupted system files don't have to ruin your day
Nothing will put a crimp in your computing style quite like a Windows error. Although Microsoft's OS has gotten exponentially more stable over the years, it's still very possible for Windows system files to become corrupt, which can cause your system to slow down, freeze, or (in the worst case) refuse to load your operating system at all.
When you encounter a Windows error, your first instinct may be to back up your data, grab the ol' installation disk, and weep silently as you press the Reformat button. We're here to tell you there's another way. Still back up your data, of course, but by following this guide, you might well be able to repair your Windows install without dropping the nuke.
Note: Though these guides are written for Windows 7, a very similar process will work for Vista or XP.
Method 1: Repair Windows Even If You Can't Get To Your Desktop
The first method will allow you to repair corrupt system files, even if the problem is so severe that you can't boot all the way to your desktop. For this method, you'll need a Windows installation DVD, so track down yours or borrow one from a friend—it doesn't matter if the DVD's version matches your license, as long as it's the correct bit count.
Step 1: Insert the Install Disc and Reboot
If your system won't boot into Windows, you'll need to boot from somewhere else—in this case, the installation DVD. Your computer should be set up to boot from your optical drive before your hard drive, but if it's not, you can always change the boot priority in the BIOS. When the system starts up, make sure you press a key when prompted to boot from the Windows installation disc. When you do, you'll see the familiar Windows installation language-selection screen (image below)
Step 2: Get to the Command Prompt
The recovery tool we're going to use is run from the command prompt, which can (thankfully) be accessed through the Windows installation disc. To get there, don't click Install Now in the middle of the screen, but instead click Repair Your Computer in the lower left. Click Next on the first menu that pops up.

Step 3: Scan Your System
Finally you're ready to scan your system files for errors. To do that simply run the following command:
sfc /scannow /offbootdir=[DRIVELETTER]:\ /offwindir=[DRIVELETTER]:\windows
Substitute the drive letter you noted earlier for [DRIVELETTER]. There should be no square brackets in the command (image below).

Method 2: Reinstall Windows Without Losing Any Data
If you are still able to get to your desktop, you've got additional options. You can still use the command prompt to scan as in the previous method, but there's another way that may be more thorough: reinstall Windows.
Wait, didn't we say you wouldn't have to reformat? We did, and you don't. It's possible to do an in-place, nondestructive reinstall of Windows, which will restore all your system files to pristine condition without damaging any of your personal data or installed programs. All you'll need is a Windows install DVD and your Windows CD key. Hopefully you still have your key written down somewhere, but if you don't, you're not out of luck. You can use a program like ProduKey, available for free, to quickly recover your Windows product key from the registry.
Important: Before continuing this process, note that it can cause problems with your installed programs, so don't do it just for fun, and make sure to back up your important data and create a restore point before continuing.
Step 1: Do Some Prep Work
Before you can get started, there's one important consideration: You can't repair a Windows 7 SP1 install with a pre-SP1 install disc. The ideal solution is to borrow a newer install disc with SP1 included (or download it, if you have access to a TechNet account), but it's also possible to uninstall SP1. To do this, open the Control Panel, select Uninstall a Program, and then choose the option to view updates (image below). You can right-click the Service Pack update to uninstall it.

We're once again using the Windows install disc, but this time we're not going to boot from it. Simply insert the disc, and when the autorun menu pops up, choose to run setup.exe. Once again, you'll find yourself staring at the Windows 7 install screen. This time, do click the Install now button (image below).

Finally, it's time to get down to business. After the installer gets past the Copying Temporary Files… screen, you'll be asked about getting updates for installation files. Go ahead and do this, as long as your computer's network connection is still working.
When the installer asks what sort of installation you'd like to perform (image below), ignore your natural instinct to choose Custom, and instead click Upgrade. Sure, you're not technically upgrading from one version of Windows to another, but we do want to do the kind of nondestructive install that the update option performs. Think of it as upgrading from a broken version to a non-broken version, if you must.

All that's left to do is to let Windows install any security updates or service packs that it's missing, and reboot. All your system files should now be fully restored!
How to Maximize Laptop Battery Backup
Laptops are important as they can be used anywhere and without power source available. But a laptop can soon become uninteresting if it gives you improper battery backup. So here are the tips to improve laptop battery backup, in this week’s Tip of the Week.
• Dim your screen - Most laptops come with the ability to dim your laptop screen. Some even come with ways to modify CPU and cooling performance. Cut them down to the lowest level you can tolerate to squeeze out some extra battery juice.
• Cut down on programs running in the background - ITunes, Desktop Search, etc. All these add to the CPU load and cut down battery life. Shut down everything that isn’t crucial when you’re on battery.
• Cut down external devices - USB devices (including your mouse) & WIFI drain down your laptop battery.
• Run off a hard drive rather than CD/DVD – battery consumed when run on a CD/DVD is higher than that of disk.
• Hibernate not standby - Although placing a laptop in standby mode saves some power and you can instantly resume where you left off, it doesn’t save anywhere as much power as the hibernate function does.
• Keep operating temperature down - Your laptop operates more efficiently when it’s cooler. Clean out your air vents with a cloth or keyboard cleaner.
• Optimize your power options – set power options from the control panel and see your laptop run more on battery as compared to earlier.
• Exercise the Battery - Do not leave a charged battery dormant for long periods of time. Once charged, you should use the battery at least once every two to three weeks.
• Ensure the battery contacts are clean: With time, the metal battery contact points tend to attract dirt, so it is better to clean the points with some soft cloth and alcohol to extract the max battery.
• Ensure proper health of the battery: Make sure that you don’t leave the battery charged for long time; it should be used once every two-three weeks. Doing this ensures longer usage of the battery.
• No Multitasking: Although computers are used for multitasking but you would have seen your battery drying out quickly when you are running several programs at the same time. Thus try to reduce the work load of the system when on battery.
• Prioritize: If you are already running low on the battery and need to maximize the usage then pick your program usage wisely as running email and word processing consume much less power than gaming or playing a DVD.
• Fully charging/discharging: Following the practice of fully charging and fully discharging provides the laptop with healthy and powerful battery.
If you also have some points then do let us know.
Laptops are important as they can be used anywhere and without power source available. But a laptop can soon become uninteresting if it gives you improper battery backup. So here are the tips to improve laptop battery backup, in this week’s Tip of the Week.
• Dim your screen - Most laptops come with the ability to dim your laptop screen. Some even come with ways to modify CPU and cooling performance. Cut them down to the lowest level you can tolerate to squeeze out some extra battery juice.
• Cut down on programs running in the background - ITunes, Desktop Search, etc. All these add to the CPU load and cut down battery life. Shut down everything that isn’t crucial when you’re on battery.
• Cut down external devices - USB devices (including your mouse) & WIFI drain down your laptop battery.
• Run off a hard drive rather than CD/DVD – battery consumed when run on a CD/DVD is higher than that of disk.
• Hibernate not standby - Although placing a laptop in standby mode saves some power and you can instantly resume where you left off, it doesn’t save anywhere as much power as the hibernate function does.
• Keep operating temperature down - Your laptop operates more efficiently when it’s cooler. Clean out your air vents with a cloth or keyboard cleaner.
• Optimize your power options – set power options from the control panel and see your laptop run more on battery as compared to earlier.
• Exercise the Battery - Do not leave a charged battery dormant for long periods of time. Once charged, you should use the battery at least once every two to three weeks.
• Ensure the battery contacts are clean: With time, the metal battery contact points tend to attract dirt, so it is better to clean the points with some soft cloth and alcohol to extract the max battery.
• Ensure proper health of the battery: Make sure that you don’t leave the battery charged for long time; it should be used once every two-three weeks. Doing this ensures longer usage of the battery.
• No Multitasking: Although computers are used for multitasking but you would have seen your battery drying out quickly when you are running several programs at the same time. Thus try to reduce the work load of the system when on battery.
• Prioritize: If you are already running low on the battery and need to maximize the usage then pick your program usage wisely as running email and word processing consume much less power than gaming or playing a DVD.
• Fully charging/discharging: Following the practice of fully charging and fully discharging provides the laptop with healthy and powerful battery.
If you also have some points then do let us know.
Subscribe to:
Posts (Atom)