How can we remove the the virus "Lord Rahul cool "
(JOMBINO ANSWER)
OK
Click Start
Run
Then type Msconfig
click on start up
then untick the box that show Lord Rahul cool from start up items
then apply and restart
ok
Second step1.
Click on Any folder.
2. Click Tools - Folder Options - View - Hidden Files & Folders
3. Mark Show hidden files and folders
4. Unmark Hide extensions of Known file types
5. Unmark Hide protected Operating system files (Recommended)
6. First two files will be seen on hdd drive : Rahulísvirusprotection.vbe & autorun.inf
7. Click on the properties of both file and unmarked Read only.
8. Clicked Apply & deleted both files.
9. Searched for Rahul*.* on hard drives.
10. Click on the properties file and unmarked Read only deleted the file.
11. Now LORD RAHUL COOL is out of my browser
ok
Third step and most easy is to use malwarebyte.
Sunday, January 6, 2013


How to Repair a Faulty Windows Installation Without Reformatting
Corrupted system files don't have to ruin your day
Nothing will put a crimp in your computing style quite like a Windows error. Although Microsoft's OS has gotten exponentially more stable over the years, it's still very possible for Windows system files to become corrupt, which can cause your system to slow down, freeze, or (in the worst case) refuse to load your operating system at all.
When you encounter a Windows error, your first instinct may be to back up your data, grab the ol' installation disk, and weep silently as you press the Reformat button. We're here to tell you there's another way. Still back up your data, of course, but by following this guide, you might well be able to repair your Windows install without dropping the nuke.
Note: Though these guides are written for Windows 7, a very similar process will work for Vista or XP.
Method 1: Repair Windows Even If You Can't Get To Your Desktop
The first method will allow you to repair corrupt system files, even if the problem is so severe that you can't boot all the way to your desktop. For this method, you'll need a Windows installation DVD, so track down yours or borrow one from a friend—it doesn't matter if the DVD's version matches your license, as long as it's the correct bit count.
Step 1: Insert the Install Disc and Reboot
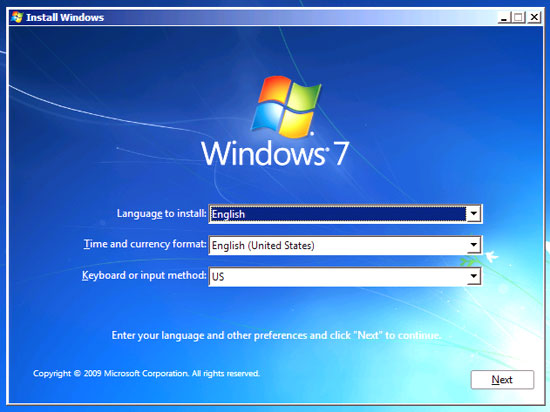
If your system won't boot into Windows, you'll need to boot from somewhere else—in this case, the installation DVD. Your computer should be set up to boot from your optical drive before your hard drive, but if it's not, you can always change the boot priority in the BIOS. When the system starts up, make sure you press a key when prompted to boot from the Windows installation disc. When you do, you'll see the familiar Windows installation language-selection screen (image below)
Step 2: Get to the Command Prompt
The recovery tool we're going to use is run from the command prompt, which can (thankfully) be accessed through the Windows installation disc. To get there, don't click Install Now in the middle of the screen, but instead click Repair Your Computer in the lower left. Click Next on the first menu that pops up.
 The next menu will have two radio buttons. Make sure the first one is selected, and note that in the text box, your System drive might not have the drive letter C. If that's the case, make a note of the drive letter used. Click Next, and on the following screen (image above), select the bottom option, marked Command Prompt.
Step 3: Scan Your System
Finally you're ready to scan your system files for errors. To do that simply run the following command:
sfc /scannow /offbootdir=[DRIVELETTER]:\ /offwindir=[DRIVELETTER]:\windows
Substitute the drive letter you noted earlier for [DRIVELETTER]. There should be no square brackets in the command (image below).
 Windows will now attempt to find and repair any errors in your system files. If the scan finds errors, you may need to repeat the steps in this guide until it finds no more errors. To restart your computer, enter the exit command, then click the Restart button. When you're ready to try booting into Windows again, remove the install disc and restart one final time.
Method 2: Reinstall Windows Without Losing Any Data
If you are still able to get to your desktop, you've got additional options. You can still use the command prompt to scan as in the previous method, but there's another way that may be more thorough: reinstall Windows.
Wait, didn't we say you wouldn't have to reformat? We did, and you don't. It's possible to do an in-place, nondestructive reinstall of Windows, which will restore all your system files to pristine condition without damaging any of your personal data or installed programs. All you'll need is a Windows install DVD and your Windows CD key. Hopefully you still have your key written down somewhere, but if you don't, you're not out of luck. You can use a program like ProduKey, available for free, to quickly recover your Windows product key from the registry.
Important: Before continuing this process, note that it can cause problems with your installed programs, so don't do it just for fun, and make sure to back up your important data and create a restore point before continuing.
Step 1: Do Some Prep Work
Before you can get started, there's one important consideration: You can't repair a Windows 7 SP1 install with a pre-SP1 install disc. The ideal solution is to borrow a newer install disc with SP1 included (or download it, if you have access to a TechNet account), but it's also possible to uninstall SP1. To do this, open the Control Panel, select Uninstall a Program, and then choose the option to view updates (image below). You can right-click the Service Pack update to uninstall it.
 Step 2: Insert the Install Disc
We're once again using the Windows install disc, but this time we're not going to boot from it. Simply insert the disc, and when the autorun menu pops up, choose to run setup.exe. Once again, you'll find yourself staring at the Windows 7 install screen. This time, do click the Install now button (image below).
 Step 3: Reinstall Windows
Finally, it's time to get down to business. After the installer gets past the Copying Temporary Files… screen, you'll be asked about getting updates for installation files. Go ahead and do this, as long as your computer's network connection is still working.
When the installer asks what sort of installation you'd like to perform (image below), ignore your natural instinct to choose Custom, and instead click Upgrade. Sure, you're not technically upgrading from one version of Windows to another, but we do want to do the kind of nondestructive install that the update option performs. Think of it as upgrading from a broken version to a non-broken version, if you must.
 After that, all that's left is to sit through the usual Windows 7 installation process, with its multiple reboots and endless progress bars. When it's done, you'll have to reactivate Windows by entering the product key that you found or wrote down earlier.
All that's left to do is to let Windows install any security updates or service packs that it's missing, and reboot. All your system files should now be fully restored!
Corrupted system files don't have to ruin your day
Nothing will put a crimp in your computing style quite like a Windows error. Although Microsoft's OS has gotten exponentially more stable over the years, it's still very possible for Windows system files to become corrupt, which can cause your system to slow down, freeze, or (in the worst case) refuse to load your operating system at all.
When you encounter a Windows error, your first instinct may be to back up your data, grab the ol' installation disk, and weep silently as you press the Reformat button. We're here to tell you there's another way. Still back up your data, of course, but by following this guide, you might well be able to repair your Windows install without dropping the nuke.
Note: Though these guides are written for Windows 7, a very similar process will work for Vista or XP.
Method 1: Repair Windows Even If You Can't Get To Your Desktop
The first method will allow you to repair corrupt system files, even if the problem is so severe that you can't boot all the way to your desktop. For this method, you'll need a Windows installation DVD, so track down yours or borrow one from a friend—it doesn't matter if the DVD's version matches your license, as long as it's the correct bit count.
Step 1: Insert the Install Disc and Reboot
If your system won't boot into Windows, you'll need to boot from somewhere else—in this case, the installation DVD. Your computer should be set up to boot from your optical drive before your hard drive, but if it's not, you can always change the boot priority in the BIOS. When the system starts up, make sure you press a key when prompted to boot from the Windows installation disc. When you do, you'll see the familiar Windows installation language-selection screen (image below)
Step 2: Get to the Command Prompt
The recovery tool we're going to use is run from the command prompt, which can (thankfully) be accessed through the Windows installation disc. To get there, don't click Install Now in the middle of the screen, but instead click Repair Your Computer in the lower left. Click Next on the first menu that pops up.

Step 3: Scan Your System
Finally you're ready to scan your system files for errors. To do that simply run the following command:
sfc /scannow /offbootdir=[DRIVELETTER]:\ /offwindir=[DRIVELETTER]:\windows
Substitute the drive letter you noted earlier for [DRIVELETTER]. There should be no square brackets in the command (image below).

Method 2: Reinstall Windows Without Losing Any Data
If you are still able to get to your desktop, you've got additional options. You can still use the command prompt to scan as in the previous method, but there's another way that may be more thorough: reinstall Windows.
Wait, didn't we say you wouldn't have to reformat? We did, and you don't. It's possible to do an in-place, nondestructive reinstall of Windows, which will restore all your system files to pristine condition without damaging any of your personal data or installed programs. All you'll need is a Windows install DVD and your Windows CD key. Hopefully you still have your key written down somewhere, but if you don't, you're not out of luck. You can use a program like ProduKey, available for free, to quickly recover your Windows product key from the registry.
Important: Before continuing this process, note that it can cause problems with your installed programs, so don't do it just for fun, and make sure to back up your important data and create a restore point before continuing.
Step 1: Do Some Prep Work
Before you can get started, there's one important consideration: You can't repair a Windows 7 SP1 install with a pre-SP1 install disc. The ideal solution is to borrow a newer install disc with SP1 included (or download it, if you have access to a TechNet account), but it's also possible to uninstall SP1. To do this, open the Control Panel, select Uninstall a Program, and then choose the option to view updates (image below). You can right-click the Service Pack update to uninstall it.

We're once again using the Windows install disc, but this time we're not going to boot from it. Simply insert the disc, and when the autorun menu pops up, choose to run setup.exe. Once again, you'll find yourself staring at the Windows 7 install screen. This time, do click the Install now button (image below).

Finally, it's time to get down to business. After the installer gets past the Copying Temporary Files… screen, you'll be asked about getting updates for installation files. Go ahead and do this, as long as your computer's network connection is still working.
When the installer asks what sort of installation you'd like to perform (image below), ignore your natural instinct to choose Custom, and instead click Upgrade. Sure, you're not technically upgrading from one version of Windows to another, but we do want to do the kind of nondestructive install that the update option performs. Think of it as upgrading from a broken version to a non-broken version, if you must.

All that's left to do is to let Windows install any security updates or service packs that it's missing, and reboot. All your system files should now be fully restored!
How to Maximize Laptop Battery Backup
Laptops are important as they can be used anywhere and without power source available. But a laptop can soon become uninteresting if it gives you improper battery backup. So here are the tips to improve laptop battery backup, in this week’s Tip of the Week.
• Dim your screen - Most laptops come with the ability to dim your laptop screen. Some even come with ways to modify CPU and cooling performance. Cut them down to the lowest level you can tolerate to squeeze out some extra battery juice.
• Cut down on programs running in the background - ITunes, Desktop Search, etc. All these add to the CPU load and cut down battery life. Shut down everything that isn’t crucial when you’re on battery.
• Cut down external devices - USB devices (including your mouse) & WIFI drain down your laptop battery.
• Run off a hard drive rather than CD/DVD – battery consumed when run on a CD/DVD is higher than that of disk.
• Hibernate not standby - Although placing a laptop in standby mode saves some power and you can instantly resume where you left off, it doesn’t save anywhere as much power as the hibernate function does.
• Keep operating temperature down - Your laptop operates more efficiently when it’s cooler. Clean out your air vents with a cloth or keyboard cleaner.
• Optimize your power options – set power options from the control panel and see your laptop run more on battery as compared to earlier.
• Exercise the Battery - Do not leave a charged battery dormant for long periods of time. Once charged, you should use the battery at least once every two to three weeks.
• Ensure the battery contacts are clean: With time, the metal battery contact points tend to attract dirt, so it is better to clean the points with some soft cloth and alcohol to extract the max battery.
• Ensure proper health of the battery: Make sure that you don’t leave the battery charged for long time; it should be used once every two-three weeks. Doing this ensures longer usage of the battery.
• No Multitasking: Although computers are used for multitasking but you would have seen your battery drying out quickly when you are running several programs at the same time. Thus try to reduce the work load of the system when on battery.
• Prioritize: If you are already running low on the battery and need to maximize the usage then pick your program usage wisely as running email and word processing consume much less power than gaming or playing a DVD.
• Fully charging/discharging: Following the practice of fully charging and fully discharging provides the laptop with healthy and powerful battery.
If you also have some points then do let us know.
Laptops are important as they can be used anywhere and without power source available. But a laptop can soon become uninteresting if it gives you improper battery backup. So here are the tips to improve laptop battery backup, in this week’s Tip of the Week.
• Dim your screen - Most laptops come with the ability to dim your laptop screen. Some even come with ways to modify CPU and cooling performance. Cut them down to the lowest level you can tolerate to squeeze out some extra battery juice.
• Cut down on programs running in the background - ITunes, Desktop Search, etc. All these add to the CPU load and cut down battery life. Shut down everything that isn’t crucial when you’re on battery.
• Cut down external devices - USB devices (including your mouse) & WIFI drain down your laptop battery.
• Run off a hard drive rather than CD/DVD – battery consumed when run on a CD/DVD is higher than that of disk.
• Hibernate not standby - Although placing a laptop in standby mode saves some power and you can instantly resume where you left off, it doesn’t save anywhere as much power as the hibernate function does.
• Keep operating temperature down - Your laptop operates more efficiently when it’s cooler. Clean out your air vents with a cloth or keyboard cleaner.
• Optimize your power options – set power options from the control panel and see your laptop run more on battery as compared to earlier.
• Exercise the Battery - Do not leave a charged battery dormant for long periods of time. Once charged, you should use the battery at least once every two to three weeks.
• Ensure the battery contacts are clean: With time, the metal battery contact points tend to attract dirt, so it is better to clean the points with some soft cloth and alcohol to extract the max battery.
• Ensure proper health of the battery: Make sure that you don’t leave the battery charged for long time; it should be used once every two-three weeks. Doing this ensures longer usage of the battery.
• No Multitasking: Although computers are used for multitasking but you would have seen your battery drying out quickly when you are running several programs at the same time. Thus try to reduce the work load of the system when on battery.
• Prioritize: If you are already running low on the battery and need to maximize the usage then pick your program usage wisely as running email and word processing consume much less power than gaming or playing a DVD.
• Fully charging/discharging: Following the practice of fully charging and fully discharging provides the laptop with healthy and powerful battery.
If you also have some points then do let us know.
Steps to Remove csrcs.exe or csrsc.exe Virus
This was the error message faced by one of our readers that when he boots the PC up, the CSRCS.exe error message comes up on the screen.
csrsc.exe is a process which is registered as W32.Spybot.CF Virus. DO NOT confuse it with csrss.exe which is an important file used by Windows. The attackers of this virus can access our computer and gain access to some important data remotely.
Steps to remove this virus:
1. Scan the system with a good and updated Anti Virus.
2. Open Task Manager, locate this exe (csrcs.exe or csrsc.exe but not csrss.exe), and kill the process.
3. Now type msconfig in the Run box, and then go to startup tab.
4. Locate this exe file, if any, and then remove it from there as well.
5. Now search the file in the C: drive.
6. Permanently delete the file (csrcs.exe or csrsc.exe only) from the computer.
7. Reboot the PC for changes to take place.
UPDATE
1.After doing the above steps, you need to clean the registry as well.
Navigate to HKEY_LOCAL_MACHINE\SOFTWARE\Microsoft\WindowsNT\CurrentVersion\Winlogon
2.On the right side, there is a key named “Shell”, it may be having a value “explorer.exe csrcs.exe”. Just modify it to delete the csrcs.exe from it (not explorer.exe). Restart the computer
The virus should have gone.
This was the error message faced by one of our readers that when he boots the PC up, the CSRCS.exe error message comes up on the screen.
csrsc.exe is a process which is registered as W32.Spybot.CF Virus. DO NOT confuse it with csrss.exe which is an important file used by Windows. The attackers of this virus can access our computer and gain access to some important data remotely.
Steps to remove this virus:
1. Scan the system with a good and updated Anti Virus.
2. Open Task Manager, locate this exe (csrcs.exe or csrsc.exe but not csrss.exe), and kill the process.
3. Now type msconfig in the Run box, and then go to startup tab.
4. Locate this exe file, if any, and then remove it from there as well.
5. Now search the file in the C: drive.
6. Permanently delete the file (csrcs.exe or csrsc.exe only) from the computer.
7. Reboot the PC for changes to take place.
UPDATE
1.After doing the above steps, you need to clean the registry as well.
Navigate to HKEY_LOCAL_MACHINE\SOFTWARE\Microsoft\WindowsNT\CurrentVersion\Winlogon
2.On the right side, there is a key named “Shell”, it may be having a value “explorer.exe csrcs.exe”. Just modify it to delete the csrcs.exe from it (not explorer.exe). Restart the computer
The virus should have gone.
Difference between Laptop, Notebook, Netbook and Tablet PCs
With the rapid growth of technology we have seen lot many gadgets being discovered. There are many types of computing devices that are available like laptops, notebooks, netbooks and the tablets, all having their own purpose of use.
If you are unsure of what the exact purpose of these devices is and when should we use which device, then this article will help you understanding the differences between each of them.
Laptop and Notebook
 The term Laptop and Notebook refers to the same device, which is a personal computer but used mostly when travelling. This device consists of all the features of a desktop like the monitor (flip-up in nature), keyboard, speakers, USB ports, optical drive etc. Laptops/Notebooks have screen size starting from 13 inches or higher.
Netbooks
 Netbooks are smaller, lighter and more portable laptops as compared to the usual ones. This is a relatively cheaper device than laptops but also have lesser features than it. Netbooks have smaller keyboards which could be bit difficult to use, smaller screen of about 11 inches and also without the optical drive slot.
Tablet PCs
 Tablet PCs are the small computers with touch screen functions. They have full size keyboard with the ability of the screen to rotate on its axis and can be used atop the keyboard. The screen can lie down on the machine to give a slate like form.
Thus you can decide for yourself, which device will suit you more before purchasing it in future.
With the rapid growth of technology we have seen lot many gadgets being discovered. There are many types of computing devices that are available like laptops, notebooks, netbooks and the tablets, all having their own purpose of use.
If you are unsure of what the exact purpose of these devices is and when should we use which device, then this article will help you understanding the differences between each of them.
Laptop and Notebook
Netbooks
Tablet PCs
Thus you can decide for yourself, which device will suit you more before purchasing it in future.
How to prevent the risks associated with using laptops

Our journey from using desktops to flaunting laptops has been satisfying and fashionable. Despite the tremendous popularity and convenience, laptops pose some serious health risks if not used cautiously.
Vision problems
Generally, when we use a laptop, the distance between the laptop screen and our eyes is little. This increases our chances of developing Computer Vision Syndrome [CVS].
CVS is characterised by eye strain, blurred vision, dry eyes and head ache. Staring at the laptop screen for long decreases the blink rate. It can also lead to refractory errors especially nearsightedness [myopia], which can develop into glaucoma if precautions are not taken.
How to prevent it…
Get your eyes checked at least once a year.
Avoid excessive bright lights both artificial light [fluorescent tubes] and natural light.
Place the laptop screen in such a way that windows are to the sides, not in front or behind the screen.
Maintain a distance of 20 – 30 inches [length of an arm] between the eyes and the laptop.
Use a font size of 12 – 14.
Install an anti-glare screen to minimise the glare.
Match the brightness and the contrast of the screen to that of the ambient light.
Practise the 20/20/20 rule—every 20 minutes, turn your eyes away from the laptop and focus on an object about 20ft away for about 20 seconds.
Prevent your eyes from getting dry by avoiding sitting directly under a fan. Keep the eyes moist by blinking often and splashing water on the eyes or lubricating them with moisturising eye drops.
Take frequent breaks; they are a must as the breaks allow the muscles to relax and avoid eye strain.
Exercise your eyes. Hold a pencil in front of you about an arm away and focus on the tip. Now, bring the pencil towards your eye, slowly. When it comes close enough for you to see double, do it all over again.
Spine issues
Although a laptop is convenient because of its portability, it has poor ergonomic features [minimum distance between the screen and the keyboard]. If kept on the lap, it increases the tendency to bend the neck forward and hunch the back, leading to tension in the neck going further down the spine.
Back, neck and shoulder pain are the commonest problems associated with using the laptop at a stretch. These problems can worsen with time, leading to more severe spinal problems like spondylitis, herniated disc or disc rupture.
How to prevent it…
Pay attention to your posture when you are using the laptop. If you are using it for a short time, sit in a comfortable chair and angle the laptop screen such a way that there is minimum neck deviation. If you are using it for a long time, place the laptop on a desk in a way that will allow you to view the screen without bending your neck.
Try to maintain the angle between the arm and forearm at 90 degrees. If the angle is less, raise the seat or adjust it.
Avoid using touch pads and use a separate mouse and when using it, keep the arm and elbow close to the body.
Use an adjustable chair that provides lumbar [lower back] support and helps in maintaining an erect sitting posture. Raise the level of the laptop by using a laptop stand or thick book, as most back problems are caused due to slouching.
Ensure that your spine and thighs are at 90 degrees.
Keep your feet firmly on the floor or use a foot rest. The idea is to keep the thighs parallel to the floor.
Stand up, walk around, and do a few stretching exercises every once in a while.
If you have to lug your laptop around, use a laptop bag with padded shoulder straps and alternate the shoulders after few minutes. If the laptop weighs over 10 lbs [4.5 kg], consider using a carrier bag with rolls.
Elevate the rear end of the laptop so that the key board is inclined and the forearm is parallel to the floor.
Finger and wrist trouble
The cramped design of the keyboard often does not provide enough space for moving fingers, which leads to early fatigue and strain. The condition worsens due to the position of the wrist while typing and while using the touchpad.
This can further compress the nerves and blood vessels leading to pain and swelling in the wrist and fingers known as Compartment Syndrome. Excessive repeated movements of the fingers required for typing stresses the small joints leading to Repeated Stress Syndrome.
How to prevent it…
Exercise your fingers every 15 – 20 minutes. Take a ball that comfortably fits in your palm and keep squeezing it. This allows continuous blood flow and also strengthens the wrist and finger muscles.
While typing and using a mouse, support your wrist with a pad or a pillow to reduce the pressure on the wrist and avoid injury.
Avoid excessive usage of touch pads and prefer mouse.
Use a portable USB keyboard as it gives your fingers ample space to move.
Keep fingers flat while typing.
Use laptops for short period of time and take frequent breaks to give your hands some rest.
Radiation repercussions
Laptops release heat from the bottom and if kept on the lap for long can decrease the sperm count of a man due to the heat produced.
Continuous and long-term usage is found to cause DNA damage due to release of Extremely Low Frequency [ELF] radiation. The radiation is also known to cause some foetal damage.
How to prevent it…
Avoid keeping the laptop on the lap.
If you are pregnant, avoid keeping laptop near the abdomen to avoid foetal defects.
Don’t charge the laptop batteries when not in use, as over charged batteries may emit some radiation.
Consume foods rich in vitamin A and C. They help combat the harmful effects of laptop radiation as they are rich in antioxidants.
Use screen radiant filter plates to prevent the harmful effects of screen radiation.
Effect on skin
When a laptop is kept on the bare lap for long, it raises the temperature of the groin area above 50 degree celsius. The long term exposure to heat may lead to redness, soreness or lesions. If unattended, it can lead to darkening of the skin called as Toasted Skin Syndrome.
How to prevent it…
Keep the laptop on a desk and not on the lap.
Use a portable laptop knee tray, which cushions your skin from the heat.
Mental health problems
The portability of laptop means that it remains hooked to you even if you don’t wish to. This has caused increased stress, depression, dependence and insomnia among regular users.
Subconsciously you are also worried about the safety of your prized possession and its theft means both mental and financial stress.
How to prevent it…
Avoid carrying your laptops everywhere you go.
Give the laptop a break. Don’t use the laptop if you don’t have urgent work, especially when you are home. Having kids in your lap is more satisfying than having the laptop. So spend time with your family.
Laptops have become a necessary evil. Use them judiciously with full awareness of the risks they bring along.
Our journey from using desktops to flaunting laptops has been satisfying and fashionable. Despite the tremendous popularity and convenience, laptops pose some serious health risks if not used cautiously.
Vision problems
Generally, when we use a laptop, the distance between the laptop screen and our eyes is little. This increases our chances of developing Computer Vision Syndrome [CVS].
CVS is characterised by eye strain, blurred vision, dry eyes and head ache. Staring at the laptop screen for long decreases the blink rate. It can also lead to refractory errors especially nearsightedness [myopia], which can develop into glaucoma if precautions are not taken.
How to prevent it…
Get your eyes checked at least once a year.
Avoid excessive bright lights both artificial light [fluorescent tubes] and natural light.
Place the laptop screen in such a way that windows are to the sides, not in front or behind the screen.
Maintain a distance of 20 – 30 inches [length of an arm] between the eyes and the laptop.
Use a font size of 12 – 14.
Install an anti-glare screen to minimise the glare.
Match the brightness and the contrast of the screen to that of the ambient light.
Practise the 20/20/20 rule—every 20 minutes, turn your eyes away from the laptop and focus on an object about 20ft away for about 20 seconds.
Prevent your eyes from getting dry by avoiding sitting directly under a fan. Keep the eyes moist by blinking often and splashing water on the eyes or lubricating them with moisturising eye drops.
Take frequent breaks; they are a must as the breaks allow the muscles to relax and avoid eye strain.
Exercise your eyes. Hold a pencil in front of you about an arm away and focus on the tip. Now, bring the pencil towards your eye, slowly. When it comes close enough for you to see double, do it all over again.
Spine issues
Although a laptop is convenient because of its portability, it has poor ergonomic features [minimum distance between the screen and the keyboard]. If kept on the lap, it increases the tendency to bend the neck forward and hunch the back, leading to tension in the neck going further down the spine.
Back, neck and shoulder pain are the commonest problems associated with using the laptop at a stretch. These problems can worsen with time, leading to more severe spinal problems like spondylitis, herniated disc or disc rupture.
How to prevent it…
Pay attention to your posture when you are using the laptop. If you are using it for a short time, sit in a comfortable chair and angle the laptop screen such a way that there is minimum neck deviation. If you are using it for a long time, place the laptop on a desk in a way that will allow you to view the screen without bending your neck.
Try to maintain the angle between the arm and forearm at 90 degrees. If the angle is less, raise the seat or adjust it.
Avoid using touch pads and use a separate mouse and when using it, keep the arm and elbow close to the body.
Use an adjustable chair that provides lumbar [lower back] support and helps in maintaining an erect sitting posture. Raise the level of the laptop by using a laptop stand or thick book, as most back problems are caused due to slouching.
Ensure that your spine and thighs are at 90 degrees.
Keep your feet firmly on the floor or use a foot rest. The idea is to keep the thighs parallel to the floor.
Stand up, walk around, and do a few stretching exercises every once in a while.
If you have to lug your laptop around, use a laptop bag with padded shoulder straps and alternate the shoulders after few minutes. If the laptop weighs over 10 lbs [4.5 kg], consider using a carrier bag with rolls.
Elevate the rear end of the laptop so that the key board is inclined and the forearm is parallel to the floor.
Finger and wrist trouble
The cramped design of the keyboard often does not provide enough space for moving fingers, which leads to early fatigue and strain. The condition worsens due to the position of the wrist while typing and while using the touchpad.
This can further compress the nerves and blood vessels leading to pain and swelling in the wrist and fingers known as Compartment Syndrome. Excessive repeated movements of the fingers required for typing stresses the small joints leading to Repeated Stress Syndrome.
How to prevent it…
Exercise your fingers every 15 – 20 minutes. Take a ball that comfortably fits in your palm and keep squeezing it. This allows continuous blood flow and also strengthens the wrist and finger muscles.
While typing and using a mouse, support your wrist with a pad or a pillow to reduce the pressure on the wrist and avoid injury.
Avoid excessive usage of touch pads and prefer mouse.
Use a portable USB keyboard as it gives your fingers ample space to move.
Keep fingers flat while typing.
Use laptops for short period of time and take frequent breaks to give your hands some rest.
Radiation repercussions
Laptops release heat from the bottom and if kept on the lap for long can decrease the sperm count of a man due to the heat produced.
Continuous and long-term usage is found to cause DNA damage due to release of Extremely Low Frequency [ELF] radiation. The radiation is also known to cause some foetal damage.
How to prevent it…
Avoid keeping the laptop on the lap.
If you are pregnant, avoid keeping laptop near the abdomen to avoid foetal defects.
Don’t charge the laptop batteries when not in use, as over charged batteries may emit some radiation.
Consume foods rich in vitamin A and C. They help combat the harmful effects of laptop radiation as they are rich in antioxidants.
Use screen radiant filter plates to prevent the harmful effects of screen radiation.
Effect on skin
When a laptop is kept on the bare lap for long, it raises the temperature of the groin area above 50 degree celsius. The long term exposure to heat may lead to redness, soreness or lesions. If unattended, it can lead to darkening of the skin called as Toasted Skin Syndrome.
How to prevent it…
Keep the laptop on a desk and not on the lap.
Use a portable laptop knee tray, which cushions your skin from the heat.
Mental health problems
The portability of laptop means that it remains hooked to you even if you don’t wish to. This has caused increased stress, depression, dependence and insomnia among regular users.
Subconsciously you are also worried about the safety of your prized possession and its theft means both mental and financial stress.
How to prevent it…
Avoid carrying your laptops everywhere you go.
Give the laptop a break. Don’t use the laptop if you don’t have urgent work, especially when you are home. Having kids in your lap is more satisfying than having the laptop. So spend time with your family.
Laptops have become a necessary evil. Use them judiciously with full awareness of the risks they bring along.
Subscribe to:
Posts (Atom)