Tuesday, January 29, 2013

How to test a diode
Diodes are one of the components that can be tested very easily.Ordinary diodes as wells as Zener diodes can be checked by using a multimeter. While testing a diode the forward conducting mode and reverse blocking mode has to be tested separately.

Testing ordinary diode using a digital multimeter.
To check an ordinary silicon diode using a digital multimeter, put the multimeter selector switch in the diode check mode. Connect the positive lead of multimeter to the anode and negative lead to cathode of the diode. If multimeter displays a voltage between 0.6 to 0.7, we can assume that the diode is healthy. This is the test for checking the forward conduction mode of diode. The displayed value is actually the potential barrier of the silicon diode and its value ranges from 0.6 to 0.7 volts depending on the temperature.

Now connect the positive lead of multimeter to the cathode and negative lead to the anode. If the multimeter shows an infinite reading (over range), we can assume that the diode is healthy. This is the test for checking the reverse blocking mode of the diode.
For testing Germanium diodes, the procedure is same but the display will be between 0.25 to 0.3 V to indicate a healthy condition in the forward biased mode. The potential barrier for Germanium diode is between 0.25 and 0.3V.When reverse biased the multimeter will show an infinite reading (over range) to indicate healthy condition.
Testing ordinary diode using analog multimeter.
To check an ordinary Silicon diode using an analogue multimeter, put the multimeter selector switch in a low resistance position (say 1K).Connect the positive lead of multimeter to anode of the diode and negative lead of multimeter to cathode of the diode. If meter shows a low resistance reading, we can assume that the diode is healthy. This is the test for checking forward biased mode of the diode.

Now put the multimeter selector switch in a high resistance position (say 100K).Connect the positive lead of multimeter to cathode of the diode and negative lead to anode of the diode. If the meter shows an infinite reading, we can assume that the diode is healthy. This is the test for checking the reverse blocking mode of the diode. The meter shows infinite or very high resistance reading because a reverse biased diode has a very high resistance (usually in the range of hundreds of K Ohms).
Testing Zener diode.
The forward characteristics of a Zener diode is similar to an ordinary diode.So the methods used for testing forward conducting mode of any ordinary diode is applicable to the Zener diode too.But in reverse mode, the reverse breakdown voltage has great significance and it has to be specifically tested.For example a 5.3V Zener diode must start conducting only when the applied reverse voltage just exceeds 5.3V.The reverse bias mode of Zener diode can be easily tested by using the circuit given below.The resistance R1 can be typically 100Ohms.The multimeter must be in voltage mode.Now slowly increase the output of variable power supply and at the same time observe the voltage shown in the multimeter. The multimeter display increases along with the increase in power supply voltage until the breakdown voltage. Beyond that the multimeter reading stays put despite of the power supply voltage. This is because the Zener diode is now in breakdown region and the voltage across it will remain constant irrespective of the increase in supply voltage and this constant voltage will be equal to the breakdown voltage. If the reading of multimeter in this instant is equal to the breakdown voltage specified by the manufacturer, we can assume that the Zener diode is healthy.
While carrying out this test, remember not to exceed the input excitation voltage to a point that forces the Zener diode to dissipate more power than it can safely handle. Typically current through the diode should not be allowed to exceed more than 10mA.


How To Check Capacitor - Electronic Repair
Read On To Learn How To Check A Capacitor
If you want to know if a capacitor is defective or not then you need to know how to check capacitors using a multimeter, in this lens you will learn the correct way to do this and the equipment you will need to do the job.
Equipment Needed To Check Capacitor
To perform a check on a capacitor whilst it is still in circuit you will need an ESR meter or if you are planning on removing the capacitor from the circuit then you can get away with just using a multi-meter as an ohm-meter to test the capacitor.

To find out if your capacitor is running at the correct micro farad then you will need to purchase a capacitor tester.

What You Need To Do To Check A Capacitor Assuming that you have already removed the capacitor from the circuit board you then need to make sure that the capacitor has been discharged as they carry a charge, the easiest way to do this on a relatively small capacitor is to use a 12v automotive bulb and touch the ground of the capacitor to the case of the bulb and the power pin to the contact point of the bulb, this will dissipate the charge and then you can safely check the capacitor with your multimeter.

To use a capacitor tester you need to select the correct micro-farad setting to use, if your capacitor says 680 micro-farad then set the tester to the higher range usually 2000 mf, once you have done this just attach the black probe lead to the ground on the capacitor and the red probe to the power, you should then get a reading of the exact micro-farad which you can compare to what is written on the side of the capacitor. Don't worry i have provided some useful videos further down the page to make it abit clearer for you.

To use a multimeter
To use a multimeter to check your capacitor is working effectively you need to set the meter to the high ranges 10k - 1m and connect the probes in the same way as the capacitor tester, black to ground red to power, as soon as the probes make contact the meter should swing near zero then slowly move toward infinity before coming to a rest at infinite ohms as the capacitor is being charged by the battery in the multimeter. If the capacitor is bad then the meter will go to zero ohms and remain there, if this is the case then this is known as a shortened capacitor.
In the case of an open capacitor there will be no ohm reading and some capacitors have a dielectric leakage, you will know this if the ohm-meter comes to a rest at a point before infinity but please check this against a known working capacitor.


what do you set the multimeter
In most cases you CAN'T use a multimeter to test a capacitor. At least, you can't measure the cap's value, but you can tell if the cap has a short.

A GOOD CAPACITOR will measure a very HIGH resistance on ALL ranges.

However, if the capacitor is SHORTED (a common problem) then the OHMETER function can be used to check it.

If the capacitor is SHORTED then the ohmeter will read 0 (zero) ohms.

It is also possible for a capacitor to have a HIGH RESISTANCE short. So check the capacitor using several different ohmeter ranges. A high resistance short will measure open ciruit on the low ohm ranges, and medium resistance on the high ohm ranges.

Very high value capacitor (like 100,000 uF) will show interesting results. When the ohmeter is first attached they will show zero ohms, but then the meter will slowly climb up to very high resistence readings. This is normal for very high capacitance values.

BTW: Watch the polarity on electrolytic caps. Always connect + to + and - to -

Other than the above, you need a special Capacitance Check Meter.

Tuesday, January 22, 2013

How to handle an AC adapter properly
Please note: Never use the AC adapter if it shows any signs of damage. When removing the AC adapter from the computer never pull from the cord, always grasp the connector and gently pull the cord from the computer.
Issues caused by handling the AC adaptor other then recommended may not be covered under warranty.
Always wrap the cord as shown when transporting or storing your AC adaptor.

Do not wrap the power cord around the AC adaptor as this can cause the wires to split or snap where it enters the AC adaptor (see below).
Do not allow the AC adaptor to hang from the computer (as pictured below) as this can cause the DC Jack on the computer to break.
Do not put any pressure on the AC adaptor connector or the DC Jack as this can damage the AC adaptor or the computer or both.
Did you find this helpful?
How To Create a Windows 7 Logon Password
When you start your computer, does Windows 7 ask for a password? It should. If not, you need to create a password as soon as possible.
Not having a Windows 7 password is a big security concern. Without a password, anyone in your home or office has full and unrestricted access to everything on the computer. Fortunately, creating a new Windows 7 password is very simple.
Follow the steps below to create a password for your Windows 7 logon account:
Note: If you're trying to create a new Windows 7 password because you've forgotten yours and can't get in to Windows, see Tip #2 at the bottom of the page for help.
Difficulty: Easy
Time Required: Creating a Windows 7 password usually takes less than a few minutes
Here's How:
Click on Start and then Control Panel.
Click on the User Accounts and Family Safety link.
Note: If you're viewing the Large icons or Small icons view of Control Panel, you won't see this link. Simply click on the User Accounts icon and proceed to Step 4.
Click on the User Accounts link.
In the Make changes to your user account area of the User Accounts window, click the Create a password for your account link.
In the first two text boxes, enter the password you would like to start using.
Entering the password twice helps to make sure that you typed your new password correctly.
In the final text box, you're asked to Type a password hint.
This step is optional but I highly recommend that you use it. If you try logging in to Windows 7 but enter the wrong password, this hint will pop up, hopefully jogging your memory.
Click the Create password button to confirm your new password.
You can now close the User Accounts window.
Now that your Windows 7 account has a password setup, you must use this password to log on to Windows 7 from this point forward.
Create a Windows 7 password reset disk. While not a required part of creating a new password, I highly recommend that you do this.
A password reset disk will protect you from the consequences of forgetting your new Windows 7 password.
Tips:
1.Not a Windows 7 user? See How Do I Create a Password in Windows? for specific instructions for your version of Windows.
2.If you need a new Windows 7 password because you've forgotten yours and can no longer access Windows, then you obviously can't use the method above.
You can, however, use a free Windows password recovery program to crack or reset the password even if you can't get in to Windows 7 at all. You can then create a new Windows 7 password using the instructions above.

Thursday, January 17, 2013

My kyocera km-2550 multifunctional copier has

My kyocera km-2550 multifunctional copier has started showing a error message "call for service c6000" and a phone number in asterisks. kindly advice on what to do or if there any online help.
This is fuser unit error code, you can try to reset it might work, but if the erorr code came back then you need to change the fuser unit.

In order to reset this code: follow those steps
on the panel press 1087 1087
The screen will change to service mode
on the panel again press 163
now look at the screen and you will see Excute.
Select Excute and press the Start key.
The Machine will rebot or it will asks you to turn it off and on.
After the machine load again, it should be good, if the Error came back!! Then change the Fuser Unit.
How to Connect a Wireless Mouse
A wireless mouse can make your desk look a more modern and neat by eliminating cords. It can also make using the mouse more comfortable for you. If you've never worked with wireless accessories before, setting up a wireless mouse might seem a little complicated. Some wireless mice use USB receivers, and others use Bluetooth. We'll show you how to connect either one.
connecting to a Receiver
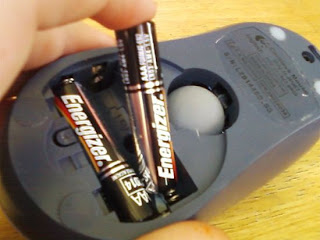
1.Insert the batteries into the mouse. Turn the mouse over, find the battery cover, and slide it off. Insert the appropriate batteries—usually two AAs.

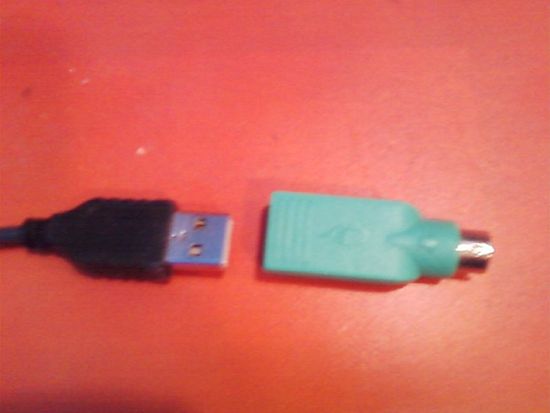
2.Connect the receiver to the computer. If your computer has a USB port (as most do), plug your receiver into an available port. There will also be a green adapter supplied, in the event that your system requires the use of the mouse port. Caution—don't try and force the mouse adapter into the keyboard port!

The mouse receiver has a USB plug (left), but can also plug into the mouse plug through the adapter it came with (right). If your receiver plugs into the USB port it should look like the left. If it plugs into the mouse plug it should look like the one on the right, only connected to the receiver.
3.Connect the mouse to the receiver. Place the mouse in close proximity to the receiver, and note the following:
The receiver should have a visible button that is easily pushable by the average human finger.
The mouse will usually have a very small reset button in a hole on the bottom that can be pushed by something like a pencil or paper clip.
Push both buttons at the same time with the receiver and the mouse relatively close to each other for about 5 seconds or more.
4.Find a permanent position the receiver. Place the receiver where it won't be far away from the mouse. Depending on where you are, you can place it on the monitor, on the tower, on the back of your laptop (if you are installing the mouse to your laptop) or on the desk.
The furthest a wireless mouse can get away from the receiver and still function is about 9 feet (2.7 meters), so keep that in mind.
5.Test your new mouse.
If you plugged into the mouse port, restart your computer.
If you plugged it into the USB port you should be able to use it immediately.
When the cursor moves when you move the mouse, you have connected the mouse properly. If the cursor doesn't move, try repositioning the receiver. If it still doesn't work, you may need to restart your computer (if you haven't already) or reconnect everything.
6.Adjust your mouse settings. Use the control panel that came with your wireless mouse, or download the necessary software from the manufacturer's website. Adjust the settings so that the mouse performs as you require.

Connecting Via Bluetooth
1.Insert batteries into your mouse. Turn your mouse over, locate the battery cover, and remove it. Insert the appropriate batteries—usually two AAs
2.Enable Bluetooth. In your Bluetooth control panel, make sure Bluetooth is turned on, and that your device is discoverable. (Refer to the device's user's guide for more information.)
Usually, the status LED on the mouse will blink when it's discoverable.
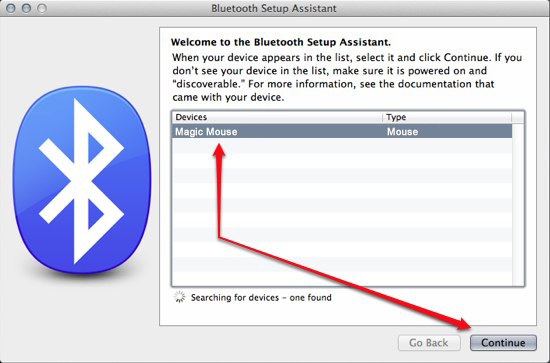
3.Discover the mouse. Set your Bluetooth setup control panel to discovery mode. It will search for available Bluetooth signals, then notify you when your mouse has been found.

Once the mouse has been discovered, follow the on-screen steps to finalize you setup procedure.
4.Adjust your mouse settings. Use the control panel that came with your wireless mouse, or download the necessary software from the manufacturer's website. Adjust the settings so that the mouse performs as you require.

Monday, January 14, 2013

How to read color codes from resistors.


The value of the resistor is marked on the body using colors. Every color is different number and you can remember these numbers or you can just use the table on next step. OR there are much resistor calculators that you can use. It's for the laziest people :D . However it's your decision ,and I will show you all ways to calculate resistor value.

Colors

Here is the table with the colors and numbers. As you can see they are:
BLACK: 0
BROWN: 1
RED: 2
ORANGE: 3
YELLOW: 4
GREEN: 5
BLUE: 6
VIOLET: 7
GREY: 8
WHITE: 9
But this is not for all colors. From right to left the second color is multiplier. Digits from the first colors must be multiplied with the number of this color.
BLACK: 1
BROWN: 10
RED: 100
ORANGE: 1000
YELLOW: 10000
GREEN: 100000
BLUE: 1000000
GOLD: 0.1
SILVER: 0.01
And the last color: This is tolerance. Tolerance is the precision of the resistor and it is given as a percentage. For example a 390 resistor with a tolerance of ±10% will have a value within 10% of 390, between 390 - 39 = 351 and 390 + 39 = 429 (39 is 10% of 390).
BROWN: 1%
RED: 2%
GOLD: 5%
SILVER: 10%
NOTHING: 20%

Calculator

Resistor color code calculator
If you are too lazy to think about colors and digits and mat ... this is for you :) :D

Examples

Exemple: If first color is RED ,second is RED ,third is BLACK and the last is SILVER it means:
RED - 2 -- RED - 2 -- YELLOW - x10000 -- SILVER - 10% so...
2 2 0000 +/- 10% * 2 2 0000 so... :D
220000 +/- 22000
This is 220 000 Ohm or 220 kOhm
or 220 000 - 22 000 Ohm or 220 - 22 kOhm
or 220 000 + 22 000 Ohm or 220 + 22 kOhm


How to Copy and Paste
"Copy and paste" is a phrase that, in the computer world, means copying material from one page to another. Material may include text, images, symbols, files, folders, an entire page, or sometimes even an entire disk. Here's how to do it.
Steps
Windows
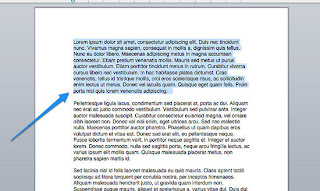
1.Select the desired text. Highlight the desired text by holding down the left mouse button and dragging across the text you wish to copy.
Note: You can also select text with the keyboard. Place your cursor where you want to begin the selection, hold down the Shift key, and use the arrow keys to select text.
If you're using a smart phone or other touch-screen device, use your finger to drag slowly over the text you wish to highlight.
2.Release the mouse button. When you've selected the entire block of text desired, release your hold of the button.
The text should now be highlighted in your chosen highlight color.
3.Right-click the selected text. A contextual menu will appear.
Select "Copy." This copies the text (places the selected text on the clipboard), where you can take it to another part of the existing document, or even to a different document on a separate application, to paste.
Note: instead of selecting "Copy" from the contextual menu, you can select it from the Edit menu of most applications, or type Control-C. All methods place the selection onto the clipboard.
4.Paste the text. Find where you want to paste the copied text, and click in the document where you want the text to go.
Right click the mouse. A contextual menu will appear.
5.Select "Paste." The copied material will be inserted into the document.
Alternately, you can select Paste from the Edit menu, or type Control-V to paste the contents of the clipboard into your document.
All Operating Systems : Drag and Drop Method
1.Select the text. Using the methods outlined above, select the desired text.

2.Drag and drop it. Click and hold inside the selected text. Keeping the mouse button held down, drag the selected text into its new destination, then release the mouse button


How to Clean a Mousepad
Have a look at your humble mousepad. This little foam marvel provides the space for your mouse to rest on and a good surface for moving across. However, it also collects specks of dead skin, oil and dirt. If it's gray and grimy, it's time for a bath.


Steps
1.Check out what your mousepad is made of. Usually it will be a spongy foam, covered with either a finely knit fabric or a plastic top.

2.Clean it according to the type of surface.

If the surface is fabric, try rubbing gently with a moist washcloth or rag and a bit of shampoo. Shampoo is a mild cleaner that's gentle on most fabrics and on skin, plus you already have it.
If your mousepad is plastic-covered, use any mild spray household cleaner and a cloth or sponge. Dish soap or shampoo will work just as well.
3.Rinse all the cleaner off the mousepad.
4.Pat the outside of the mousepad dry.
5.Allow the mousepad to dry thoroughly. Let it dry all the way through the foam before returning it to your desk.
How to Save Your Computer Accessories
Did you ever wonder what would happen if your computer suddenly broke down? Here are several small steps you can take to help ensure your computer accessories will continue running smoothly for years to come.
Steps
1.Do not bang on your keyboard. When you type, lightly tap the keys instead. Not only will this ensure that your keyboard lasts much longer, it is also better for your fingers and wrists.

2.Take care of your mouse. Do not pick it up and drop it, especially if you have a digital mouse, as this can move the sensor out of place. Clean your ball mouse if you have one:

Turn your ball mouse upside-down and unscrew the cap;
Take out the ball;
Take a toothpick, cotton swab, or your finger, and clean off the three (3) small long rings inside of your ball mouse. Turn each ring slowly several times to make sure there is nothing left on the rings.
Replace parts and use the ball mouse again.
3.Take care of your speakers. When turning up volume, do it gently. Make sure the speakers are away from edges, so that they do not fall off the sides, which can badly damage them. Keep them away from heat sources as well.
4.Take care of your monitor. Make sure you have your screen saver turned on. If you use your computer often, consider setting the time to two-three (2-3) minutes before the screen saver comes on. Clean your screen at least once a week. Other ways to keep the monitor in good condition include:

Turn off your monitor at night or when not in use.
Take a window spray, such as Windex, and lightly spray it on your screen.
Immediately wipe screen vertically with a newspaper, or any other soft cloth that you may prefer. (Do not use paper towels, as they can scratch the screen, and small pieces can break off which, if not removed immediately, dry on your screen.)
5.Clean the computer. Use an appropriate cleaning product, such as a can of dust remover to spray to clean your computer parts. Parts should include: mouse, keyboard, speakers, modem, etc. To spray the mouse, simply remove the cap and spray in the hole for three-five (3-5) seconds. To spray the keyboard, simply turn your keyboard upside down and gently shake for several seconds. This will remove any large debris that may have gotten caught in your keyboard. Then simply tilt your keyboard at a 45 degree angle, and spray down each row of keys.
6.Clean out your modem.
Shut down your computer completely.
Remove all cords from the back from the modem.
Remove the outside casing from your computer. Look in your computer manual for further instructions on how to do this.
Spray all chips and parts in your computer. Warning: do not touch the chips with your hands, as this can badly damage them. If easily accessible, use dry cotton swabs to clean the fans and metal casings.
Replace all parts and cords, and start your computer.
7.Protect your computer. If you have small children in the house, you should always keep your computer up high and away from the edges, so that there are no dangers of any parts falling on them. If you cannot place your computer out of the way of small children, place a small child-safety fence in all doorways surrounding the computer, or a small fence around your computer/computer desk.
How to Use a Computer Mouse
Do you continually 'miss' your target link when browsing the web? Well, don't worry. Though it may seem confusing or difficult at first, you can learn how to operate a mouse with these easy steps and tips.
Steps
1.Connect the mouse. If you drag it around the arrow on the screen should move around with it. If not, you may have a technical problem. Sometimes the arrow will dart around in spurts, or will move too slowly. The former will require troubleshooting (probably downloading a driver) and the latter can be adjusted in your computer's settings. If this doesn't work, consider using a wrench to open your mouse and remove any broken objects.

2.Mice (more than one mouse) can be used by either hand. If you are left handed, you can just place the mouse on the other side of the keyboard, if it reaches. The mouse will work the same.
3.Hold the mouse correctly. For Windows or PC users, place your pointer finger on the left button, and your ring finger on the right button. If your mouse has a button or 'wheel' in the middle, your middle finger can operate this. For Mac users, the mouse usually has only one button. Use any of your three center fingers to press the button.
4.To click, press the button (usually the left one, when there are two) and promptly release it. It should be a firm, quick tap, and the mouse should be still when you do it.
5.To double click (for opening applications, documents or folders), you must click (the left button) twice in rapid succession. If you have physical trouble with the required double click speed, your computer can be adjusted to suit your needs.
6.To drag files, press and hold the (left) button, then move the mouse without letting the button go until the file is where you want it to be.
7.Use mouse gestures. When you feel more confident you may like to set up mouse gestures.

Friday, January 11, 2013

HP Color LaserJet 1600 Printer - Change Print Cartridges
When a print cartridge approaches the end of useful life, the control panel displays a message recommending that you order a replacement. The printer can continue to print using the current print cartridge until the control panel displays a message instructing you to replace the cartridge.

The printer uses four colors and has a different print cartridge for each color: black (K), cyan ©), magenta(M), and yellow (Y).

Replace a print cartridge when the printer control panel displays one of the following messages: Replace yellow cartridge , Replace magenta cartridge , Replace cyan cartridge , Replace black cartridge .The control panel display also indicates the color that should be replaced (unless a genuine HP cartridge is not currently installed).

Change the print cartridge
1.Open the front door.
CAUTION: Do not place anything on the transfer belt (ETB), which is located on the inside of the front door.
2.Remove the used print cartridge from the printer.
3.Remove the new print cartridge from the bag. Place the used print cartridge in the bag for recycling.
4.Grasp both sides of the print cartridge by the blue handles and distribute the toner by gently rocking the print cartridge from side to side.
CAUTION: Do not touch the shutter or the surface of the roller.
5.Remove the orange shipping locks and the orange shipping tape from the new print cartridge. Discard the shipping tape and shipping locks according to local regulations.
6.Align the print cartridge with the tracks inside the printer, and using the handles, insert the print cartridge until it is firmly seated.
7.Firmly close the front door.
After a short time, the control panel should display Ready .
NOTE: If a cartridge is in the wrong slot or is the wrong type for the printer, the control panel will display one of the following messages: Incorrect yellow , Incorrect magenta , Incorrect cyan , Incorrect black .
8.Installation is complete. Place the used print cartridge in the box in which the new cartridge arrived. See the enclosed recycling guide for recycling instructions.
9.If you are using a non-HP print cartridge, check the printer control panel for further instructions.
For additional help, go to http://www.hp.com/support/clj1600 .
NOTE: When replacing or changing a black print cartridge, a cleaning page will automatically be printed. This helps prevent speckles on the front or back of printed documents.

How to rest error code e 0000000 in canon ir 2016
The main thermistor TH1 has poor contact or open circuit.The thermal switch TP1 has an open circuit.The fixing heater has an open circuit.The SSR is faulty or the DC controller PCB.After the main power switch is turned ON the temperature detected by the main thermistor does not reach 70 C.The error must be reset in service mode :
*28* - COPIER - FUNCTION - CLEAR - ERR.

How to remove personal folder password

go to RUN, type SYSEDIT


check WIN.INI or SYSTEM.ini

delete the line for Password Information.

reboot the computer.

How do I password protect my files and folders in Windows?


Question

How do I password protect my files and folders in Windows?

Answer
Tip: Before password protecting any document you may wish to create a backup of the non-password protected folder and files in case you forget the password in the future.
The majority of Microsoft Windows operating systems do not come with a method of password protecting your sensitive files and folders. If you're using Microsoft Windows 3.x, Windows 95, Windows 98, you will need to download or purchase a third-party program to password protect your files and folders in Windows; skip down to the other security solutions section if you're using one of these operating systems.
Microsoft Windows XP professional users
Microsoft Windows XP home users
Other security solutions for protecting your files and folders in Windows
Things to remember when encrypting or password protecting files and folders
Microsoft Windows XP professional users
The below steps for encrypting the files on Windows XP professional applies to users who are using a computer that has different accounts. If you're using a single account for all users who use the computer you will need to see the below other security solutions section.
Select the folder you wish to encrypt.
Right-click the folder and click Properties.
Click the Advanced button.
Check "Encrypt contents to secure data" option.
Click Apply and then Ok.
Encrypt contents to secure data is grayed out
This will be grayed out if you're using the home edition of Microsoft Windows XP. See the below steps for securing the contents of your folders in Windows XP home.
Show "Encrypt" on the context menu
The newest version of TweakUI also enables you to show the Encrypt option in the context menu. To do this, follow the below steps.
Open TweakUI.
In the TweakUI window, select Explorer
In the right side of the window under Settings, locate Show 'Encrypt' on context menu and check the box. This option should be below Prefix 'shortcut to' on new shortcuts and above Show 'View workgroup computers' in NetPlaces.
I'm missing Show "Encrypt" on the context menu in TweakUI.
Microsoft Windows XP home users
Select the folder you wish to encrypt.
Right-click the folder and click Properties.
Click the Sharing tab.
Check the box Make this folder private
Click Apply and then Ok.
Make this folder private is grayed out
In order for this option to work in Microsoft Windows XP home you must meet the below requirements.
The hard drive must be formatted in NTFS and not FAT32 File System.
The folder you're attempting to encrypt must be in your own personal folder. For example, if your name is bob, you must be encrypting a folder that is or that is contained within the below folder:
C:\Documents and Settings\Bob\
You cannot encrypt any folders outside of this folder. If you wish to encrypt outside this folder see the below other security solutions.
Other security solutions for protecting your files and folders in Windows
File and folders not frequently used
If you need to password protect files or folders that you do not frequently use, one of the simplest ways is to compress the folder and files with a compression utility and password protect the compressed file. However, each time you wish to work or modify the files you will need to uncompress the files using the password.
Windows ME and Windows XP users - Microsoft Windows ME and Windows XP come with their own compression utility. This utility can also be used to compress and password protect files.
Tip: When a file is compressed, users can still view a listing of the files in the compressed file. If you wish for both your file names and the contents to be hidden, move all the files into a single folder and password protect that folder.
File and folders frequently used or accessed
If you need to password protect or encrypt data you frequently use, you will need to install a third-party program that will enable you to protect your files and folders. Below are some free and commercial solutions.
AxCrypt - An excellent free encryption utility that enables users to encrypt all files within a folder and not allow those files to be viewed unless a passphrase (password) is known.
WinCry - A freeware utility that enables your files to be encrypted, secure deletion, as well as other helpful methods of protecting your files.
Folder Guard - A commercial version of a password protection software that enables you to password protect files, folders, and other Windows resources.
Click here to search for more solutions to password protect files and folders in Windows.
Things to remember when encrypting or password protecting files and folders
There is no such thing as a 100% protected file. There are numerous tools, utilities, and instructions for how to break a lot of the encryption and passwords on files. However, the protection methods listed above will protect your files from the majority of users who may encounter them. If you're working with really sensitive data we suggest a commercial product for protecting your files and data.
Even though a file or folder may be password protected it still can be deleted (unless the program supports the ability to protect files from being deleted). Always remember to backup all your files, even those protected by passwords.
If you forget the password, unless you're willing to spend the time attempting to break it or pay someone else to break the password, all your file data will be lost. Unless you've made a backup of the non-password protected data.

Share a printer

If you have a printer attached to your computer, you can share it with anyone on the same network. It doesn't matter what type of printer you have, as long it's installed on your computer and is directly attached with a USB cable or other type of printer cable. The people you choose to share the printer with will be able to use it to print, as long as they first locate your computer on the network.
Printers that are directly connected to a network rather than attached to a computer are available to anyone on the same network. Such printers must have a network port or wireless connection that allows them to connect directly to the network.
Sharing a printer requires a few steps. First, on the computer that the printer is plugged in to, follow these steps.

To turn on file and printer sharing
Open Advanced sharing settings by clicking the Start button , and then clicking Control Panel. In the search box, type network, click Network and Sharing Center, and then, in the left pane, click Change advanced sharing settings.
Click the chevron to expand the current network profile.
If printer sharing is off, under File and printer sharing, select Turn on file and printer sharing, and then click Save changes. If you're prompted for an administrator password or confirmation, type the password or provide confirmation.
Now you need to share the printer itself.

To share your printer
Open Devices and Printers by clicking the Start button , and then, on the Start menu, clicking Devices and Printers.
Right-click the printer you want to share, and then click Printer properties.
Click the Sharing tab, and select the Share this printer check box.
Other people on your network can now connect to this printer. All they need to do is add a network printer (your printer) to their computers.

To add a network printer
Open Devices and Printers by clicking the Start button , and then, on the Start menu, clicking Devices and Printers.
Click Add a printer.
Click Add a network, wireless, or Bluetooth printer, click the shared printer, click Next, and follow the instructions on the screen.

Monday, January 7, 2013

How to unhide hidden files and folder in flash drive?
When I try to use my flash drive I never seen any files of folders inside my flash drive..when i check the property some space was used. anyone could help me on this matter? i want to restore all my files inside my flash drive...anyone pls...>>>> tnx.

Solution:
1. click start>>run>>type in "cmd"
2. type the location of your flash drive.. e.g. "d:", "e:", "f:", etc..
3. type "dir /ah"
*you will now see the files/folders with hidden attributes
4. type "attrib [name of file/folder] -r -a -s -h"
*if you're going to unhide files, you should type the whole name plus the extension (format).. example "attrib party.jpg -r -a -s -h"
**if you have folders with 6 characters and above, type the first 6 characters then "~1".. example for folder named "birthday"
"attrib birthd~1 -r -a -s -h"
5. you should repeatedly type dir /ah after unhiding some files/folders so you'll know if they're now working or not..
6. now check you flash drive.. it should be there..
How to Install a Printer Without a CD

Many people have become frustrated over a lack of CD to install a printer. Now installing a printer without a CD does not have to be a difficult task. Just follow a few simple instructions and the printer can be installed.

Instructions
1.Place the computer and printer next to each other and make sure that all the wires are connected to both the printer and the computer.

2.Turn the computer on and wait for it to boot up.
We support: Wireless, EVDO, USB, Firewire, ACPI hibernate, BlueTooth

3.Plug the printer into the wall and then take the USB cord that is attached to the printer and plug it into the appropriate port on the computer.

4.Turn the printer on.

5.Click on "Start menu" and go to the "Control panel".
6.Find "Printers and hardware" box and click on it.

7.Take mouse and click "Add printer".

8.When you see "Welcome to the add printer wizard," hit "Next."

9.Click "Automatically detect and install plug and play printer" on the add printer wizard page. Click "Next."

10.Installing the printer will begin if the network can automatically detect it. Otherwise, the message unable to detect will pop up and you will be prompted to install the printer manually. Click "Next."

11.Select printer port. Use the recommended port for best set up options. Click "Next."

12.Pick manufacturer and printer. Click "Next."

13.Type a name or confirm name if it appears in the box and set printer as default printer if wish. Click "Next."

14.Print a test page to be sure printer is set up and online. Click "Next."

15.Receive a successful completion of installation of printer message. Click "Finish."


How to Add a Printer to a Laptop
Adding a printer to your laptop is a simple process. Printers come with unique driver and installation software that is particular to the printer brand and model number. Because printers are often used by multiple computers, most printer manufacturers have made it easy for users to access the software necessary for installation. You can also easily add a printer to a laptop by connecting with a shared printer on a network.

Instructions
1.If you have you have the installation CD that came with your printer, insert it into the CD-drive of your laptop and complete the installation process.

2.If you do not have the installation CD, go to the printer manufacturer's website and find the support section for your printer model number. Download the driver for your printer and install it onto your laptop.

3 .Once you have installed the driver and software for your printer, plug the printer cable into your laptop's USB port, and the laptop should immediately recognize the printer.

4 .If the printer you want to add is attached to another computer on the same network as the laptop, you can share the printer without actually adding it. Go to the computer that the printer is attached to. Click the "Start" button, select "Control Panel," then select "Network and Internet" and click "Network and Sharing Center." Click the arrow next to "Printer Sharing." Select "Turn On Printer Sharing" and then click the "Apply" button. Make sure the shared printer is turned on.

5 .Go to your laptop and click the "Start" button. In the search box, type "\\" and the name of the computer with the attached shared printer (for example, enter "\\mydesktop"). Click "Enter."

6.In the folder that opens on your screen, double-click "Printers." You should see the shared printer on your network. Double-click the shared printer. Windows automatically adds it to your laptop and installs the driver software. Click the "Next" button. The printer is successfully added to your laptop and should be visible in your "Printers" folder.

Sunday, January 6, 2013

How can we remove the the virus "Lord Rahul cool " 
                            (JOMBINO ANSWER)
OK
Click Start
Run
Then type Msconfig
click on start up
then untick the box that show Lord Rahul cool from start up items
then apply and restart
ok

Second step1.
Click on Any folder.
2. Click Tools - Folder Options - View - Hidden Files & Folders
3. Mark Show hidden files and folders
4. Unmark Hide extensions of Known file types
5. Unmark Hide protected Operating system files (Recommended)
6. First two files will be seen on hdd drive : Rahulísvirusprotection.vbe & autorun.inf
7. Click on the properties of both file and unmarked Read only.
8. Clicked Apply & deleted both files.
9. Searched for Rahul*.* on hard drives.
10. Click on the properties file and unmarked Read only deleted the file.
11. Now LORD RAHUL COOL is out of my browser

ok
Third step and most easy is to use malwarebyte.
How to Repair a Faulty Windows Installation Without Reformatting
Corrupted system files don't have to ruin your day
Nothing will put a crimp in your computing style quite like a Windows error. Although Microsoft's OS has gotten exponentially more stable over the years, it's still very possible for Windows system files to become corrupt, which can cause your system to slow down, freeze, or (in the worst case) refuse to load your operating system at all.
When you encounter a Windows error, your first instinct may be to back up your data, grab the ol' installation disk, and weep silently as you press the Reformat button. We're here to tell you there's another way. Still back up your data, of course, but by following this guide, you might well be able to repair your Windows install without dropping the nuke.
Note: Though these guides are written for Windows 7, a very similar process will work for Vista or XP.
Method 1: Repair Windows Even If You Can't Get To Your Desktop
The first method will allow you to repair corrupt system files, even if the problem is so severe that you can't boot all the way to your desktop. For this method, you'll need a Windows installation DVD, so track down yours or borrow one from a friend—it doesn't matter if the DVD's version matches your license, as long as it's the correct bit count.
Step 1: Insert the Install Disc and Reboot
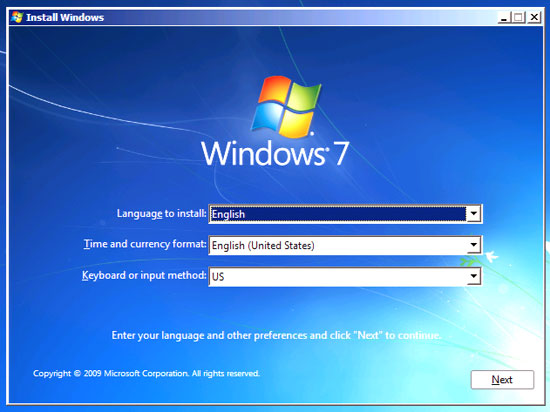
If your system won't boot into Windows, you'll need to boot from somewhere else—in this case, the installation DVD. Your computer should be set up to boot from your optical drive before your hard drive, but if it's not, you can always change the boot priority in the BIOS. When the system starts up, make sure you press a key when prompted to boot from the Windows installation disc. When you do, you'll see the familiar Windows installation language-selection screen (image below)

Step 2: Get to the Command Prompt
The recovery tool we're going to use is run from the command prompt, which can (thankfully) be accessed through the Windows installation disc. To get there, don't click Install Now in the middle of the screen, but instead click Repair Your Computer in the lower left. Click Next on the first menu that pops up.
The next menu will have two radio buttons. Make sure the first one is selected, and note that in the text box, your System drive might not have the drive letter C. If that's the case, make a note of the drive letter used. Click Next, and on the following screen (image above), select the bottom option, marked Command Prompt.
Step 3: Scan Your System
Finally you're ready to scan your system files for errors. To do that simply run the following command:
sfc /scannow /offbootdir=[DRIVELETTER]:\ /offwindir=[DRIVELETTER]:\windows
Substitute the drive letter you noted earlier for [DRIVELETTER]. There should be no square brackets in the command (image below).
Windows will now attempt to find and repair any errors in your system files. If the scan finds errors, you may need to repeat the steps in this guide until it finds no more errors. To restart your computer, enter the exit command, then click the Restart button. When you're ready to try booting into Windows again, remove the install disc and restart one final time.
Method 2: Reinstall Windows Without Losing Any Data
If you are still able to get to your desktop, you've got additional options. You can still use the command prompt to scan as in the previous method, but there's another way that may be more thorough: reinstall Windows.
Wait, didn't we say you wouldn't have to reformat? We did, and you don't. It's possible to do an in-place, nondestructive reinstall of Windows, which will restore all your system files to pristine condition without damaging any of your personal data or installed programs. All you'll need is a Windows install DVD and your Windows CD key. Hopefully you still have your key written down somewhere, but if you don't, you're not out of luck. You can use a program like ProduKey, available for free, to quickly recover your Windows product key from the registry.
Important: Before continuing this process, note that it can cause problems with your installed programs, so don't do it just for fun, and make sure to back up your important data and create a restore point before continuing.
Step 1: Do Some Prep Work
Before you can get started, there's one important consideration: You can't repair a Windows 7 SP1 install with a pre-SP1 install disc. The ideal solution is to borrow a newer install disc with SP1 included (or download it, if you have access to a TechNet account), but it's also possible to uninstall SP1. To do this, open the Control Panel, select Uninstall a Program, and then choose the option to view updates (image below). You can right-click the Service Pack update to uninstall it.
Step 2: Insert the Install Disc
We're once again using the Windows install disc, but this time we're not going to boot from it. Simply insert the disc, and when the autorun menu pops up, choose to run setup.exe. Once again, you'll find yourself staring at the Windows 7 install screen. This time, do click the Install now button (image below).
Step 3: Reinstall Windows
Finally, it's time to get down to business. After the installer gets past the Copying Temporary Files… screen, you'll be asked about getting updates for installation files. Go ahead and do this, as long as your computer's network connection is still working.
When the installer asks what sort of installation you'd like to perform (image below), ignore your natural instinct to choose Custom, and instead click Upgrade. Sure, you're not technically upgrading from one version of Windows to another, but we do want to do the kind of nondestructive install that the update option performs. Think of it as upgrading from a broken version to a non-broken version, if you must.
After that, all that's left is to sit through the usual Windows 7 installation process, with its multiple reboots and endless progress bars. When it's done, you'll have to reactivate Windows by entering the product key that you found or wrote down earlier.
All that's left to do is to let Windows install any security updates or service packs that it's missing, and reboot. All your system files should now be fully restored!
How to Maximize Laptop Battery Backup
Laptops are important as they can be used anywhere and without power source available. But a laptop can soon become uninteresting if it gives you improper battery backup. So here are the tips to improve laptop battery backup, in this week’s Tip of the Week.
•  Dim your screen - Most laptops come with the ability to dim your laptop screen. Some even come with ways to modify CPU and cooling performance. Cut them down to the lowest level you can tolerate to squeeze out some extra battery juice.
• Cut down on programs running in the background - ITunes, Desktop Search, etc. All these add to the CPU load and cut down battery life. Shut down everything that isn’t crucial when you’re on battery.
• Cut down external devices - USB devices (including your mouse) & WIFI drain down your laptop battery.
• Run off a hard drive rather than CD/DVD – battery consumed when run on a CD/DVD is higher than that of disk.
• Hibernate not standby - Although placing a laptop in standby mode saves some power and you can instantly resume where you left off, it doesn’t save anywhere as much power as the hibernate function does.
• Keep operating temperature down - Your laptop operates more efficiently when it’s cooler. Clean out your air vents with a cloth or keyboard cleaner.
• Optimize your power options – set power options from the control panel and see your laptop run more on battery as compared to earlier.
• Exercise the Battery - Do not leave a charged battery dormant for long periods of time. Once charged, you should use the battery at least once every two to three weeks.
• Ensure the battery contacts are clean: With time, the metal battery contact points tend to attract dirt, so it is better to clean the points with some soft cloth and alcohol to extract the max battery.
• Ensure proper health of the battery: Make sure that you don’t leave the battery charged for long time; it should be used once every two-three weeks. Doing this ensures longer usage of the battery.
• No Multitasking: Although computers are used for multitasking but you would have seen your battery drying out quickly when you are running several programs at the same time. Thus try to reduce the work load of the system when on battery.
• Prioritize: If you are already running low on the battery and need to maximize the usage then pick your program usage wisely as running email and word processing consume much less power than gaming or playing a DVD.
• Fully charging/discharging: Following the practice of fully charging and fully discharging provides the laptop with healthy and powerful battery.

If you also have some points then do let us know.
How to Maximize Laptop Battery Backup

Steps to Remove csrcs.exe or csrsc.exe Virus
This was the error message faced by one of our readers that when he boots the PC up, the CSRCS.exe error message comes up on the screen.
csrsc.exe is a process which is registered as W32.Spybot.CF Virus. DO NOT confuse it with csrss.exe which is an important file used by Windows. The attackers of this virus can access our computer and gain access to some important data remotely.
Steps to remove this virus:
1. Scan the system with a good and updated Anti Virus.
2. Open Task Manager, locate this exe (csrcs.exe or csrsc.exe but not csrss.exe), and kill the process.
3. Now type msconfig in the Run box, and then go to startup tab.
4. Locate this exe file, if any, and then remove it from there as well.
5. Now search the file in the C: drive.
6. Permanently delete the file (csrcs.exe or csrsc.exe only) from the computer.
7. Reboot the PC for changes to take place.
UPDATE
1.After doing the above steps, you need to clean the registry as well.
Navigate to HKEY_LOCAL_MACHINE\SOFTWARE\Microsoft\WindowsNT\CurrentVersion\Winlogon
2.On the right side, there is a key named “Shell”, it may be having a value “explorer.exe csrcs.exe”. Just modify it to delete the csrcs.exe from it (not explorer.exe). Restart the computer
The virus should have gone.
Difference between Laptop, Notebook, Netbook and Tablet PCs
With the rapid growth of technology we have seen lot many gadgets being discovered. There are many types of computing devices that are available like laptops, notebooks, netbooks and the tablets, all having their own purpose of use.
If you are unsure of what the exact purpose of these devices is and when should we use which device, then this article will help you understanding the differences between each of them.
Laptop and Notebook
The term Laptop and Notebook refers to the same device, which is a personal computer but used mostly when travelling. This device consists of all the features of a desktop like the monitor (flip-up in nature), keyboard, speakers, USB ports, optical drive etc. Laptops/Notebooks have screen size starting from 13 inches or higher.
Netbooks
Netbooks are smaller, lighter and more portable laptops as compared to the usual ones. This is a relatively cheaper device than laptops but also have lesser features than it. Netbooks have smaller keyboards which could be bit difficult to use, smaller screen of about 11 inches and also without the optical drive slot.
Tablet PCs
Tablet PCs are the small computers with touch screen functions. They have full size keyboard with the ability of the screen to rotate on its axis and can be used atop the keyboard. The screen can lie down on the machine to give a slate like form.
Thus you can decide for yourself, which device will suit you more before purchasing it in future.
How to prevent the risks associated with using laptops


Our journey from using desktops to flaunting laptops has been satisfying and fashionable. Despite the tremendous popularity and convenience, laptops pose some serious health risks if not used cautiously.

Vision problems
Generally, when we use a laptop, the distance between the laptop screen and our eyes is little. This increases our chances of developing Computer Vision Syndrome [CVS].
CVS is characterised by eye strain, blurred vision, dry eyes and head ache. Staring at the laptop screen for long decreases the blink rate. It can also lead to refractory errors especially nearsightedness [myopia], which can develop into glaucoma if precautions are not taken.

How to prevent it…
Get your eyes checked at least once a year.
Avoid excessive bright lights both artificial light [fluorescent tubes] and natural light.
Place the laptop screen in such a way that windows are to the sides, not in front or behind the screen.
Maintain a distance of 20 – 30 inches [length of an arm] between the eyes and the laptop.
Use a font size of 12 – 14.
Install an anti-glare screen to minimise the glare.
Match the brightness and the contrast of the screen to that of the ambient light.
Practise the 20/20/20 rule—every 20 minutes, turn your eyes away from the laptop and focus on an object about 20ft away for about 20 seconds.
Prevent your eyes from getting dry by avoiding sitting directly under a fan. Keep the eyes moist by blinking often and splashing water on the eyes or lubricating them with moisturising eye drops.
Take frequent breaks; they are a must as the breaks allow the muscles to relax and avoid eye strain.
Exercise your eyes. Hold a pencil in front of you about an arm away and focus on the tip. Now, bring the pencil towards your eye, slowly. When it comes close enough for you to see double, do it all over again.

Spine issues
Although a laptop is convenient because of its portability, it has poor ergonomic features [minimum distance between the screen and the keyboard]. If kept on the lap, it increases the tendency to bend the neck forward and hunch the back, leading to tension in the neck going further down the spine.
Back, neck and shoulder pain are the commonest problems associated with using the laptop at a stretch. These problems can worsen with time, leading to more severe spinal problems like spondylitis, herniated disc or disc rupture.

How to prevent it…
Pay attention to your posture when you are using the laptop. If you are using it for a short time, sit in a comfortable chair and angle the laptop screen such a way that there is minimum neck deviation. If you are using it for a long time, place the laptop on a desk in a way that will allow you to view the screen without bending your neck.
Try to maintain the angle between the arm and forearm at 90 degrees. If the angle is less, raise the seat or adjust it.
Avoid using touch pads and use a separate mouse and when using it, keep the arm and elbow close to the body.
Use an adjustable chair that provides lumbar [lower back] support and helps in maintaining an erect sitting posture. Raise the level of the laptop by using a laptop stand or thick book, as most back problems are caused due to slouching.
Ensure that your spine and thighs are at 90 degrees.
Keep your feet firmly on the floor or use a foot rest. The idea is to keep the thighs parallel to the floor.
Stand up, walk around, and do a few stretching exercises every once in a while.
If you have to lug your laptop around, use a laptop bag with padded shoulder straps and alternate the shoulders after few minutes. If the laptop weighs over 10 lbs [4.5 kg], consider using a carrier bag with rolls.
Elevate the rear end of the laptop so that the key board is inclined and the forearm is parallel to the floor.

Finger and wrist trouble
The cramped design of the keyboard often does not provide enough space for moving fingers, which leads to early fatigue and strain. The condition worsens due to the position of the wrist while typing and while using the touchpad.
This can further compress the nerves and blood vessels leading to pain and swelling in the wrist and fingers known as Compartment Syndrome. Excessive repeated movements of the fingers required for typing stresses the small joints leading to Repeated Stress Syndrome.

How to prevent it…
Exercise your fingers every 15 – 20 minutes. Take a ball that comfortably fits in your palm and keep squeezing it. This allows continuous blood flow and also strengthens the wrist and finger muscles.
While typing and using a mouse, support your wrist with a pad or a pillow to reduce the pressure on the wrist and avoid injury.
Avoid excessive usage of touch pads and prefer mouse.
Use a portable USB keyboard as it gives your fingers ample space to move.
Keep fingers flat while typing.
Use laptops for short period of time and take frequent breaks to give your hands some rest.

Radiation repercussions
Laptops release heat from the bottom and if kept on the lap for long can decrease the sperm count of a man due to the heat produced.
Continuous and long-term usage is found to cause DNA damage due to release of Extremely Low Frequency [ELF] radiation. The radiation is also known to cause some foetal damage.

How to prevent it…
Avoid keeping the laptop on the lap.
If you are pregnant, avoid keeping laptop near the abdomen to avoid foetal defects.
Don’t charge the laptop batteries when not in use, as over charged batteries may emit some radiation.
Consume foods rich in vitamin A and C. They help combat the harmful effects of laptop radiation as they are rich in antioxidants.
Use screen radiant filter plates to prevent the harmful effects of screen radiation.
Effect on skin
When a laptop is kept on the bare lap for long, it raises the temperature of the groin area above 50 degree celsius. The long term exposure to heat may lead to redness, soreness or lesions. If unattended, it can lead to darkening of the skin called as Toasted Skin Syndrome.
How to prevent it…
Keep the laptop on a desk and not on the lap.
Use a portable laptop knee tray, which cushions your skin from the heat.

Mental health problems
The portability of laptop means that it remains hooked to you even if you don’t wish to. This has caused increased stress, depression, dependence and insomnia among regular users.
Subconsciously you are also worried about the safety of your prized possession and its theft means both mental and financial stress.

How to prevent it…
Avoid carrying your laptops everywhere you go.
Give the laptop a break. Don’t use the laptop if you don’t have urgent work, especially when you are home. Having kids in your lap is more satisfying than having the laptop. So spend time with your family.

Laptops have become a necessary evil. Use them judiciously with full awareness of the risks they bring along.
                   How to Take Good Care of Your Laptop Computer


It is important to take care of your laptop to keep it in good shape; prevention is always better than cure. There are a number of easy things that you can do to keep your laptop in great shape; following these easy steps will help to ensure that it lasts longer and will need less maintenance. As an added bonus, many of the steps will also maintain your laptop's speed.

Steps
1.Keep liquids away from your laptop. As tempting as it might be to drink coffee, soda, water or any other liquid near your laptop, accidents can happen all too easily. Spilled liquids may damage the internal components or cause electrical injury to the laptop. Short circuits can corrupt data or even permanently destroy parts. The solution is very simple: Keep your drinks away from your computer. Even if you're careful, someone else might bump into your desk or you. Or you can use a cup with a cover on it, so even if it does spill, the liquid doesn't go any where!
2.Having an available antivirus software would help. Even if you know what you download, it may contain a virus that can lead to a circuit error in your system hardware or slowness in the software.

3.Keep food away from your laptop. Don't eat over your laptop. The crumbs can go down between the keys in the keyboard and provide an invitation to small bugs. The crumbs can also irritate the circuitry. Worse, it makes the laptop look dirty if there are crumbs and food stains on it.

4.Always have clean hands when using your laptop. Clean hands make it easier to use your laptop touchpad and there will be less risk of leaving dirt and other stains on the computer. In addition, if you clean your hands before use, you will help reduce wear and tear on the coating of the laptop caused by contact with sweat and small particles that can act upon the laptop's exterior underneath your wrists and fingers.

5.Protect the LCD display monitor. When you shut your laptop, make sure there are no small items, such as a pencil or small ear-phones, on the keyboard. These can damage the display screen when shut; the screen will scratch if the item is rough. Close the lid gently and holding from the middle. Closing the lid using only one side causes pressure on that hinge, and over time can cause it to bend and snap.

6.Hold and lift the computer by its base, not by its LCD display (the screen). If you lift it by the screen part alone, you could damage the display or the hinges attaching it to the base. The display is also easily scratched or damaged by direct pressure – avoid placing pressure on it.

7.Don't pull on the power cord. Tugging your power cord out from the power socket rather than putting your hand directly on the plug in the socket and pulling can break off the plug or damage the power socket. Also, if you have the power point near your feet, avoid constantly bumping into the plug or you could loosen it and eventually break it.

8.Don't roll your chair over the computer cord. Stick the cord onto your desk with tape or a special computer cord tie which can be easily undone when you've finished using the laptop. Always try to keep most of the cord away from the floor or your legs; sometimes you can be so engrossed in what you're doing that you move your legs and forget the cord is there.

9.Plug in accessory devices into their proper slots. Always look at the symbols on the laptop carefully before inserting devices. Jamming a phone line into an Ethernet port or vice versa could damage the sockets, making it impossible to use them again. It is very important to observe this step
.
10.Handle any removable drives with care. Floppy drives or CD drives that have been removed from your laptop can easily get crushed, dropped or pressed if you are careless. Put them straight into a bag or a storage box/case for safe keeping if you are not putting them back into the laptop.

11.Insert drives into their slots carefully and at the correct angle. Pushing the wrong drive into a socket, or at an angle, or even upside down can jam it.

12.Check to see if labels are affixed securely before inserting media into your laptop computer. Media such as CDs, DVDs or floppy disks should not have any loose label parts that might jam inside the laptop drive. Never insert undersized CDs, as these can damage the disk player permanently.

13.Don't expose your laptop to rapid temperature fluctuations. When bringing your laptop indoors during winter, don't turn it on immediately. Instead, let it warm to room temperature first. This will avoid any potential for damage to the disk drive from condensation forming inside the machine. Avoid heat from sunlight as well.

14.Don't leave your laptop in a car. Not only do the insides of cars experience large temperature swings that could damage a laptop, but a laptop (or laptop bag) is an inviting target for a smash and grab thief.

15.Have the unit cleaned once a year to remove internal dust. Get this done by a computer professional. If dust accumulates, the system cannot cool itself correctly. Heat can destroy the motherboard.

16.Avoid placing heavy materials, such as books, on top of your laptop and keyboard. This can push the LCD screen into the keyboard, and will eventually damage it. Also, the CD-ROM insert will also be squished and, eventually, will break.

17.Use a properly-sized laptop case. Whatever you use to carry your laptop around in, be it a case, a bag or something you have made yourself, make sure that it it large enough to contain the laptop. This will avoid scratching, squeezing or even potentially dropping it.

18.Look into getting a laptop bag. Many breaks happen because of laptops being dropped or bumped. A bag greatly reduces the risk of damage
.
19.Use and store in a well-circulated area. When you are using your laptop, do so in a place that has a constant air-circulation. Lots of people ruin their laptop by using it in an enclosed area and thus making the laptop overheat. It also helps if you store it in a well circulated area.

20.Use an old tooth brush to clean the area around the exhaust fan screen. If that gets plugged up, air flow is diminished and overheating can most certainly occur.

21.Try and keep the laptop on a flat surface. This prevents damage to the laptop. This step can be hard, particularly if you are going out with your laptop, but if there is a flat surface available to put your laptop on then do so.

22.Don't use your laptop on the bed. Repeated use of the laptop on the bed will cause the fans to suck up the dust and further debris which lies in the bed, ultimately blocking the fan. Refrain from this by using the laptop somewhere else than the bed.
                                 Define adware, spyware, and grayware 


Adware, spyware, and grayware are usually installed on a computer without the knowledge of the user. These programs collect information stored on the computer, change the computer configuration, or open extra windows on the computer without the user’s consent.

Adware
Adware is a software program that displays advertising on your computer. Adware is usually distributed with downloaded software. Most often, adware is displayed in a popup window. Adware popup windows are sometimes difficult to control and will open new windows faster than users can close them.

Grayware or malware
Grayware or malware is a file or program other then a virus that is potentially harmful. Many grayware attacks are phishing attacks that try to persuade the reader to unknowingly provide attackers with access to personal information. As you fill out an online form, the data is sent to the attacker. Grayware can be removed using spyware and adware removal tools.

Spyware
Spyware, a type of grayware, is similar to adware. It is distributed without any user intervention or knowledge. Once installed, the spyware monitors activity on the computer. The spyware then sends this information to the organization responsible for launching the spyware.

Phishing
Phishing is a form of social engineering where the attacker pretends to represent a legitimate outside organization, such as a bank. A potential victim is contacted via e-mail. The attacker might ask for verification of information, such as a password or username, to supposedly prevent some terrible consequence from occurring.
                                           Define viruses, worms, and Trojans

Computer viruses are deliberately created and sent out by attackers. A virus is attached to small pieces of computer code, software, or documents. The virus executes when the software is run on a computer. If the virus is spread to other computers, those computers could continue to spread the virus.

Virus 
A virus is a program written with malicious intent and sent out by attackers. The virus is transferred to another computer through e-mail, file transfers, and instant messaging. The virus hides by attaching itself to a file on the computer. When the file is accessed, the virus executes and infects the computer. A virus has the potential to corrupt or even delete files on your computer, use your e-mail to spread itself to other computers, or even erase your entire hard drive.

Some viruses can be exceptionally dangerous. The most damaging type of virus is used to record keystrokes. These viruses can be used by attackers to harvest sensitive information, such as passwords and credit card numbers. Viruses might even alter or destroy information on a computer. Stealth viruses can infect a computer and lay dormant until summoned by the attacker.

Worm 
A worm is a self-replicating program that is harmful to networks. A worm uses the network to duplicate its code to the hosts on a network, often without any user intervention. It is different from a virus because a worm does not need to attach to a program to infect a host. Even if the worm does not damage data or applications on the hosts it infects, it is harmful to networks because it consumes bandwidth.

Trojan
A Trojan is technically a worm. The Trojan does not need to be attached to other software. Instead, a Trojan threat is hidden in software that appears to do one thing, and yet behind the scenes it does another. Trojans are often disguised as useful software. The Trojan program can reproduce like a virus and spread to other computers. Computer data damage and production loss could be significant. A technician might be needed to perform the repairs, and employees might lose or have to replace data. An infected computer could be sending critical data to competitors, while at the same time infecting other computers on the network


Anti-virus
.
Virus protection software, known as anti-virus software, is software designed specifically to detect, disable, and remove viruses, worms, and Trojans before they infect a computer. Anti-virus software becomes outdated quickly, however, and it is the responsibility of the technician to apply the most recent updates, patches, and virus definitions as part of a regular maintenance schedule. Many organizations establish a written security policy stating that employees are not permitted to install any software that is not provided by the company. Organizations also make employees aware of the dangers of opening e-mail attachments that may contain a virus or a worm.