My kyocera km-2550 multifunctional copier has
My kyocera km-2550 multifunctional copier has started showing a error message "call for service c6000" and a phone number in asterisks. kindly advice on what to do or if there any online help.
This is fuser unit error code, you can try to reset it might work, but if the erorr code came back then you need to change the fuser unit.
In order to reset this code: follow those steps
on the panel press 1087 1087
The screen will change to service mode
on the panel again press 163
now look at the screen and you will see Excute.
Select Excute and press the Start key.
The Machine will rebot or it will asks you to turn it off and on.
After the machine load again, it should be good, if the Error came back!! Then change the Fuser Unit.
Thursday, January 17, 2013
How to Connect a Wireless Mouse
A wireless mouse can make your desk look a more modern and neat by eliminating cords. It can also make using the mouse more comfortable for you. If you've never worked with wireless accessories before, setting up a wireless mouse might seem a little complicated. Some wireless mice use USB receivers, and others use Bluetooth. We'll show you how to connect either one.
connecting to a Receiver
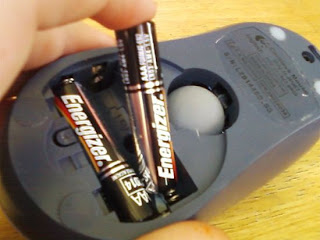
1.Insert the batteries into the mouse. Turn the mouse over, find the battery cover, and slide it off. Insert the appropriate batteries—usually two AAs.
2.Connect the receiver to the computer. If your computer has a USB port (as most do), plug your receiver into an available port. There will also be a green adapter supplied, in the event that your system requires the use of the mouse port. Caution—don't try and force the mouse adapter into the keyboard port!
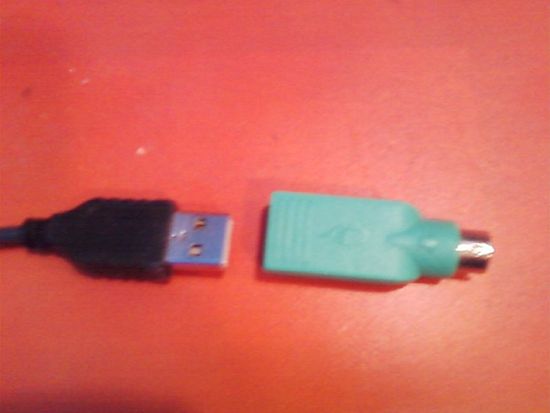
The mouse receiver has a USB plug (left), but can also plug into the mouse plug through the adapter it came with (right). If your receiver plugs into the USB port it should look like the left. If it plugs into the mouse plug it should look like the one on the right, only connected to the receiver.
3.Connect the mouse to the receiver. Place the mouse in close proximity to the receiver, and note the following:
The receiver should have a visible button that is easily pushable by the average human finger.
The mouse will usually have a very small reset button in a hole on the bottom that can be pushed by something like a pencil or paper clip.
Push both buttons at the same time with the receiver and the mouse relatively close to each other for about 5 seconds or more.
4.Find a permanent position the receiver. Place the receiver where it won't be far away from the mouse. Depending on where you are, you can place it on the monitor, on the tower, on the back of your laptop (if you are installing the mouse to your laptop) or on the desk.
The furthest a wireless mouse can get away from the receiver and still function is about 9 feet (2.7 meters), so keep that in mind.
5.Test your new mouse.
If you plugged into the mouse port, restart your computer.
If you plugged it into the USB port you should be able to use it immediately.
When the cursor moves when you move the mouse, you have connected the mouse properly. If the cursor doesn't move, try repositioning the receiver. If it still doesn't work, you may need to restart your computer (if you haven't already) or reconnect everything.
6.Adjust your mouse settings. Use the control panel that came with your wireless mouse, or download the necessary software from the manufacturer's website. Adjust the settings so that the mouse performs as you require.
Connecting Via Bluetooth
1.Insert batteries into your mouse. Turn your mouse over, locate the battery cover, and remove it. Insert the appropriate batteries—usually two AAs
2.Enable Bluetooth. In your Bluetooth control panel, make sure Bluetooth is turned on, and that your device is discoverable. (Refer to the device's user's guide for more information.)
Usually, the status LED on the mouse will blink when it's discoverable.
3.Discover the mouse. Set your Bluetooth setup control panel to discovery mode. It will search for available Bluetooth signals, then notify you when your mouse has been found.
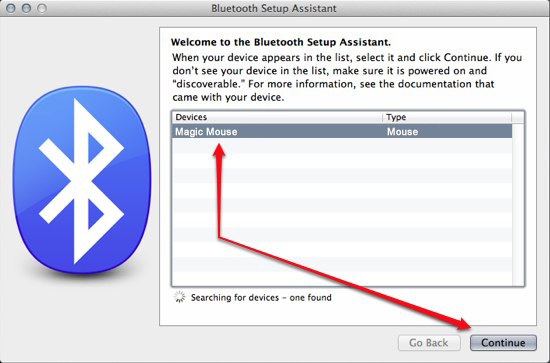
Once the mouse has been discovered, follow the on-screen steps to finalize you setup procedure.
4.Adjust your mouse settings. Use the control panel that came with your wireless mouse, or download the necessary software from the manufacturer's website. Adjust the settings so that the mouse performs as you require.
A wireless mouse can make your desk look a more modern and neat by eliminating cords. It can also make using the mouse more comfortable for you. If you've never worked with wireless accessories before, setting up a wireless mouse might seem a little complicated. Some wireless mice use USB receivers, and others use Bluetooth. We'll show you how to connect either one.
connecting to a Receiver
1.Insert the batteries into the mouse. Turn the mouse over, find the battery cover, and slide it off. Insert the appropriate batteries—usually two AAs.

2.Connect the receiver to the computer. If your computer has a USB port (as most do), plug your receiver into an available port. There will also be a green adapter supplied, in the event that your system requires the use of the mouse port. Caution—don't try and force the mouse adapter into the keyboard port!
3.Connect the mouse to the receiver. Place the mouse in close proximity to the receiver, and note the following:
The receiver should have a visible button that is easily pushable by the average human finger.
The mouse will usually have a very small reset button in a hole on the bottom that can be pushed by something like a pencil or paper clip.
Push both buttons at the same time with the receiver and the mouse relatively close to each other for about 5 seconds or more.
4.Find a permanent position the receiver. Place the receiver where it won't be far away from the mouse. Depending on where you are, you can place it on the monitor, on the tower, on the back of your laptop (if you are installing the mouse to your laptop) or on the desk.
The furthest a wireless mouse can get away from the receiver and still function is about 9 feet (2.7 meters), so keep that in mind.
5.Test your new mouse.
If you plugged into the mouse port, restart your computer.
If you plugged it into the USB port you should be able to use it immediately.
When the cursor moves when you move the mouse, you have connected the mouse properly. If the cursor doesn't move, try repositioning the receiver. If it still doesn't work, you may need to restart your computer (if you haven't already) or reconnect everything.
6.Adjust your mouse settings. Use the control panel that came with your wireless mouse, or download the necessary software from the manufacturer's website. Adjust the settings so that the mouse performs as you require.
Connecting Via Bluetooth
1.Insert batteries into your mouse. Turn your mouse over, locate the battery cover, and remove it. Insert the appropriate batteries—usually two AAs
2.Enable Bluetooth. In your Bluetooth control panel, make sure Bluetooth is turned on, and that your device is discoverable. (Refer to the device's user's guide for more information.)
Usually, the status LED on the mouse will blink when it's discoverable.
3.Discover the mouse. Set your Bluetooth setup control panel to discovery mode. It will search for available Bluetooth signals, then notify you when your mouse has been found.
Once the mouse has been discovered, follow the on-screen steps to finalize you setup procedure.
4.Adjust your mouse settings. Use the control panel that came with your wireless mouse, or download the necessary software from the manufacturer's website. Adjust the settings so that the mouse performs as you require.
Subscribe to:
Posts (Atom)