 Have you enjoy? Please help us improve this articles, We encourage you to
kindly please post a comments below for your reaction, correction,
question and suggestion. Thanks
Have you enjoy? Please help us improve this articles, We encourage you to
kindly please post a comments below for your reaction, correction,
question and suggestion. ThanksTuesday, April 16, 2013
How To Create Password Protected Folder Without Using Software

Well, I will teach you how to create a folder with a password so that only those user who knows the password can open it. Ok lets start, just follow these steps.

First make a new folder ( name it as you like ) then inside this folder, right click then "new" and click "Text Document". Open the text file then copy the entire code below and paste it inside.
Code:
Quote:

Quote: cls

@ECHO OFF

title Folder Private

if EXIST "Control Panel.{21EC2020-3AEA-1069-A2DD-08002B30309D}" goto UNLOCK

if NOT EXIST Private goto MDLOCKER

:CONFIRM

echo Are you sure you want to lock the folder(Y/N)

set/p "cho=>"

if %cho%==Y goto LOCK

if %cho%==y goto LOCK

if %cho%==n goto END

if %cho%==N goto END

echo Invalid choice.

goto CONFIRM

:LOCK

ren Private "Control Panel.{21EC2020-3AEA-1069-A2DD-08002B30309D}"

attrib +h +s "Control Panel.{21EC2020-3AEA-1069-A2DD-08002B30309D}"

echo Folder locked

goto End

:UNLOCK

echo Enter password to unlock folder

set/p "pass=>"

if NOT %pass%== password here goto FAIL

attrib -h -s "Control Panel.{21EC2020-3AEA-1069-A2DD-08002B30309D}"

ren "Control Panel.{21EC2020-3AEA-1069-A2DD-08002B30309D}" Private

echo Folder Unlocked successfully

goto End

:FAIL

echo Invalid password

goto end

:MDLOCKER

md Private

echo Private created successfully

goto End
:EndAfter you've paste the code dont save it yet. Find this line : (if NOT %pass%== password here goto FAIL ) and change the word "password here" to the password you want.

So your password here becomes "InTechTalk" make sure that you can remember it. After that go to 'save as' & name this file as "locker.bat ". Now back to the folder & you will find a "LOCKER command".

Double Click on it & you will find a new folder (Private ). Ok, now copy what you want in this "Private Folder" & after that come out of the folder.

Double click on locker again. It will open and ask if you want to lock your folder? Y/N ?. Press "Y" and press enter, then your private folder will dissapear. If you want to UNLOCK your folder, go to "LOCKER command" & type your password and you will see your private folder.
It not only hides the folder, but in case, you unhide all files... and try opening it without entering password, it will take you to the control panel...
How do I password protect my files and folders in Windows?
Question
How do I password protect my files and folders in Windows?Answer
Tip: Before password protecting any document you may wish to create a backup of the non-password protected folder and files in case you forget the password in the future.The majority of Microsoft Windows operating systems do not come with a method of password protecting your sensitive files and folders. If you're using Microsoft Windows 3.x, Windows 95, Windows 98, you will need to download or purchase a third-party program to password protect your files and folders in Windows; skip down to the other security solutions section if you're using one of these operating systems.
Microsoft Windows XP professional users
Microsoft Windows XP home users
Other security solutions for protecting your files and folders in Windows
Things to remember when encrypting or password protecting files and folders
Microsoft Windows XP home users
Other security solutions for protecting your files and folders in Windows
Things to remember when encrypting or password protecting files and folders
The
below steps for encrypting the files on Windows XP professional applies
to users who are using a computer that has different accounts. If
you're using a single account for all users who use the computer you
will need to see the below other security solutions section.
- Select the folder you wish to encrypt.
- Right-click the folder and click Properties.
- Click the Advanced button.
- Check "Encrypt contents to secure data" option.
- Click Apply and then Ok.
Encrypt contents to secure data is grayed out
This
will be grayed out if you're using the home edition of Microsoft
Windows XP. See the below steps for securing the contents of your
folders in Windows XP home.
Show "Encrypt" on the context menu
The newest version of TweakUI also enables you to show the Encrypt option in the context menu. To do this, follow the below steps.
- Open TweakUI.
- In the TweakUI window, select Explorer
- In the right side of the window under Settings, locate Show 'Encrypt' on context menu and check the box. This option should be below Prefix 'shortcut to' on new shortcuts and above Show 'View workgroup computers' in NetPlaces.
- Select the folder you wish to encrypt.
- Right-click the folder and click Properties.
- Click the Sharing tab.
- Check the box Make this folder private
- Click Apply and then Ok.
In order for this option to work in Microsoft Windows XP home you must meet the below requirements.
- The hard drive must be formatted in NTFS and not FAT32 File System.
- The
folder you're attempting to encrypt must be in your own personal
folder. For example, if your name is bob, you must be encrypting a
folder that is or that is contained within the below folder:
C:\Documents and Settings\Bob\
You cannot encrypt any folders outside of this folder. If you wish to encrypt outside this folder see the below other security solutions.
File and folders not frequently used
If
you need to password protect files
or folders that you do not frequently use, one of the simplest ways is
to compress the folder and files with a compression utility and password
protect the compressed file. However, each time you wish to work or
modify the files you will need to uncompress the files using the
password.
Windows ME and Windows XP users -
Microsoft Windows ME and Windows XP come with their own compression
utility. This utility can also be used to compress and password protect
files.
Tip: When a file is compressed, users can
still view a listing of the files in the compressed file. If you wish
for both your file names and the contents to be hidden, move all the
files into a single folder and password protect that folder.
File and folders frequently used or accessed
If
you need to password protect
or encrypt data you frequently use, you will need to install a
third-party program that will enable you to protect your files and
folders. Below are some free and commercial solutions.
- AxCrypt - An excellent free encryption utility that enables users to encrypt all files within a folder and not allow those files to be viewed unless a passphrase (password) is known.
- WinCry - A freeware utility that enables your files to be encrypted, secure deletion, as well as other helpful methods of protecting your files.
- Folder Guard - A commercial version of a password protection software that enables you to password protect files, folders, and other Windows resources.
Click here to search for more solutions to password protect files and folders in Windows.
- There is no such thing as a 100% protected file. There are numerous tools, utilities, and instructions for how to break a lot of the encryption and passwords on files. However, the protection methods listed above will protect your files from the majority of users who may encounter them. If you're working with really sensitive data we suggest a commercial product for protecting your files and data.
- Even though a file or folder may be password protected it still can be deleted (unless the program supports the ability to protect files from being deleted). Always remember to backup all your files, even those protected by passwords.
- If you forget the password, unless you're willing to spend the time attempting to break it or pay someone else to break the password, all your file data will be lost. Unless you've made a backup of the non-password protected data.
Tuesday, April 9, 2013
How to Reset a BIOS Password
On Windows computers, the BIOS (Basic Input/Output System) is updatable computer firmware designed to initialize the computer during start prior to handing control to the operating system. Due to the sensitive nature of the system settings controlled by the BIOS, a password can be set by either the computer manufacturer or the end-user. Some of the most common BIOS producers include AMI, AWARD, IBM, and Phoenix with many manufacturers making their own changes to the firmware prior to selling a computer on the open market. The common methods to reset BIOS password include: Generating a BIOS password using a hash code, entering a backdoor BIOS password, reset the BIOS password using software, reset the BIOS password using hardware, and resetting the BIOS password with vendor specific solutions.How Does the BIOS Work?
The computer BIOS is the first programming code executed by a Windows computer when the machine is rebooted or turned on. The computer firmware conducts a power-on self-test of the system which is responsible for identifying system hardware and initializing components such as the CPU, hard drive(s), RAM, video card, mouse, and keyboard. Once the initialization task is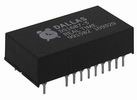 complete,
the BIOS checks the boot devices in order of configured preference
(traditional default setting is the computer’s hard drive). The boot
loader software is executed by the BIOS once located, and control of the
computer is then passed to the operating system. Functionality that can
be changed by the end-user through the BIOS user interface (UI) include
setting the system clock, enabling or disabling system hardware,
configuring hardware, enabling or setting passwords, and choosing the
order of boot devices.
complete,
the BIOS checks the boot devices in order of configured preference
(traditional default setting is the computer’s hard drive). The boot
loader software is executed by the BIOS once located, and control of the
computer is then passed to the operating system. Functionality that can
be changed by the end-user through the BIOS user interface (UI) include
setting the system clock, enabling or disabling system hardware,
configuring hardware, enabling or setting passwords, and choosing the
order of boot devices.Although the BIOS was originally stored on a ROM (read only memory) chip on the computer’s motherboard, today’s computers will store the firmware in flash memory or EEPROM chips that can be updated after the computer has been sold. Once Intel started producing chips for use on non-Windows OS’s such as Mac OS X and Linux, a successor to the legacy BIOS system was required and is called the Extensible Firmware Interface (EFI). Although EFI provides a number of improvements over the traditional BIOS, it has not yet gained market dominance on computers running the Windows operating system.
Is There a BIOS on Mac OS X?
Prior to the production of Mac computers using x86 or Intel chips during the later portion of the 2000’s and their use of EFI, OpenFirmware was the BIOS equivalent on all Macintosh computers. OpenFirmware provides similar functionality on a Mac as the BIOS and EFI do on other computing systems. It conducts tasks such as locating attached or installed hardware and uses environment variables to direct the boot process for the Mac. To access the interface for OpenFirm, press the power button on the mac for about 10 seconds. While pressing the power button, simultaneously depress the “CMD,” “OPT,” “O,” and “F” keys once you hear an audible “chime.” Once you are done with the required modifications in OpenFirmware, exit the interface by typing “bye”, “boot”, or “mac-boot” (depends on the version of Mac computer you are using) followed by pressing the “return” key.How to Rest a BIOS Password By Using a Hash Code
A lot of the major computer manufacturers use a master password generated from a hash code to reset the master BIOS password. This hash code is normally calculated from a unique equipment identifier such as the Serial Number, Service Tag, System ID, or Express Service Code. On many brands of computer, the identifying code will be displayed after the BIOS password has been entered incorrectly three times in a row. On other brands, it may be printed on the computer. On some HP models of computer, the hash code will only display if the “F2” or “F12” keyboard function key is press prior to entering the incorrect password a third time.A free service provided by Tech FAQ (other websites will charge you) is our BIOS password generation tool. The tool is designed to make a BIOS password that will work on many computer brands to include: Compaq, Dell, Fujitsu-Siemens, HP, Samsung, and Sony models. The tool has also worked for many white-label PC’s running Phoenix or Insyde BIOS. Tech-FAQ.com recommends end users that desire to reset the BIOS password for their respective computer try the hashcode generator before paying another company money to conduct the same task. Many times, third party companies will simply charge individuals upwards of $40 USD to obtain the same information provided for free here:
Finding the Backdoor BIOS Password
In addition to creating a BIOS password from a hash code, a number of BIOS manufacturers also implement an explicit backdoor password. This password will work regardless of the presence of a manually set BIOS password. The primary purpose of a manufacturer’s backdoor BIOS password is for maintenance and testing evolutions. These passwords are changed periodically by the respective company and success will vary across brand and age of computer.The reported BIOS backdoor passwords to date include:
| Manufacturer | BIOS Password |
|---|---|
| AMI | A.M.I., AAAMMMIII, AMI?SW , AMI_SW, BIOS, CONDO, HEWITT RAND, LKWPETER, MI, Odor, and PASSWORD. |
| Award BIOS | ,01322222, 589589, 589721, 595595, 598598 , ALFAROME, ALLY, ALLy, aLLY, aLLy, aPAf, award, AWARD PW, AWARD SW, AWARD?SW, AWARD_PW, AWARD_SW, AWKWARD, awkward, BIOSTAR, CONCAT, CONDO, Condo, condo, d8on, djonet, HLT, J256, J262, j262, j322, j332, J64, KDD, LKWPETER, Lkwpeter, PINT, pint, SER, SKY_FOX, SYXZ, syxz, TTPTHA, ZAAAADA, ZAAADA, ZBAAACA, and ZJAAADC. |
| Russian Award BIOS | %øåñòü ïpîáåëîâ%, %äåâÿòü ïpîáåëîâ |
| Phoenix BIOS | BIOS, CMOS, phoenix, and PHOENIX. |
| VOBIS & IBM | merlin |
| Dell | Dell |
| Biostar | Biostar |
| Compaq | Compaq |
| Enox | xo11nE |
| Epox | central |
| Freetech | Posterie |
| IWill | iwill |
| Jetway | spooml |
| Packard Bell | bell9 |
| QDI | QDI |
| Siemens | SKY_FOX |
| SOYO | SY_MB |
| TMC | BIGO |
| Toshiba | Toshiba |
How to Reset the BIOS Password Using Software
A popular option for end users to reset the BIOS/CMOS password is to use third party software. The BIOS/CMOS Password recovery Tool is a low-cost application that can be used to remove or reset the BIOS password on Windows computers. Once the software is purchased, you boot the computer using the Boot CD provided by the company and it will recover the BIOS password on the computer. The application advertises success with the following BIOS versions:ACER/IBM BIOS
AMI BIOS
AMI WinBIOS 2.5
Award 4.5x/4.6x/6.0
Compaq (1992, New version)
IBM (PS/2, Activa, Thinkpad)
Phoenix 1.00.09.AC0 (1994), a486 1.03, 1.04, 1.10 A03, 4.05 rev 1.02.943, 4.06 rev 1.13.1107
Phoenix 4 release 6 (User)
Packard Bell
Gateway Solo – Phoenix 4.0 release 6
Toshiba
Zenith AMI
CmosPWD is a free application that can be used to retrieve and decrypt the BIOS password. It also provides backup, restoral, and erasing capabilities. The program is proven to work with the following BIOS types:
ACER/IBM BIOS
AMI BIOS
AMI WinBIOS 2.5
Award 4.5x/4.6x/6.0
Compaq (1992)
Compaq (New version)
IBM (PS/2, Activa, Thinkpad)
Packard Bell
Phoenix 1.00.09.AC0 (1994), a486 1.03, 1.04, 1.10 A03, 4.05 rev 1.02.943, 4.06 rev 1.13.1107
Phoenix 4 release 6 (User)
Gateway Solo – Phoenix 4.0 release 6
Toshiba
Zenith AMI
How to Reset the BIOS Password By Removing the CMOS Battery
One of the most common methods to reset the BIOS password is to remove or discharge the battery on the computer’s motherboard. If the power to the battery is lost or drained, the BIOS configuration will be reset to the factory state with no password. System settings made to the BIOS will also be lost.Step 1 – Turn off the computer and ensure it has no external power (ie unplug the power cable. If it has a battery, remove it).
Step 2 – Open the computer’s case or box.
Step 3 – Locate the computer’s motherboard and look for the white silver button battery on the motherboard.
Step 4 – If the battery is not soldered to the motherboard, remove it carefully and wait for approximately 30 seconds.
Step 5 – Put the computer case back together and boot the computer.
Step 6 – If the “CMOS Checksum Error-Defaults Loaded” error message is displayed, the BIOS password has been reset.
In the event the CMOS battery is soldered to the computer’s motherboard, you will want to seek a different method to reset the BIOS password on the computer.
Steps to Reset the BIOS Password Using Hardware
If the CMOS battery is soldered to the computer’s motherboard, some brands will have a jumper located on the board that can be used to reset or clear the BIOS password. The location of the jumper on the motherboard will be contained in the motherboard documentation. If you can not find documentation on which jumper will reset the BIOS password, some users will guestimate on which jumper is the appropriate by choosing the one closest to the battery for reset. Another option is to short the points of the battery connection pins to the motherboard (when there is no power being applied to the computer).Steps to Reset the BIOS Password Using the Real Time Clock
If attempts at resetting the CMOS battery through removal or by jumper fail, another method is to reset the Real Time Clock (RTC) Integrated Circuit (IC) on the computer’s motherboard. This method will work if the RTC requires an external battery. To reset, simply remove the RTC from the motherboard socket with no power available to the computer and reseat. The RTCs reported to require external batteries include:Dallas Semiconductor DS12885S
TI benchmarq bq3258S
Motorola MC146818AP
Hitachi HD146818AP
Samsung KS82C6818A
If the RTC contains an integrated battery, it can typically be reset by shorting two of the pins for several seconds after power has been removed from the system.
How to Reset the BIOS Password Using Vendor Specific Solutions
Resetting a Dell BIOS PasswordFor information on how to recover a Dell BIOS password, please refer to How do I reset Dell BIOS password?
Resetting an IBM ThinkPad BIOS Password
For information on how to recover an IBM Thinkpad BIOS password, please refer to How do I reset an IBM ThinkPad BIOS password?
Resetting an IBM Aptiva BIOS Password
Some IBM Aptivas can bypass the startup BIOS password if both mouse buttons are pressed repeatedly while booting the system.
Resetting an Acer BIOS Password
For information on how to recover an Acer BIOS password, please refer to How do I reset an Acer BIOS password?
How to Turn Off the BIOS Password
Once end-users obtain the master BIOS password for the target computer, a common task to accomplish is making the computer stop asking for the password when restarted or rebooted.Step 1 – Restart your computer.
Step 2 – Press the BIOS access key during computer restart (F2 on many models, Tech-FAQ listing of common BIOS access keys).
Step 3 – Use the keyboard arrow keys to locate the security tab in the BIOS setup.
Step 4 – Locate the submenu that lists menu items similar to:
Supervisor password is: set
User password is: set
Step 5 – Use the keyboard arrow key to navigate to the available options and press the first password setting.
Step 6 – Enter the current BIOS password in the subsequently displayed menu prompt. Some BIOS types will ask for the password to be entered twice.
Step 7 – Change the password setting to blank, not set, etc.
Step 8 – Repeat steps 5-7 for the subsequent password options that indicate they are “set.”
Step 9 – Navigate to the BIOS “exit” menu option and choose the “save changes” menu option.
Step 10 – Continue to exit from the BIOS setup and restart your computer for the changes to take effect.
Thursday, April 4, 2013
Introduction
When an external hard disk crashes your next step depends on whether the disk is still working mechanically. If you are “lucky” the disk works, but it has lost the index of the data on it.
To find out attach the external hard disk to your computer and make sure the disk gets power if it has its own power device. If your computer recognizes the disk but does not show data (e.g. disk not formatted) do NOT format it and continue with section Software Data Recovery.
If, on the other hand, the external hard disk does not seem to get powered attach the disk internally in your computer. If the disk is recognized chances are high you see all your data intact, and all you have to do is dash to your computer hardware retailer to buy a new cage or power supply. If the disk is dead read on in section Lab Data Recovery.Software Data Recovery
In case of logical failures, such as when Master File Table (MFT) in Windows has been corrupted your data is still there but the index to it is missing. The first important step is that you stop writing data to the disk.
Now you need you another hard drive with the same capacity as the crashed disk, or bigger, plus specialized recovery software such as GetDataBack, ParetoLogic Data Recovery Pro or EasyRecovery (Standard Edition). Alternatively you can try the free excellent tool featured in Bright Hub’s article Recuva – Top Free Recovery Tool: Undelete Files.
- If you’re not satisfied with Recuva’s results then use the paid software, or perhaps even better consider outsourcing the data recovery process to an IT professional in your neighborhood as this may reduce total costs for this incident.
Depending on disk size the data recovery process can take days during which the recovering computer should not be turned off. Chances are good that you will get your data back, or at least a large part. If the index (MFT) cannot be reconstructed you will get your data in the form of individual files without the folder structure. Lab Data Recovery
In case your external disk does not spin or work mechanically you should not try to fix it yourself. Never open the hard disk unless you are absolutely sure about what you are doing. Instead get in contact with a specialized lab like Ontrack Data Recovery Services or google the web for a similar company with a track record.The Bottom Line
Try to prevent data recovery actions and costs by safely removing external disks and making regular backups - very large disks have become incredibly cheap. You can simply use another external disk for you backup as it is very unlikely that both the primary disk as well as the backup drive fail at the same time.
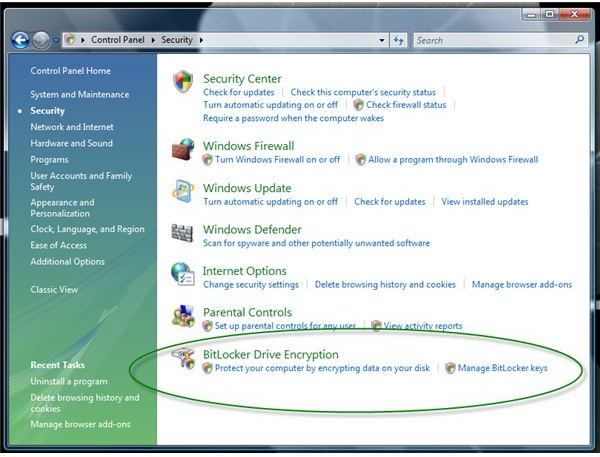
Encrypting Removable Drives
 The
content of an external hard-drive can be set to unreadable mode by
anyone that does not have the passphrase or key to decrypt the
hard-disk. Users of Windows 7, Vista, and Windows Server 2008 may take
advantage of free encryption software to protect the system and external
volumes. The program is called BitLocker Drive Encryption which is
different from Encrypting File System (EFS) that only encrypt files but
not the entire volume of local or external drives. Users with XP system
will need to use third-party password protection for external hard
drives.
The
content of an external hard-drive can be set to unreadable mode by
anyone that does not have the passphrase or key to decrypt the
hard-disk. Users of Windows 7, Vista, and Windows Server 2008 may take
advantage of free encryption software to protect the system and external
volumes. The program is called BitLocker Drive Encryption which is
different from Encrypting File System (EFS) that only encrypt files but
not the entire volume of local or external drives. Users with XP system
will need to use third-party password protection for external hard
drives.BitLocker Drive Encryption in Vista and Windows 7
The Ultimate and Enterprise editions of Vista and Windows 7 includes BitLocker Drive Encryption feature and can be turn on only if the hard-disk meet the requirement for BitLocker to operate: The hard disk requires at least two NTFS-formatted volumes. An optional requirement is a Trusted Platform Module (TPM) module. Read more how to use BitLocker with or without TPM chip.
Users of Windows 7 may also take advantage of BitLocker To Go, a free encryption software to password protect USB sticks.
TrueCrypt
A freeware password protection for external drives that has not been decrypted by unauthorized user, even by FBI is called TrueCrypt. A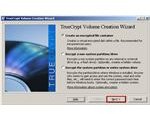 hard-drive
or any volume encrypted using TrueCrypt is secure and will not be
readable unless you are the owner or have knowledge on the passphrase to
decrypt the entire volume or external hard-drive.
hard-drive
or any volume encrypted using TrueCrypt is secure and will not be
readable unless you are the owner or have knowledge on the passphrase to
decrypt the entire volume or external hard-drive.
There are two options to encrypt or password protect external drives using TrueCrypt:
- Encrypt a non-system volume (usually a flash drive or any external hard-drive). This is the normal method of encrypting a volume or hard-drive that only uses one password to encrypt and decrypt.
- Same as above but with an option to create a hidden volume. This option requires a user to create two passwords — one for the hidden volume and the other is for the outer volume. The passwords for each must be different, to prevent revealing the encrypted but hidden volume when the outer volume is decrypted.
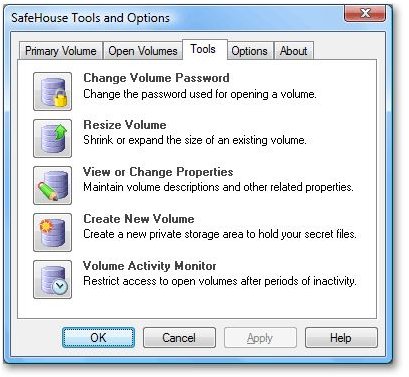
SafeHouse Explorer
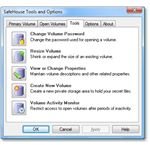 SafeHouse Explorer
is encryption software that is available as free download. The program
uses 256-bit advanced encryption to protect not only files or folders
but can encrypt external hard-drives, memory sticks, iPod, network
servers and DVD or CD. SafeHouse Explorer runs on Windows 7 and earlier operating systems. Users of Mac and Linux should use TrueCrypt instead of SafeHouse Explorer.
SafeHouse Explorer
is encryption software that is available as free download. The program
uses 256-bit advanced encryption to protect not only files or folders
but can encrypt external hard-drives, memory sticks, iPod, network
servers and DVD or CD. SafeHouse Explorer runs on Windows 7 and earlier operating systems. Users of Mac and Linux should use TrueCrypt instead of SafeHouse Explorer.Final Words
Encrypting an external hard-drive is important only if you really require it e.g. you have important files that no one should know or view. The performance of a hard-disk may change if you are accessing files from decrypted volumes, especially if the encryption automatically encrypts modified files.
Make sure to keep your passphrase, keys or password secure when encrypting a drive (external or local drives) and remember it. If you forget the password to decrypt the drive, you won't be able to access it. Take advantage of feature to store the password in a flash drive so you can always reset a password when required, and keep the flash drive in safe place to prevent unauthorized usage to gain access to encrypted external HD.

Quarantine and Virus Vault
 Before
we start out on how to recover a file AVG has deleted, let's make sure
it was truly deleted. Most of the time, anitivirus programs will just
quarantine an infected file. You can easily clean and restore it without
much fuss. This is a major reason that I suggest that you first
quarantine any infected file (I cover the difference between quarantine and deletion in another article). So let's check that quite quickly.
Before
we start out on how to recover a file AVG has deleted, let's make sure
it was truly deleted. Most of the time, anitivirus programs will just
quarantine an infected file. You can easily clean and restore it without
much fuss. This is a major reason that I suggest that you first
quarantine any infected file (I cover the difference between quarantine and deletion in another article). So let's check that quite quickly.
If you're afraid that AVG has deleted a file, then open up the interface and click on the Computer Scanner tab. In the bottom right corner, there is a button labeled Virus Vault. Click it to open up your virus vault. This is where all your infected files get quarantined. The deleted file might still be in there, since it shouldn't clear out the vault until you tell it to do so. Just click on the relevant files and restore them. Note that if they are infected, you might want to use another scanner or antimalware program to clean out the infection.
If they aren't in there, then they are truly deleted and you'll need to take a few extra steps to recover your deleted file.How to Recover a File AVG Deleted
Unfortunately, when AVG deletes a file, it's truly deleted. If it is no longer quarantined in the virus vault, then AVG removed it from your active programs. It might not be completely gone from your computer though. Only very serious deletion programs actually "remove" the file from your computer. Deleting a file just means that it is no longer listed. The actual information usually sticks around until it is overwritten with something else.
- This means that you might still have it on your hard drive, and a file recovery program might be able to save it. There are a lot of programs out there to recover deleted files. Another writer seems to have had a lot of luck with FreeUndelete, another liked Recuva and another Undelete 2009. Feel free to read the reviews and guide to get a handle on how to recovery a deleted file. Then just run the program that you chose and see if it's still on there. Most of these have pretty simple interfaces, so just look through for the file title or deletion date and see if it's there. If it's not listed as a recovered program, then unfortunately, it's probably gone forever. There isn't another way to recover a file that AVG has deleted.
AVG Option for Online Backup
Since it's pretty difficult to consistently recover a file AVG has deleted, then you may want to look into an option for online backup. Note that AVG has paired up with Carbonite to offer online backup for your most important files. You can look at their listed plans and pick one that is the right size for you. The system will let you upload copies of vital files automatically. Then, if one of those files is deleted, you can restore a clean copy using AVG's Online Backup utility. Mozy or SOS online are also options, but you they would work independently from AVG.
We have an article covering which of these three top online backup options is the best and an article covering the different benefits of online backup vs. offline backup. If you are very worried about your file security, then you should think about these backup options.

How to Create a Bootable Windows 7 or Vista USB Drive
Did you ever wish to install Windows with a Flash drive but don't know how ? Here are a few quick and easy tweaks that might help you to Create a Bootable USB Drive for installing Windows 7 or Vista . You can also use this to install Windows on a friends computer with no CD/DVD drive .1.Plug-in your Flash Drive . First plug-in your USB stick to your USB port and copy all the content to a safe location in your hard drive .
Run Command Prompt as an administrator . For opening Command prompt
Go to start menu and type cmd in the search box . Right click on it and select run as Administrator to use it with admin-rights .
2.Run Command Prompt as an administrator . For opening Command prompt
Go to start menu and type cmd in the search box . Right click on it and select run as Administrator to use it with admin-rights .
3.Using the Diskpart utility find the drive number of your Flash Drive . To do so, type in the following commands in the Command Prompt :
DISKPART- Running DISKPART will display the version of DISKPART you are running, name of your PC . Run the following command .
list disk- Your Disk Number will be listed and note it down as you'll need this in the next step .
- Let us assume that the USB Drive is Disk 1 but if it was listed as Disk 2 use Disk 2 instead .
- 4.Format the drive by executing the following commands one by one . Make sure you replace Disk 1 with proper Disk number .select disk 1
clean
create partition primary
select partition 1
active
format fs=NTFS QUICK
assign
exit
- When its done and if everything goes well , you should have a formatted USB drive .
- 5.Make the Flash Drive bootable by using the bootsect utility that is shipped with Windows 7/Vista .For doing so
- First insert the Windows 7/Vista DVD and note down the drive letter of the DVD drive . Let us assume it as D: and that of the USB as G .
- Navigate to the directory where bootsect is found .
D: cd d:\boot- Use the bootsect to make the USB Drive Bootable (ie Updating the drive with BOOTMGR compatible code) and for preparing it to boot Windows 7/Vista . Here, replace G: with the name of your USB Drive .
BOOTSECT.EXE/NT60 G:- Close the Command Prompt windows .
- 6.Copy all files from the Windows 7/DVD DVD to the formatted USB stick . The safest and the fastest way would be to use the Windows Explorer.7.Change the boot priority at the BIOS to USB.
Warnings
- Make sure you motherboard is capable of booting USB drive ,if not your computer won't be able to make use of this bootable device .
- There is no bootsect
in XP and therefore this might not work in XP .
You can, from within 64-bit Windows, create a bootable USB drive of
your 32-bit or 64-bit Windows disc. In Windows 32-bit you can only
create bootable USB drive of 32-bit Windows disc.
Subscribe to:
Posts (Atom)