Introduction
When an external hard disk crashes your next step depends on whether the disk is still working mechanically. If you are “lucky” the disk works, but it has lost the index of the data on it.
To find out attach the external hard disk to your computer and make sure the disk gets power if it has its own power device. If your computer recognizes the disk but does not show data (e.g. disk not formatted) do NOT format it and continue with section Software Data Recovery.
If, on the other hand, the external hard disk does not seem to get powered attach the disk internally in your computer. If the disk is recognized chances are high you see all your data intact, and all you have to do is dash to your computer hardware retailer to buy a new cage or power supply. If the disk is dead read on in section Lab Data Recovery.Software Data Recovery
In case of logical failures, such as when Master File Table (MFT) in Windows has been corrupted your data is still there but the index to it is missing. The first important step is that you stop writing data to the disk.
Now you need you another hard drive with the same capacity as the crashed disk, or bigger, plus specialized recovery software such as GetDataBack, ParetoLogic Data Recovery Pro or EasyRecovery (Standard Edition). Alternatively you can try the free excellent tool featured in Bright Hub’s article Recuva – Top Free Recovery Tool: Undelete Files.
- If you’re not satisfied with Recuva’s results then use the paid software, or perhaps even better consider outsourcing the data recovery process to an IT professional in your neighborhood as this may reduce total costs for this incident.
Depending on disk size the data recovery process can take days during which the recovering computer should not be turned off. Chances are good that you will get your data back, or at least a large part. If the index (MFT) cannot be reconstructed you will get your data in the form of individual files without the folder structure. Lab Data Recovery
In case your external disk does not spin or work mechanically you should not try to fix it yourself. Never open the hard disk unless you are absolutely sure about what you are doing. Instead get in contact with a specialized lab like Ontrack Data Recovery Services or google the web for a similar company with a track record.The Bottom Line
Try to prevent data recovery actions and costs by safely removing external disks and making regular backups - very large disks have become incredibly cheap. You can simply use another external disk for you backup as it is very unlikely that both the primary disk as well as the backup drive fail at the same time.
Thursday, April 4, 2013
Encrypting Removable Drives
 The
content of an external hard-drive can be set to unreadable mode by
anyone that does not have the passphrase or key to decrypt the
hard-disk. Users of Windows 7, Vista, and Windows Server 2008 may take
advantage of free encryption software to protect the system and external
volumes. The program is called BitLocker Drive Encryption which is
different from Encrypting File System (EFS) that only encrypt files but
not the entire volume of local or external drives. Users with XP system
will need to use third-party password protection for external hard
drives.
The
content of an external hard-drive can be set to unreadable mode by
anyone that does not have the passphrase or key to decrypt the
hard-disk. Users of Windows 7, Vista, and Windows Server 2008 may take
advantage of free encryption software to protect the system and external
volumes. The program is called BitLocker Drive Encryption which is
different from Encrypting File System (EFS) that only encrypt files but
not the entire volume of local or external drives. Users with XP system
will need to use third-party password protection for external hard
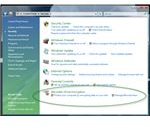
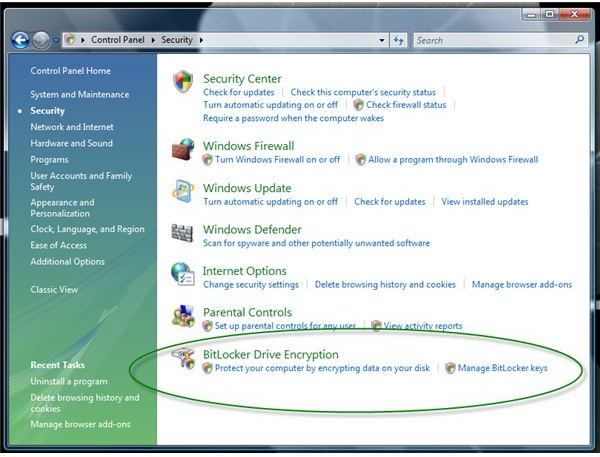
drives.BitLocker Drive Encryption in Vista and Windows 7
The Ultimate and Enterprise editions of Vista and Windows 7 includes BitLocker Drive Encryption feature and can be turn on only if the hard-disk meet the requirement for BitLocker to operate: The hard disk requires at least two NTFS-formatted volumes. An optional requirement is a Trusted Platform Module (TPM) module. Read more how to use BitLocker with or without TPM chip.
Users of Windows 7 may also take advantage of BitLocker To Go, a free encryption software to password protect USB sticks.
TrueCrypt
A freeware password protection for external drives that has not been decrypted by unauthorized user, even by FBI is called TrueCrypt. A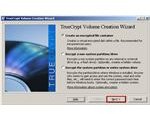 hard-drive
or any volume encrypted using TrueCrypt is secure and will not be
readable unless you are the owner or have knowledge on the passphrase to
decrypt the entire volume or external hard-drive.
hard-drive
or any volume encrypted using TrueCrypt is secure and will not be
readable unless you are the owner or have knowledge on the passphrase to
decrypt the entire volume or external hard-drive.
There are two options to encrypt or password protect external drives using TrueCrypt:
- Encrypt a non-system volume (usually a flash drive or any external hard-drive). This is the normal method of encrypting a volume or hard-drive that only uses one password to encrypt and decrypt.
- Same as above but with an option to create a hidden volume. This option requires a user to create two passwords — one for the hidden volume and the other is for the outer volume. The passwords for each must be different, to prevent revealing the encrypted but hidden volume when the outer volume is decrypted.
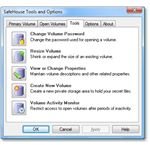
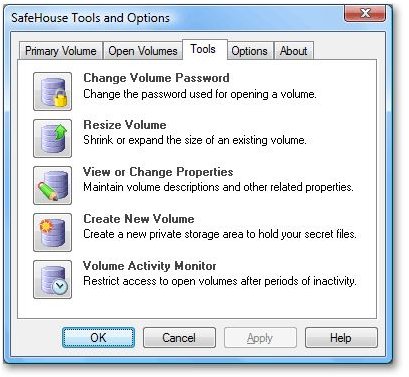
SafeHouse Explorer
 SafeHouse Explorer
is encryption software that is available as free download. The program
uses 256-bit advanced encryption to protect not only files or folders
but can encrypt external hard-drives, memory sticks, iPod, network
servers and DVD or CD. SafeHouse Explorer runs on Windows 7 and earlier operating systems. Users of Mac and Linux should use TrueCrypt instead of SafeHouse Explorer.
SafeHouse Explorer
is encryption software that is available as free download. The program
uses 256-bit advanced encryption to protect not only files or folders
but can encrypt external hard-drives, memory sticks, iPod, network
servers and DVD or CD. SafeHouse Explorer runs on Windows 7 and earlier operating systems. Users of Mac and Linux should use TrueCrypt instead of SafeHouse Explorer.Final Words
Encrypting an external hard-drive is important only if you really require it e.g. you have important files that no one should know or view. The performance of a hard-disk may change if you are accessing files from decrypted volumes, especially if the encryption automatically encrypts modified files.
Make sure to keep your passphrase, keys or password secure when encrypting a drive (external or local drives) and remember it. If you forget the password to decrypt the drive, you won't be able to access it. Take advantage of feature to store the password in a flash drive so you can always reset a password when required, and keep the flash drive in safe place to prevent unauthorized usage to gain access to encrypted external HD.

Quarantine and Virus Vault
 Before
we start out on how to recover a file AVG has deleted, let's make sure
it was truly deleted. Most of the time, anitivirus programs will just
quarantine an infected file. You can easily clean and restore it without
much fuss. This is a major reason that I suggest that you first
quarantine any infected file (I cover the difference between quarantine and deletion in another article). So let's check that quite quickly.
Before
we start out on how to recover a file AVG has deleted, let's make sure
it was truly deleted. Most of the time, anitivirus programs will just
quarantine an infected file. You can easily clean and restore it without
much fuss. This is a major reason that I suggest that you first
quarantine any infected file (I cover the difference between quarantine and deletion in another article). So let's check that quite quickly.
If you're afraid that AVG has deleted a file, then open up the interface and click on the Computer Scanner tab. In the bottom right corner, there is a button labeled Virus Vault. Click it to open up your virus vault. This is where all your infected files get quarantined. The deleted file might still be in there, since it shouldn't clear out the vault until you tell it to do so. Just click on the relevant files and restore them. Note that if they are infected, you might want to use another scanner or antimalware program to clean out the infection.
If they aren't in there, then they are truly deleted and you'll need to take a few extra steps to recover your deleted file.How to Recover a File AVG Deleted
Unfortunately, when AVG deletes a file, it's truly deleted. If it is no longer quarantined in the virus vault, then AVG removed it from your active programs. It might not be completely gone from your computer though. Only very serious deletion programs actually "remove" the file from your computer. Deleting a file just means that it is no longer listed. The actual information usually sticks around until it is overwritten with something else.
- This means that you might still have it on your hard drive, and a file recovery program might be able to save it. There are a lot of programs out there to recover deleted files. Another writer seems to have had a lot of luck with FreeUndelete, another liked Recuva and another Undelete 2009. Feel free to read the reviews and guide to get a handle on how to recovery a deleted file. Then just run the program that you chose and see if it's still on there. Most of these have pretty simple interfaces, so just look through for the file title or deletion date and see if it's there. If it's not listed as a recovered program, then unfortunately, it's probably gone forever. There isn't another way to recover a file that AVG has deleted.
AVG Option for Online Backup
Since it's pretty difficult to consistently recover a file AVG has deleted, then you may want to look into an option for online backup. Note that AVG has paired up with Carbonite to offer online backup for your most important files. You can look at their listed plans and pick one that is the right size for you. The system will let you upload copies of vital files automatically. Then, if one of those files is deleted, you can restore a clean copy using AVG's Online Backup utility. Mozy or SOS online are also options, but you they would work independently from AVG.
We have an article covering which of these three top online backup options is the best and an article covering the different benefits of online backup vs. offline backup. If you are very worried about your file security, then you should think about these backup options.

How to Create a Bootable Windows 7 or Vista USB Drive
Did you ever wish to install Windows with a Flash drive but don't know how ? Here are a few quick and easy tweaks that might help you to Create a Bootable USB Drive for installing Windows 7 or Vista . You can also use this to install Windows on a friends computer with no CD/DVD drive .1.Plug-in your Flash Drive . First plug-in your USB stick to your USB port and copy all the content to a safe location in your hard drive .
Run Command Prompt as an administrator . For opening Command prompt
Go to start menu and type cmd in the search box . Right click on it and select run as Administrator to use it with admin-rights .
2.Run Command Prompt as an administrator . For opening Command prompt
Go to start menu and type cmd in the search box . Right click on it and select run as Administrator to use it with admin-rights .
3.Using the Diskpart utility find the drive number of your Flash Drive . To do so, type in the following commands in the Command Prompt :
DISKPART- Running DISKPART will display the version of DISKPART you are running, name of your PC . Run the following command .
list disk- Your Disk Number will be listed and note it down as you'll need this in the next step .
- Let us assume that the USB Drive is Disk 1 but if it was listed as Disk 2 use Disk 2 instead .
- 4.Format the drive by executing the following commands one by one . Make sure you replace Disk 1 with proper Disk number .select disk 1
clean
create partition primary
select partition 1
active
format fs=NTFS QUICK
assign
exit
- When its done and if everything goes well , you should have a formatted USB drive .
- 5.Make the Flash Drive bootable by using the bootsect utility that is shipped with Windows 7/Vista .For doing so
- First insert the Windows 7/Vista DVD and note down the drive letter of the DVD drive . Let us assume it as D: and that of the USB as G .
- Navigate to the directory where bootsect is found .
D: cd d:\boot- Use the bootsect to make the USB Drive Bootable (ie Updating the drive with BOOTMGR compatible code) and for preparing it to boot Windows 7/Vista . Here, replace G: with the name of your USB Drive .
BOOTSECT.EXE/NT60 G:- Close the Command Prompt windows .
- 6.Copy all files from the Windows 7/DVD DVD to the formatted USB stick . The safest and the fastest way would be to use the Windows Explorer.7.Change the boot priority at the BIOS to USB.
Warnings
- Make sure you motherboard is capable of booting USB drive ,if not your computer won't be able to make use of this bootable device .
- There is no bootsect
in XP and therefore this might not work in XP .
You can, from within 64-bit Windows, create a bootable USB drive of
your 32-bit or 64-bit Windows disc. In Windows 32-bit you can only
create bootable USB drive of 32-bit Windows disc.
Subscribe to:
Posts (Atom)