How to reset Windows 7 Administrator Password with USB Drive
The first thing we often do When we Lost Windows 7 password is
asking a computer expert for help. However, it is only a moment for
you forgetting Windows 7 password and it may take you several days
to regain access to your system. From now on, don't worry about
anything when you forgot windows 7 password. The article will give
you some ideas to reset Windows 7 password with USB Drive.
Section One: Reset Windows 7 administrator password with Password
reset disk.
Most people usually only know how to create a new user with a
strong password or change it. But they don't develop a habit to
create a password reset disk for preventing lost password. It is a
great and free gift from Microsoft. Click here to learn how to
create password reset disk in windows 7. If you ready have a reset
disk, please follow steps below:
Step1: Start or restart your computer, insert your USB. In the
welcome interface, type the user name that you want to use and a
wrong password or leave it blank, and then press ENTER or click OK.
It will show you logon failed.
Step2: Click Reset password…… it will show you the
Password Reset Wizard. And it enables you to create a new password
for your user account. In the Password Reset Wizard dialog box,
click Next.
Step 3: Chose the disk which you insert, click Next. Type a new
password in the Type a new password box, and then type the password
again in the Type the password again to confirm box. In the Type a
new password hint box, type a hint for the password or not, and
then click Next→Finish, and then try to log on to Windows 7
again when use the new password you just set.
This USB Password reset disk only use in a certain account which
you have created before, or it won’t help. So it’s
better to create Windows 7 password reset disk when you add a
password to account.
Section Two: Recover Windows 7 administrator password with
Windows Password Rescuer run from USB drive
If you haven't created a password reset disk for your account
and unfortunately you lost windows 7 password, see below. I will
show you step-by-step guide to do this task in several minutes with
USB, without reinstalling system or losing any data.
Step 1: Prepare a 2GB USB flash drive and a computer which you can
access to.
Step 2: Download Windows Password Rescuer Personal /Windows 7
password recovery and install it to a computer which you have
access.
Step 3: Run the program and burn the ISO image to the USB Flash
Drive.
NOTE: This action will make your USB drive be formatted and all
your data in it will be lost. You'd better provide one with nothing
in it.
Step 4: Use the USB to reset windows 7 password. Before this step,
you must set your computer boot from USB. Then start your computer,
and you will enjoy the process of resetting the password, it is
easy and quick. Don’t worry if you have difficulty to bios
setting, you can see more about how to set computer to boot from
CD/USB. http://www.daossoft.com/knowledge/forgot-windows-7-password.html
How to change Administrator password in Windows 7 using cmd
If your PC or Laptop is password protected,you
have to enter the password before admin in computer.And once if you
admitted in computer by providing the correct administrator password,then you don’t need to provide old password to change the admin password.It can be possible only by using command prompt.
It is really a funny trick and may be useful for many users of PCs
and Laptops.One thing here which you need to remember that without run
as Administrator,you can not implement this trick.
Actually,it really seems funny when you want to change the password
of someone’s PC but you don’t know the current password of that PC.In
this condition ask for their PC or Laptop to run for a while.Now type
the following commands in command prompt(cmd).
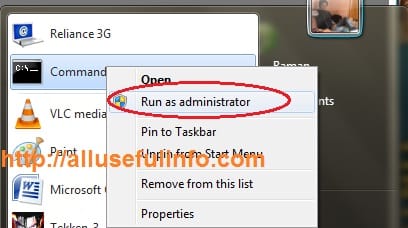
Open command prompt by run it as administrator.
Command Prompt>>Run as Administrator
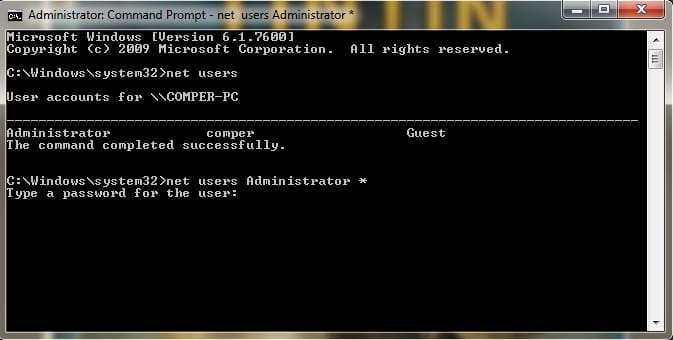
Type command Net Users to see the user accounts of Windows.
Command prompt screen with net users command
Now if you want to change password of Administrator,type the command Net Users Administrator * and hit Enter.Now you will see new line to type a new password for administrator.
Command Prompt>>Type a new password
So,now type a new password to change the current password.Let’s see the last step of this funny trick of cmd.
Password changed successfully using cmd
At last,you have done!Two another things that’s my duty to tell you
that whenever you type the password in cmd then you can’t see the
numbers or characters you have entered.You have to keep in mind the
letters and retype again.And if you not log in as Administrator,you will
an error message like system error 5 has occurred…..Access is denied.So keep in mind you have to log in with Administrator.
First of all, you must have a bootable Ubuntu OS CD or DVD or a USB flash drive.
If you dont have it, you can download it from www.ubuntu.com and burn
it to a CD or DVD or copy it on a USB flash drive by using UNetbootin
software.This tool is available in several websites.But I have
downloaded it from www.download.com
2
Then boot the OS from CD or DVD or USB flash drive. If it doesn't boot, then you may have to change the boot order from your BIOS.
3
Don't install Ubuntu, instead choose Try Ubuntu without installing. Now the Ubuntu OS gets loaded.
4
When the OS has completed booting it will show you the desktop. In the left side of the desktop, you'll see a list of icons.You can find a folder icon on that list. Click on that icon.
5
Click on Windows folder in the C:
drive(you may have installed it on a different drive.So go to that
respective drive) and then click on the System32. In the System32 folder
point to Magnify.exe and rename it as cmd.exe and rename the actual
cmd.exe into Magnify.exe
6
Then restart your system and boot into windows(dont forget to remove the Ubuntu installation CD or USB drive before booting).
Now at the logon screen press the ease of access button at the lower
left corner and check the 'Make items on the screen larger(Magnifier)'
checkbox and click apply. Now you will be provided with a command prompt
window.
7
In this window type net user and press enter.
8
This will list out the users in the system.
9
Next type net user x
Microsoft("x" represents the username whose password is to be removed,so
replace x with the corresponding username) and press enter.
10
Now close the command prompt window and click that user name and type Microsoft in place of password and press enter.
11
Now you can log in to your windows account with this password.But dont forget to change your password.
12
Then rename those two(magnify.exe and cmd.exe) back to their original names using Ubuntu.
Three tips to reset admin password without data lost:
Tip 1. Reset Windows 7 password with CMD
1. Logon you laptop with another user account which has admin privileges.
2. Click Start, type in "CMD.EXE" in the search box, press Enter.
3. Command screen apears, type in "net user" "user name" " new password", press Enter.
The user account password will be replace as the new one.
Tip 2. Reset Windows 7 Password with Repair CD 1.Boot the machine with your Windows 7 Repair CD. 2.Select "Repair Mode". 3.Use "System Restore" to set Windows back to a point before you changed the password.
4.Log on with your old password. 5.Plan ahead a little and create, test and document a spare admin account, same as you have a spare house key for emergencies. If you have no reset disk, this is a better way for you. Tip 3. Recover Windows 7 admin and user password with USBLoad a program which can recover lost
password for Windows 7 on another PC, burn it to a bootable CD/USB flash
drive. Boot your locked computer from the USB, then you can recover any
user account password. Read more if you'd like: How
to recover Windows 7 password.
Reset the password by using Safe Mode way There
is a hidden default Administrator account that is created when your
operating system is installed. Access that account to reset your
password.
1. Boot your computer and press F8 repeatedly 2. Access 3. Key in "Administrator" in Username, with no password. 4. Go to Control Panel, then User Accounts 5. Select the account you want to reset the password 6. Change the password
If it doesn't help, you need to download Windows Password Key to wipe up the password, read more from its official website.
Hope this helps.
Tuesday, July 16, 2013
How to Install Printers, Scanners, and Fax Machines on Windows 7
To Windows 7, printers, scanners, and fax machines are all
pretty much the same thing. Windows 7 prints to and accepts input from any
of these devices in similar ways. What sets these devices apart, however,
is the way they are connected.
Printers, scanners, and fax machines can be either physically
attached or network-attached. A
physically attached device is connected directly to your computer with a
USB cable. A network-attached device is connected directly to your network
via Ethernet, Bluetooth, or Wi-Fi, and is accessed remotely rather than
directly.
Note
If your computer has a built-in fax modem, it will appear in the
Windows Fax and Scan utility.
Many networked scanners can be used over the Web without needing
an install. If you know the IP address or hostname of your scanner, open
Internet Explorer and navigate to http://SCANNER,
replacing SCANNER with the host name or IP
address of the scanner. If you see an informational web page, look
around for an option called Scan or Webscan. This will let you access
most of the scanner’s functions over the Web without needing to install
a driver.
Both physically attached and network-attached devices can be shared
as well. The computer sharing these devices for other computers on the
network is referred to as a print server, regardless
of whether the computer is actually running a server version of Windows.
The print server also handles sending the formatted document and receiving
an incoming document. For ease of reference, I’ll refer to both processes
as spooling. A key advantage of using a
computer as a print server is that your printers, scanners, and fax
machines will have a central queue that you can manage.
At home or at the office, you don’t have to share printers,
scanners, or fax machines from your computer, or any computer, for that
matter. Instead, you can have everyone connect directly to a
network-attached device. When you do this, the network device is handled
much like a local device attached directly to a computer. However,
everyone who uses a network-attached device will then have separate
queues, which can make tracking down problems extremely difficult.
Installing Physically Attached Printers, Scanners, and Fax
Machines
Physically attached printers, scanners, and fax machines
are connected directly to your computer through a USB cable. Although
Windows 7 will automatically install most devices that are Plug and Play–compatible automatically, printers, scanners
and fax machines are exceptions in some cases. Why? Windows 7 won’t
automatically install drivers that aren’t designed for and known to be
fully compatible with the operating system. Additionally, Windows 7
won’t automatically install non–Plug and Play devices. Unfortunately,
many older printers, scanners, and fax machines fall into one of these
two categories and it’ll take a bit more work to install and use them
with Windows 7.
Note
Some very old printers may connect directly via serial or parallel cables. Windows 7 continues to support these
devices and you’ll need to install them using the manual installation
technique.
Most printers come with management software and device drivers on a CD. To avoid
problems, my advice is this: unless you are installing a
network-attached printer and are an administrator, you probably do not
need to install and use the management software. The reason for this
is that Windows 7 includes device and printer management features and
these can be used accessed by clicking Start→Devices and Printers and
then double-clicking the printer you want to manage.
With respect to device drivers shipped by the manufacturer, my
advice is this: if the device software wasn’t designed for Windows
Vista or later, don’t use it. Instead, rely on Windows 7’s automatic
or manual installation process to install the printer, scanner, or fax
device. If during a manual installation your device is not listed,
check Windows Update for driver software first and then check the
manufacturer’s website.
You can install most physically attached printers, scanners, and
fax machines by completing the following steps:
Turn on the printer, scanner, or fax device.
Connect the device to your computer using the appropriate USB
cable.
Let Windows 7 automatically detect and install the device.
Your computer will search its driver cache and may search the
Windows Update site.
Figure 12.1. Windows 7 detects the printer, scanner, or fax device
Windows 7 should automatically detect the printer, scanner or fax
device as shown in Figure 12.1, and then
automatically install a built-in driver to support it. As shown in Figure 12.2, the Driver Software
Installation component handles the installation task. The printer,
scanner, or fax device should then run immediately without any
problems.
Figure 12.2. Windows 7 installs the device
You can confirm that the printer, scanner, or fax device is
available by clicking Start→Devices and Printers. As shown in Figure 12.3, the printer,
scanner, or fax device should be listed as an available device.
Double-click the printer, scanner, or fax device to check its status.
The device status should be “Ready,” as shown in Figure 12.4,.
Figure 12.3. Confirming that the device is installed
Figure 12.4. Confirming that the device is available and ready for
use
Automatic installation is great when it works, but it doesn’t work
100 percent of the time. Windows 7 might also automatically detect the
printer, scanner, or fax device, but the Driver Software Installation
component may run into problems installing the device. If this happens,
you’ll see errors similar to those shown in Figure 12.5. For example, the
HP printer that installed automatically on 32-bit Windows
7 would not install automatically on 64-bit Windows 7. Why? At the time,
the 64-bit printer driver was not designed for and known to be fully
compatible with the operating system.
Figure 12.5. Windows 7 is unable to install the device
Installing a printer or fax machine manually
If automatic installation fails, you can install the
printer or fax machine manually by completing the following
steps:
Figure 12.6. Installing a printer manually
With the printer, scanner, or fax device powered on and
connected to your computer using the appropriate cable,
Start→Devices and Printers.
In Devices and Printers, click “Add a printer.”
In the Add Printer Wizard, shown in Figure 12.6, click “Add a local
printer.”
On the “Choose a printer port page,” ensure that “Use an
existing port” is selected, choose the printer port to use, and then click Next.
If you are trying to manually install a USB printer that did not
install automatically, choose USB001 (Virtual Printer Port for
USB), as shown in Figure 12.7.
Otherwise, choose the COM port (for serial printers) or LPT port
(for parallel printers) that your printer is connected to.
As shown in Figure 12.8, you must
now specify the device manufacturer and model. This allows Windows
7 to assign a driver to the device. If the device manufacturer and
model you are using are displayed, choose a manufacturer and a
model, and then skip steps 6–9.
If the device manufacturer and model you’re using aren’t
displayed in the list, ensure that your computer is connected to
the Internet and then click Windows Update. Windows will then
update the list of printers to show additional models. This
feature is part of Windows 7’s automatic driver provisioning and
it can take several minutes to retrieve the updated list.
Figure 12.7. Select the port to use
Figure 12.8. Select the manufacturer and printer type
You should then be able to select your printer manufacturer
and model. If you aren’t, download the driver from the
manufacturer’s website and then extract the driver files.
Click Have Disk. In the Install from Disk dialog box, click
Browse.
In the Locate File dialog box, locate the .inf driver file for the device and
then click Open.
Click Next. On the “Type a printer name” page, type a name
for the device or accept the default name. You’ll see this name on
the Printers page in the Control Panel. Click Next, and the
printer driver will be installed.
The printer or fax machine is automatically
configured for sharing. If you don’t want the printer or fax
machine to be shared, select “Do not share this printer.”
Otherwise, you can set the share name and location, and add an
optional comment.
When you click Next, the Add Printer Wizard will install the
printer and set it as the default automatically. If you don’t want
the printer to be the default, clear the “Set as the default printer” checkbox (you will see
this checkbox only if you had a default printer before you
installed this one).
To print a test page, click Print a Test Page. The wizard
will then print a test page. Click Close.
Click Finish. Click Start→Devices And Printers. The Devices
and Printers page in the Control Panel will have an additional
icon with the name set the way you specified (see Figure 12.9). You can
change the printer or fax properties and check printer or fax
status at any time.
Figure 12.9. Confirming that the device was installed
Installing a scanner manually
You can install a scanner manually by completing the
following steps:
In Windows Explorer, access C:\Program Files\Windows Photo Viewer,
where C: is your system drive, and then double-click ImagingDevices.exe.
In the Scanners and Cameras window, click Add Device. This
starts the Scanner and Camera Installation Wizard.
Click Next.
You must now specify the device manufacturer and model. This
allows Windows 7 to assign a driver to the device. If the device
manufacturer and model you are using are displayed, choose a
manufacturer and a model, and then skip steps 5–7.
If the device manufacturer and model you’re using aren’t
displayed in the list, download the driver from the manufacturer’s
website and then extract the driver files.
Click Have Disk. In the Install from Disk dialog box, click
Browse.
In the Locate File dialog box, locate the .inf driver file for the device and
then click Open.
Click Next. On the “What is the name of your device?” page, type a name
for the scanner or accept the default name. You’ll see this name
in the Scanners and Cameras window.
Click Next and then click Finish.
The Scanners and Cameras window will have an additional icon
with the name set the way you specified. You can change the
scanner properties and check scanner status at any time.
Installing Wireless and Bluetooth Printers
Windows 7 fully supports wireless and Bluetooth. Often,
wireless and Bluetooth printers will include installation software that
you may be able to use to install and begin using the device. Before you
use the installation software, however, you should ensure it is
compatible with Windows 7. If it isn’t, you may want to check the device
manufacturer’s website for updated software.
Some wireless and Bluetooth printers connect directly to a
computer. Others connect to a computer via a network. You can connect a
wireless or Bluetooth printer directly to a computer by completing the
following steps:
Typically, wireless and Bluetooth devices require that you
connect a receiver to the computer. You’ll need to plug the receiver
into a USB slot on the computer.
Position the computer and receiver so that the receiver is
within range of the printer to which you want to connect.
Configure the printer as necessary and ensure that it is
powered on.
Click Start→Devices and Printers. In Devices and Printers,
click “Add printer.”
In the Add Printer Wizard, shown in Figure 12.10, click “Add a
network, wireless or Bluetooth Printer.”
As shown in Figure 12.11, your computer
will then search for available printers. If the printer you want to
use is shown in the list of available printers, select the printer,
and then click Next.
Note
If your computer can’t find the wireless printer, make sure that
the printer is powered on and that the wireless/Bluetooth transmitter
is switched on. If you suspect the printer is out of range, try moving
it closer to the computer. Make sure the printer is positioned away
from air conditioning units, microwave ovens, etc. Then click Search
Again to have your computer search again for the printer. If this
resolves the problem, select the printer and then click Next to
continue this procedure. Otherwise, click “The printer that I want
isn’t listed,” and then click Next.
On the “Find a printer by name or TCP/IP address” page, select
“Add a printer using a TCP/IP address or hostname,” and then click Next. On the “Type a printer
hostname or IP address” page, use the “Device type” list to select
the type of device. If you don’t know the type of device, choose
Autodetect. In the “Hostname or IP address” text box, type the
hostname or Internet Protocol (IP) address of the device. If you are
unsure, use the device’s control menu to print a configuration page.
The port name is set for you based on the hostname or IP address
entry. The port name doesn’t matter as long as it’s unique for your
computer.
When you click Next, the wizard attempts to contact the device.
If the wizard is unable to detect the print device, make sure that the
print device is turned on and connected to the network. Also, ensure
that you typed the correct IP address or printer name in the previous
page. If you entered incorrect information, click the Back arrow and
then retype this information. Complete the installation by setting the
printer name and sharing options as discussed in steps 7–11.
On the “Type a printer name” page, type a name for the device
or accept the default name. You’ll see this name on the Printers
page in the Control Panel. Click Next.
The printer is automatically configured for sharing. If you
don’t want the printer to be shared, select “Do not share this
printer.” Otherwise, you can set the share name and location, and
add an optional comment.
When you click Next, the Add Printer Wizard will install the
printer and set it as the default automatically. If you don’t want
the printer to be the default, clear the “Set as the default
printer” checkbox (you will see this checkbox only if you had a
default printer before you installed this one).
Figure 12.10. Add a network, wireless, or Bluetooth printer
Figure 12.11. Check the list of available devices for the printer
To print a test page, click Print a Test Page. The wizard will
then print a test page. Click Close.
Click Finish. Click Start→Devices and Printers. The Devices
and Printers page in the Control Panel will have an additional icon
with the name set the way you specified. You can change the printer
properties and check printer status at any time.
To connect a wireless printer to a computer via a network, do the
following:
Power on the printer. Configure its initial settings as
appropriate for the network. For example, you may need to configure
TCP/IP settings to use Dynamic Host Configuration Protocol (DHCP) or
you may need to use a static IP address.
Wait 30–60 seconds for the device to be detected. The device
should be detected and installed automatically. If the device isn’t
detected and installed, click Start and then click Devices and
Printers. In Devices and Printers, ensure that the device isn’t
already listed as available. If the device isn’t available yet,
click “Add printer.” You’ll then be able to install the printer as
discussed in steps 5–11 of the previous procedure.
If you have trouble connecting to the printer, make sure that
a firewall isn’t blocking connectivity to the printer. You may need
to open a firewall port to allow access between the computer and the
device. Also double-check the printer’s TCP/IP configuration. If
your network consists of multiple subnets connected together, try to
connect the device to the same network subnet.
Keep in mind that Network Discovery settings control whether your
computer can find other computers and devices on the network and
whether other computers on the network can find your computer. By
default, Network Discovery is not enabled (but you may have enabled
this feature already by creating a homegroup, sharing folders, or
performing other tasks). To enable Network Discovery, click
Start→Control Panel→Network and Internet→Network and Sharing Center.
In the left pane, click “Change advanced sharing settings.” Access
the appropriate network profile, such as Home or Work. Under Network
Discovery, click “Turn on network discovery,” and then click Save
Changes.
Installing Network-Attached Printers, Scanners, and Fax
Machines
A network-attached printer, scanner, or fax machine is a
device that’s attached directly to the network using a wireless
connection or a network cable. Network-attached printers, scanners, and
fax machines are configured so that they’re accessible to network users
as shared devices.
Warning
If you configure the printer and enable sharing, the
computer on which you configure the print device becomes an additional
print server for it. When you install this printer on
another computer, you might see two listings: one for the device
itself, and another for the shared printer on the computer that is
sharing it. Unless you want your computer to act as a print server,
you might want to select “Do not share this printer” in step 5.
You can install a network-attached printer or fax machine by
completing these steps:
Click Start→Devices and Printers. In Devices and Printers,
click “Add printer.” This starts the Add Printer Wizard.
In the Add Printer Wizard, click “Add a network,
wireless or Bluetooth printer.” The Add Printer Wizard will then
begin searching for available devices.
If the wizard finds the device you want to use, click it in
the list of devices found. Click Next.
Note
If your computer can’t find the network printer, make
sure that the printer is powered on and that a firewall isn’t blocking connectivity to the printer. You
may need to open a firewall port to allow access between the computer
and the printer. If your network consists of multiple subnets
connected together, try to connect the printer to the same network
subnet. Also, make sure the printer is configured to broadcast its
presence on the network. Although most network printers automatically
do this, this isn’t always the case. Finally, make sure that the
printer has an IP address and proper network settings. With DHCP,
network routers assign IP addresses automatically as printers connect
to the network. After you’ve double-checked everything, click Search
Again to have your computer search again for the printer. If this
resolves the problem, select the printer and then click Next to
continue this procedure. Otherwise, skip the remaining steps and
follow the next procedure to install the printer manually.
On the “Type a printer name” page, type a name for the device
or accept the default name. You’ll see this name on the Printers
page in the Control Panel. Click Next.
The printer is automatically configured for sharing. If you
don’t want the printer to be shared, select “Do not share this
printer.” Otherwise, you can set the share name and location and add
an optional comment.
When you click Next, the Add Printer Wizard will install the
printer and set it as the default automatically. If you don’t want
the printer to be the default, clear the “Set as the default printer” checkbox (you will see
this checkbox only if you had a default printer before you installed
this one).
To print a test page, click “Print a test page.” The wizard
will then print a test page. Click Close.
Click Finish. Click Start→Devices and Printers. The Devices
and Printers page in the Control Panel will have an additional icon
with the name set the way you specified. You can change the printer
properties and check printer status at any time.
If the Add Printer Wizard doesn’t find the network printer you
want to use, complete the installation by following these steps:
Figure 12.12. Setting the printer options
On the “Searching for available printers” page, click “The
printer that I want isn’t listed” and then click Next.
On the “Find a printer by name or TCP/IP address” page, select
“Add a printer using a TCP/IP address or hostname,” and then click Next.
On the “Type a printer hostname or IP address” page, shown in
Figure 12.12, use the “Device
type” list to select the type of device. If you don’t know the type
of device, choose Autodetect.
In the “Hostname or IP address” text box, type the hostname or
Internet Protocol (IP) address of the device. If you are unsure, use
the device’s control menu to print a configuration page.
The port name is set for you based on the hostname or IP
address entry. The port name doesn’t matter as long as it’s unique
for your computer.
When you click Next, the wizard attempts to contact the device
and automatically determine the protocol details as well as the
adapter type. If the wizard is unable to detect the print device,
make sure that the print device is turned on and connected to the
network. Also, ensure that you typed the correct IP address or
printer name in the previous page. If you entered incorrect
information, click the Back arrow and then retype this
information.
Complete the installation by setting the printer name and
sharing options as discussed in the previous procedure.
Xerox makes a network-attached scanner called the Xerox
WorkCentre Pro Scanner. This device and other similar devices install in
the same way as a directly attached scanner. When you complete the
installation, the scanner should be configured automatically. If it
isn’t, follow these steps to set the IP address for the scanner:
In Windows Explorer, access C:\Program Files\Windows Photo Viewer,
where C: is your system drive, and then double-click ImagingDevices.exe.
In the Scanners and Cameras window, click the scanner and then
click Properties.
On the Device Settings tab, type the hostname or IP address of
the scanner and then click OK.
Monday, July 1, 2013
Cell phone radiation: A self-defense guide (FAQ)
For
many people, it's just not practical or realistic to avoid cell phones
altogether. And it may not be necessary, if you follow some of these
suggestions for reducing your exposure.
Editors' note: This is the third of a three-part series on issues related to cell phone radiation. Revisit Tuesday's story on the inconclusive state of research on cell phone radiation, and Thursday's story about the trouble with federal safety standards, or click here for a roundup of related coverage.
When my sister--a mother of four--was shopping for a new cell phone
last summer, she wanted to know: what's the safest cell phone in terms
of radiation?
At first, I simply directed her to CNET's Quick Guide: Cell phone radiation levels,
which shows the specific absorption rate, or SAR level, for some of the
most popular cell phones on the market. SAR is the rate at which your
whole body absorbs energy from a radio-frequency (RF) magnetic field.
Every model of cell phone sold in the U.S. is tested and certified by
the Federal Communications Commission to ensure it has a SAR value less
than 1.6 watts per kilogram.
The FCC has established a protocol for testing cell phones, and after
each model is tested it's assigned an SAR value. This value, which must
be below 1.6 watts per kilogram over a mass weighing 1 gram, is
supposed to represent the maximum amount of radiation that this phone
can produce under the most stringent conditions.
But as I started working on this CNET special report on cell phone
radiation, I realized that the FCC's SAR limit is not enough to help
concerned consumers limit exposure. As I mentioned last week in the
second installment of this special report, "The trouble with the cell phone radiation standard,"
the studies on which these limits are based are outdated. Also, cell
phone radiation levels vary depending on the strength of the wireless
signal the phones are receiving. And the amount of radiation to which
you could be exposed is dependent on how close the phone is to your
body. Even holding the phone a few centimeters from your head can
greatly reduce the amount of radiation you could be exposing yourself
to.
To help readers figure out their best options for reducing exposure
to cell phone radiation and to answer other questions related to
protecting oneself, CNET has put together this FAQ. What's the real meaning of the World Health Organization's recent report that cell phones may cause cancer? Last week, a division of the WHO classified cell phones as a "possible carcinogen."
This means that though no definite link has been established between
cell phone use and some forms of cancer, there's enough evidence that
the group believes more research is needed. Other "possible
carcinogens," according to the WHO, include lead, exhaust from gasoline
engines, chloroform, and coffee.
Previously, the WHO had said there was not enough evidence to even
suggest a link between cell phone use and cancer. So the recent news is a
departure from the previous stance. And it may spur governments and
other groups to change their recommendations for cell phone use and
safety. So far, neither the Federal Food and Drug Administration nor the
FCC here in the U.S. have changed their recommendations. You mentioned the SAR values assigned by the FCC. Should I be
looking for a phone with a lower SAR if I'm concerned about reducing my
exposure to cell phone radiation? The FCC has said on its Web
site that consumers shouldn't use the SAR value to compare the "safety"
of cell phones. It maintains that all phones sold in the U.S. must test
below the 1.6 watts per kilogram limit, and that therefore all phones
that have made it to market are safe.
And because the amount of radiation a phone emits can change, the FCC
SAR value is not really that meaningful. Still, some experts say that
looking at the SAR value of a phone is a good starting place for
consumers concerned about cell phone radiation exposure.
"There's no harm in disclosing the SAR value," said Henry Lai, a
researcher at the University of Washington, who has published several
studies and has peer-reviewed several more studies on the effects of
electromagnetic radiation. "It may not be particularly meaningful, but
the point is that it gives people a choice, and it gets them thinking
about other ways they can reduce their exposure."
"We would never tell people to stop using their cell phones. But when
you drive a car, you put on your safety belt. When you are trying to get
to a healthy weight to prevent illnesses like heart disease, you count
calories."
--Tawkon CEO Gil Friedlander
So should I avoid using a cell phone? I'm sure there are
some people who might advocate that you should not use a cell phone at
all. But in today's world, that's not really practical. And it's
probably unnecessary, especially when there are ways you can reduce
exposure. For example, automobile accidents kill more people every year
than many diseases do, but nobody has suggested that people stop driving
their
cars.
Instead, the government requires safety standards, like air bags, and
drivers take safety precautions, such as wearing seat belts. Consumers
can also take precautions to minimize the risk associated with cell
phones.
"We would never tell people to stop using their cell phones," said Gil Friedlander, co-founder and CEO of Tawkon,
which makes a smartphone app that monitors cell phone radiation
exposure and alerts people when the exposure is likely high. "But when
you drive a car, you put on your safety belt. When you are trying to get
to a healthy weight to prevent illnesses like heart disease, you count
calories." What precautions can I take to reduce exposure to cell phone radiation?
• Don't put your cell phone right next to your body.
Moving a cell phone even an inch from the body can greatly reduce
radiation exposure. Signal strength falls off as the square of the
distance to the source. This means that if you double the distance to
the source, which is the cell phone to your head, the signal strength
would be four times less, since two squared is four. If you triple the
distance, the signal strength would be nine times less, and so on. At 10
times the distance between the cell phone and your head, the signal
strength is 100 times less, and at 100 times the distance, it would be
10,000 times less.
• Keep conversations short. The less you talk on your cell
phone, the less exposure to radiation you will have. So by keeping
voice conversations short, you're limiting your exposure.
• Use a headset. Experts recommend using either a wired
headset or a Bluetooth headset. While you may still be exposed to some
radiation using either type of headset, it's still a lot less than
holding the phone to your ear. If you do use a Bluetooth headset, I'd
recommend taking it out of your ear when you're not using it. There's no
need to continue to expose yourself to low levels of electromagnetic
radiation when you don't need to, since we still don't know the
long-term effects of radiation exposure at these low levels.
• Use the speaker phone function of the cell phone. For
the same reason you'd use a headset, using a speaker phone is another
good option. It keeps the cell phone away from your body, and you don't
have to worry about using a headset. Of course, the downside is that
everyone around you will hear your conversation, so this may only be
something you do when you're at home or somewhere private.
• Turn your cell phone off when you are not using it. For
example, turn off your phone when you go to sleep at night. Or at the
very least turn off the cellular radio in your phone. Many smartphones,
such as the iPhone, allow you to put your phone in "airplane mode." This
shuts down the cellular radio portion of your phone. You can also turn
off the Wi-Fi radio, too, just to be safe.
• Avoid using your cell phone in places where you get a poor signal.
Many consumers also don't realize that cell phones emit different
amounts of radiation depending on where they are with respect to a
wireless operator's cell phone tower. Cell phones are constantly
communicating with cell phone towers, but the further away the
subscriber is from the cell tower, the weaker the signal. In order to
connect to the cell tower, the device must boost its power, which
increases the amount of radiation emitted. This means that if you get
poor reception in your basement, you should move upstairs to your living
room, where you have better reception, to talk on your cell phone.
Tawkon's Friedlander noted that a minute of talk time in a "red zone,"
where the radiation is likely higher because of a poor cell phone
signal, is equivalent to the amount of exposure you'd get talking on the
phone for three hours in a "green zone," where reception is good and
the radiation emitted from a cell phone is much less.
• Text, IM, or use the Net more than talking on your phone.
When you're texting or using your phone to access the Internet, you
aren't holding it up to your head the same way you would if you were
talking on it. So texting and using other forms of communication that
don't require you to put the phone to your head or right next to your
body are good ways to reduce exposure.
• Carry your cell phone in your purse or backpack instead of in your pocket.
Again, it's all about creating distance between you and your cell
phone. So if you carry your phone away from your body, then you are
reducing your exposure.
I've heard device makers warn that cell phones shouldn't be held too close to your head. Is this true?
User manuals from most cell phones suggest keeping the phone a certain
distance from your head rather than pressed up against your ear. The
iPhone 4
manual says: "When using iPhone near your body for voice calls or for
wireless data transmission over a cellular network, keep iPhone at least
15 mm (5/8 inch) away from the body, and only use carrying cases, belt
clips, or holders that do not have metal parts and that maintain at
least 15 mm (5/8 inch) separation between iPhone and the body."
Many people have interpreted this as a warning from Apple about
keeping the device a certain distance from your body. But the disclosure
is written that way because that is how the cell phones are actually
tested.
In the testing procedures the FCC uses to certify that cell phones
don't exceed the 1.6 watts per kilogram SAR limit, the commission chose
to test the phones at a distance of between 0.59 inches and 0.98 inches
(1.5cm to 2.5cm) from the body. It also tests the devices in a
"body-worn" configuration and specifies that this should be done with
the device in a belt clip or holster. If a belt clip or holster was not
supplied with the phone, the FCC has told testers to assume a separation
distance of between 0.59 inches and 0.98 inches (1.5 cm to 2.5 cm)
during a test.
In other words, the FCC's testing protocol does not test for phones
that are broadcasting at full power while inside your pants pocket or
pushed up against your ear, two of the most likely ways cell phones are
actually used.
Given the current testing guidelines, it's hard to say whether cell
phones sold in the U.S. would exceed 1.6 watts per kilogram if they were
in a pocket or against your ear. But officials at the FCC have said
that there is enough of a cushion built in to the current standard that
they believe that all cell phones in the U.S. are safe.
Tawkon radiation alert.
(Credit:
Tawkon)
I've seen advertisements for cell phone radiation shields that
supposedly block cell phones from emitting radiation. Do these shields
work? The Federal Trade Commission, the nation's consumer
protection agency, says that manufacturer claims regarding so-called
"shields" are mostly baseless.
According to the FTC, there is no scientific proof that these
"shields" significantly reduce RF radiation exposure from cell phones.
The agency warns that some of the shield products that claim to block
radiation from the earpiece or another part of the phone can interfere
with the phone's voice signal, which may cause the device to use even
more power to communicate with cell phone towers. And this could lead to
the cell phone emitting even more radiation. What about the app from Tawkon that was mentioned earlier in this article? Is that app useful in reducing radiation exposure?
The Tawkon app supposedly monitors the SAR level and alerts users when
it gets above a certain limit. To be honest, I don't know how accurate
the Tawkon application is. There are a lot of factors that go into
calculating the SAR level of a phone at any given moment. But the
company claims its application uses an algorithm that measures your SAR
by using the phone's GPS technology and accelerometers to gauge the
position and proximity of the device to the body to determine the amount
of radiation that's being absorbed by the person using the phone.
The company is also using anonymous information culled from its users
to provide free access to a radiation map, powered by Google Maps, that
makes radiation exposure levels publicly available to users worldwide.
The app also provides an in-home or office map that lets users
predict where radiation would be the lowest and highest, based on their
individual usage. The idea is that given this information, consumers can
choose to use their mobile phones in areas where radiation is the
lowest, or they can reduce exposure in areas with more radiation by
using a headset. The app also provides personal statistics based on
usage that give wireless subscribers an indication of how much radiation
they've likely been exposed to during the last call, day, week, month,
or six months.
So assuming that the way it measures SAR is accurate, the Tawkon
application could provide you with more information about when and where
your phone is likely to emit more radiation, and then it allows you to
decide how you will change your behavior to minimize exposure.
Tawkon initially released its app for Research In Motion's BlackBerry operating system. And now it offers the app for the Google
Android
OS. The company submitted its app to the iPhone App Store, but it was
rejected. However, iPhone customers can still use the app if they
jailbreak their phone and get the app through Cydia, a software
application for iOS devices that lets a user find and download software
for jailbroken iPhones, iPod Touches, and iPads.
Because the
application must be tested and calibrated for each individual piece of
hardware, it is not yet available for every BlackBerry or Android
device. So potential users should check Tawkon's Web site for device
availability.
The app can either be purchased from the BlackBerry
App World or Android Market for $9.99, or users can get the app for
free if they agree to accept mobile advertisements. The iPhone app for
jailbroken devices is free and does not include advertisements. Are children at an increased risk for cell phone radiation exposure and its effects?
Many experts believe that if risks exist owing to cell phone radiation,
children will likely be affected more than adults. There are a couple
of reasons for this. For one, children today are likely to begin using
cell phones at a much younger age than their parents did, which means
they will be exposed to this low-power radiation for a much longer
period of time over their lifespan than today's adults.
And
secondly, children have smaller heads and thinner skulls than adults.
And as a result, radiation is believed to penetrate more deeply into
children than adults. What's more, cell phones may have a greater effect
on children's brains because their brains are still developing.
Some
researchers have suggested that children might be more likely to suffer
from memory loss, sleeping disorders, and headaches as a result of cell
phone radiation exposure, as well as be at increased risk of some
cancers later in life. Several countries, including Russia, Germany,
France, Israel, Finland, and the United Kingdom, have issued warnings
against children using cell phones.
In the U.S., meanwhile,
efforts to require warning labels or requirements to provide more
information about the SAR of a particular phone at the point of sale
have so far been largely unsuccessful. Check out CNET Reviews editor
Kent German's recent story that surveys the current state of cell phone radiation warning legislation.
Marguerite
Reardon has been a CNET News reporter since 2004, covering cell phone
services, broadband, citywide Wi-Fi, the Net neutrality debate, as well
as the ongoing consolidation of the phone companies.