Passive Components
Passive electronic components, such as resistors, inductors, capacitors, or transformers, do not require any source of energy to perform their function in an application.
Capacitors (24 Products, 207 Companies)
Fundamental electrical components that store charge and energy in the electric field between a pair of conductors (“plates”) separated by an insulating material called the dielectric. Used in electronic circuits, filters, power supplies, etc.
Coils, Inductors & Magnetics (31 Products, 410 Companies)
Coils, inductors and magnetics account for types of fixed and variable coils and inductors, including chokes and reactors. Also included are ferrite parts and materials related to magnetic applications.
Potentiometers, Trimmers & Controls (12 Products, 92 Companies)
Potentiometers, trimmers and controls pertain to the variable or adjustable properties of resistors.
Resistors (37 Products, 207 Companies)
Resistors are fundamental circuit components having electrical resistance and utilized in an electric circuit for purposes of protection, operation, or control of current.
Transformers (55 Products, 467 Companies)
Transformers are electrical devices, which by electromagnetic induction, transform electrical energy from one or more circuits to one or more other circuits at the same frequency, but usually at a different voltage and current value.
Wednesday, June 19, 2013
Wednesday, June 12, 2013
how to hack tigo WAP in oder to get free internet tigo.
Step 1 : Enter the Access point name (APN) Prepaid/postpaid customer : wap
Step 2 : Enter Session mode as Permanent with no user name and password
Step 3 : Enter website as http://wap.tigo.lk
Step 4 : Enter the IP Address as 192.168.104.4>>put this as ...
Step 5 : WAP 1X port : 9201, WAP 2X port : 9401
Settings (INTERNET)
Step 1 : Enter the Access point name (APN) Postpaid customer : internet
Step 2 : Enter Session mode as Permanent with no user name and password
Step 3 : Enter website as www.tigo.lk
Charges (GPRS)
GPRS Session will be charged at Rs. 2.
GPRS volume will be charged at 2 cents KB
Settings (MMS)
Step 1 : Enter the Access point name (APN) Prepaid/postpaid customer : mms
Step 2 : Enter Session mode as Permanent with no user name and password
Step 3 : Enter website as http://mms.tigo.lk:8085
Step 4 : Enter the IP Address as 192.168.104.4
Step 5 : WAP 1X port : 9201, WAP 2X port : 9401
HOW TO BROSWE FREE WITH YOUR DSTV, HITV, STARTIMES DECODER
FREE INTERNET BROWSING WITH YOUR DSTV, STARTIMES, MY TV, HITV
(NEW OR OLD MODELS)
Many years ago, i came across some thing in the internet, how to
browse free with phones, some months back its stop. Last two years until
now i have been on this free internet and its been working for me and
others. The best free internet presently is the Satellite Internet, which DSTV, STAR-TIMES, HITV, MY TV, are providers.
SATELLITE INTERNET doesn’t affect signal or any
damage to your Decoder, but add more values to it. Why pay some much for
a bouquet and pay more on internet plans. When you can make use of this
free internet with decoders.
The procedure are so simple and easy to follow:
Requirement:
- A Decoder (dstv, hitv, e.t.c.) (see fig 1)
- A Cable Modem
- RJ 45 NIC Cable
- SPLITTER
- A Router
- E16-12 Channel on your decoder…see more…….

Fig 2. Cable Modem

Fig 3. RJ 45 NIC Cable

Fig 4. SPLITTER


These configuration is done on a scramble channel on the decoder. That gives the Access and IP for the Internet browsing. The configuration doesn’t affect any channel, but add one channel called Internet E16-12 (The Code is what you are paying for).
HOW TO SET UP:
1) CONNECT SPLITTER WITH DECODER CO AXIAL HOLE
2) CONNECT OTHER SIDE OF SPLITTER TO CABLE MODEM
3) CONNECT MODEM JACK TO SYSTEM
4) SWITCH ON THE WHOLE CONTRAPTION
5) CONFIGURE THE DECODER TO GET IP OR INTERNET CHANNEL ( E-16- 12)
How to encrypt your external drives (Locking your flash drives)

security are always meticulous
about the security of our data. We
provide passwords on our PC. Some
of us go to the extent of creating
BIOS password, syskey, and then
the windows login password. Some
with extra paranoia will even use
softwares like folder lock or PGP to
encrypt their files and folders.
This
is really good and I am also a big
fan of security because I implement
it a lot but when I become the
attacker, I hate security.
I realized that all these accounting
bank managers that are so careful
with their data and some other
individuals also will just provide all
these security on their computers.
Forgetting the fact that some of
those information are in their flash
drives, they just drop their flash
drives carelessly sometimes.
Sometimes it may not be a careless
drop, you may get a physical
attack and your flash drive will be
stolen from you.
Here I will show you a way to
provide complete security to the
data on your flash drives and
other external drives.
You do not need to download any
software.
Note: This tutorial is for windows
users only
Follow these steps to encrypt your
drive:
1. Plug in the external drive into
the USB port
2. Go to my computer and right-
click the drive to be encrypted as
shown below
Now click "Turn on Bitlocker"
3. You will see something like this
Click the first check button and
provide the password you want for
your drive then click next
4. Our computers know we are
likely to forget some things so
they provide us with backup
option. Save a recovery file and if
suits you to print it then do that
and proceed
Now there is a big question for
you.
Are you ready to encrypt? If
you're with me on this then
continue
Grab a snack and chill for the
encryption to be over.
And that's it. The encryption is
over
To test this, you can unplug your
drive and plug again.
Now you
have to type your password. I hope
this post helps you security
fanatics
Airtel unlimited giggs trick
We all know airtel to be ths fastest network in nigeria . You would
want to add more grade to it when you hear this
Well airtel has been browsing free for sometime now, i dnt to waste
your time so lets just get down to the business of the day
HOW TO GET AIRTEL UNLIMITED GIGGS FOR FREE
[hr]
1. buy an airtel recharge card [#400]
2. Get another phone or you could umm ask your pal to help you with his phone
3. Now load the card and umm make sure the sim in the second phone
is not an airtel sim, u can make use of etisalat or mtn
4. Now call the number i.e the second number whnile it's still
ringing dial this code *440*5#
5. You would get erro codin..
Not to worry . Dial *141*712*0#
you would discover that u'av been credited with 100mega byte
6. Check your credit by dialin *123# . Your money is still intact
Repeat the above procidure to earn more
NOTE: do not allow the call to end while dialing these code, else you
would loss your #400
So i advice that you control your greed on this one .
you can also make use of #100 recharge card, with same procidure. Bt
this type you would have to make use of this code *440*6#
Enjoy it
Trick to Complete Formatting Mobile Phone
Here is the trick for completeformatting of your virus infected
or other problem arriving mobile
phone...
This trick is for almost all Nokia
models.
1. Switch off your phone...
2. Remove SIM card & memory
chip...
3. Now press & hold keys - 3,*,call
green) ...
4. Then without leaving these three
buttons press power button...
5. Formatting task will be started...
6. Remember its a very rare
trick....
Yes its true its call hard format.
key * , 3 , Call button (green)
press and hold when display is on
than formatting screen is
displayed.
Wait for formatting to be finished,
Before carrying out this process
make sure you have copied all
your contacts and notes onto your
Memory, because every thing will
be deleted. When its finished the
formatted phone may be like new,
just like when u have brought it
from showroom.
Note: You can also make use of these procidure to flash a death phone.
You only need a flashing software when you want to upgrade the
firmware of the phone.
Cracking DSTV the easy way
For those who do not know already, there a few unencrypted channels on
Eutelsat W4 and Eutelsat W7, both located at 36° East. DStv was formerly
on W4 but is now beaming its signals from W7. The information I am
sharing relates to how to view the unencrypted channels that share the
same satellite as Multichoice’s DStv, and not how to illegally hack into
DStv’s encrypted channels.
DStv decoders are designed, manufactured and sold to receive Multichoice services only. Therefore, I offer no guarantee that all the channels I am sharing would necessarily work on your DStv decoder. The DStv HD decoder for example, does not offer a “Public bouquet” and even for the single view decoders that do, one might be unable to watch the unencrypted channels once subscription is overdue. It would thus make the most sense to simply buy a good MPEG4-compatible digital satellite receiver and connect same to your satellite dish. There would be more on that later.
The free channels from China
The easiest unencrypted channels to watch are the following 3 TV channels from China Central Television (CCTV), the major state television broadcaster in mainland China:
CCTV News (formerly CCTV 9): this channel is targetted at an English-speaking international audience and mainly broadcasts news and current affairs programmes
CCTV-F: programming targetted at a French-speaking international audience
CCTV-4: an international channel broadcast in Chinese language
Any DStv decoders can view the CCTV channels whether your subscription is expired or not. So long your satellite is pointed towards 36° East.
If you are using a good Free-To-Air (FTA) digital satellite receiver, a blind scan should reveal the CCTV channels. Else, enter the following parameters to your receiver:
In South Africa – Frequency: 11637 Symbol rate: 22000 Polarization: Vertical FEC: 3/4
Rest of Africa – Frequency: 11940 Symbol rate: 27500 Polarization: Horizontal FEC: 3/4 and Frequency: 11862 Symbol rate: 27500 Polarization: Horizontal FEC: 3/4
The free channels from East Africa
In recent times, a few channels have emerged on Eutelsat W7 from Kenya, and beamed at the African continent:
NTV Kenya: a leading TV channel in Kenya offering news and general entertainment
KBC Channel 1: a TV service from the wholly-state owned Kenya Broadcasting Corporation
K24: a news and current affairs channel from Kenya
KTN Kenya: an all-round channel in Kenya. Arguably the leading TV station
NTV Uganda: a general entertainment channel targetted at Uganda
Parameters:
Frequency: 11731 Symbol rate: 8751 Polarization: Vertical FEC: 3/5
Frequency: 11716 Symbol rate: 3141 Polarization: Vertical FEC: 3/4
The free channels from Francophone West Africa
A bouquet of mostly French-speaking African channels exist on Eutelsat W4.
La Chaîne de Futur (LCF): a tv channel from Togo
Mboa TV: an entertainment TV channel based in France and exclusively dedicated to black-afro artists
RTS 1 (Senegal): Radiodiffusion Télévision Sénégalaise (RTS) is the Senegalese public broadcasting company
2STV: a TV channel in Senegal broadcasting mainly cultural programmes, interviews with local music and other artistic stars, and talkshows
Touba TV: a privately-owned TV channel in Senegal
ORTB TV: Office de Radiodiffusion et Télévision du Bénin (ORTB) is a the mainstream terrestrial television channel and radio operator in Benin
LoveWorld Plus: Christian-themed programming in English language from Nigeria
Parameters:
Frequency: 12437 Symbol rate: 23437 Polarization: Horizontal FEC: 3/4
Kindly note that the channels are subject to change without notice. Thus, re-scanning your receiver regularly ensures that you are constantly in the loop as to the current channels.
HOW TO UPGRADE AND RESTORE DEATH STRONG DECODER
HOW TO UPGRADE /RESTORE A DEATH STRONG DECODER.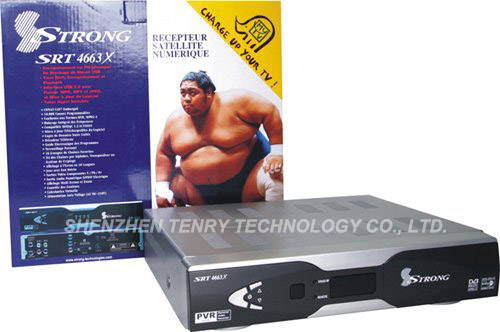
Good day fellas today am going to talk about how to upgrade a strong decoder and how to restore a strong decoder thats death. When i say ''death'' i mean decoders that refused to turn on after upgrading the decoder this might be due to use of wrong or lower version of firmware on the decoder.
HOW TO UPGRADE A STRONG DECODER
NOTE:you have to make sure you are using a genuine strong decoder before doing this, cuz you might end up killing your decoder if you are making use of a fake strong one.
BASIC REQUIREMENTS


FREE INTERNET ACCESS ON ORANGE UGANDA USING PROXIEZ
USING PROXIES ON ORANGE ----courteusy of Horny -cupid
FREE INTERNET ACCESS ON ORANGE UGANDA USING PROXIEZ
(Some might work on MTN UG) ..Domain/tunnel = m.facebook.com
->I'm posting this for tha last time coz I'm sick & tired of people over loading ma inbox wit Questions about free internet
.........................................................................................................
hidemyass.com
hidemy.biz
browseunblocked.com
152.26.53.5
0001tool.info
www.freeproxyserver.ca
vvd1
abeproxy.tk
60.217.32.143 port 3128
110.139.66.22 port 8080
201.199.127.232 port 8080
173.13.36.177 port 8080
...
.........................................................................................................
PC SETUP
...***Mozilla Firefox***...
Lets use browseunblocked.com port 80.. Disable Java script script on yo browser (tools>>options>>content and disabled it).
Input "m.facebook.com" as ur home page so that when u open ur browser,automatically it wil display "browseunblocked.com" page
were u type yo web address or google".
Input home page on ur browser(tools>>options>>general and type..m.facebook.com).
...***Google Chrome / Internet Explorer***...
settings>>under the hood>>Network>>Change proxy settings>>connections>>LAN settings>>Proxy server>>Advanced
...***Opera***...
Menu>>Settings>>Preferences>>Advanced>>Network>>Proxy Servers...
...***Avant Browser***...
This is ma favorite web browser coz...
1- It uses settings of all web browserz installed on a pc
2- It has split screen view (view 2 pages at tha same time), Content Zoom, Full Screen and Full Desktop
3- Auto Refresh (u set tha duration a page should refresh every after X seconds or X minutes)
4- It has a fast download manager that can even download youtube files.. so no need of idm
5- Quick switch from Direct Connection to Proxy vice versa without going to Options/Settings
........Tools>>Default Rendering Engine>> and choose the web browser u want to use plus its settings
For downloads using avant go to Tools>>Downloads>>Options>> Input tha proxy address and port for HTTP & FTP Proxy Server
...***IDM (Internet Download Manager)***...
to download youtube videos and other downloads (Its better if yo browser downloads files which are not videos)
options>>proxy and type the proxy yo using. i.e browseunblocked.com port 80
.........................................................................................................
PHONE SETUP
Http/ip address= browseunblocked.com or 69.162.137.252....port = 80....apn/access point = orange.ug....homepage = m.facebook.com
....they work on all phonez even china phones (2,3,4 sim-card phonez)
and some china phones run java apps so download ucweb handler from umnet.com to load pages faster.........
if yo using opera, ucweb, bolt, firefox for original non-china phones etc ,its beta u download handler versionz from umnet.com
.........................................................................................................
IF ONE PROXY FAILS, TRY ANOTHER!!
MEMORY CARD PASSWORD RETRIEVAL
MEMORY CARD PASSWORD RETRIEVER.
This is a very short tutorial , basically it is meant to help you recover your lost memory card password .
STEPS
1. Just download this symbian application Download
2.PUT the memory card with the lost password in your card slot.
3.Open the application >>>press option>>> choose the first option.
4 And the password would popup . Thats all .
Simple uhn, enjoy it
HOW TO GET PASSWORD AND EMAIL FROM A PHISHING SITE
TODAY IM GONE TEACH YOU HOWTO GET FACEBOOK EMAIL AND
PASSWORD FROM A PHISHING
SITE
1) FIRST COPY ONE OF THE
GOOGLE DORK BELOW AND PASTE
IT IN GOOGLE SEARCH ENGINE
i) intext:charset_test= email=
default_persistent=
ii) inurl:"passes" OR
inurl:"passwords" OR
inurl:"credentials" -search -
download -techsupt -git -games -gz -
bypass -exe filetype:txt
@yahoo.com OR @gmail OR
@hotmail OR @rediff
2) THEN YOU WILL GET SOME
SITES JUST CLICK ONE AND SEE
THE EMAIL AND PASSWORD
Tomb Raider Full Pc Game + Crack

Tomb Raider is an upcoming action-adventure platform video game. Published by Square Enix,
Tomb Raider is the fifth title developed by Crystal Dynamics in the Tomb Raider franchise.
As the first entry in a new Tomb Raider continuity, the game is a reboot that emphasizes
the reconstructed origins of the culturally influential lead character Lara Croft.[4][5]
Tomb Raider is scheduled for release on March 2013 for PlayStation 3, Xbox 360
and Microsoft Windows.[3] It has become the first Tomb Raider game to be given
an "M" (Mature) rating by the Entertainment Software Rating Board,
and also the first Tomb Raider game to be rated "18+" by Pan European Game Information.
Tomb Raider Minimum System Requirements
OS: Windows XP Service Pack 3
CPU: Intel Core 2 Duo E6300 1.86GHz or AMD Athlon 64 2.1GHz 4050+
RAM: 1GB System Memory
GPU: Nvidia GeForce 8600 GT or ATI Radeon HD 2600 XT
DX: DX 9
HDD: 5 Gb Free Hard Drive Space
Tomb Raider Recommended System Requirements
OS: Windows 7 64bit
CPU: Intel Core i5-750 2.4GHz or AMD Phenom II X2 565 3.4GHz
RAM: 4GB System Memory
GPU: Nvidia GeForce GTX 480 or Radeon HD 4870
DX: DX 11

FREE TO AIR CONFIGURATION OF DSTV DECODER ,MYTV/STRONG DECODERS

and Codes
These are the following
channels you will pick after
entering the settings below:
Lotus FM, Mindset Health,
Botswana TV, Vivid Mosiac,
RADIO Radio2000, Hope
Channel Africa, ITV, Astro
and various commercial
channels. God TV Africa,
SAFM, Ikwekwezi FM, 5FM,
RSG, Lesedi FM, Trans World
Radio, Metro FM, Good Hope
FM, Channel Africa, Classic
FM, DW Radio, Radio Pulpit/
Kansel, Impact Radio, Radio
Pretoria, ASTV, YFM. .
No: 1 Setting up of your
decoder, make sure that your
decoder software is updated
to the latest version. To do
this update: Press the Menu
button. Select "Advanced
Options" and press OK. Select
"DSD UPGRADE" and press
OK. The decoder should start
to upgrade the software now.
No: 2 Press menu Select
"Advanced Options" Select
"Dish Installation" Enter the
pin "9949" Select "Network
Configuration" Select
"Network 2 Setup" NB:
Leave "Network 1 Setup
(Home)" unchanged!! Set
Signal Setup to "Enabled" by
selecting it, and moving left
or right Set Frequency to
"11170" Set Symbol Rate to
"26652 Set Polarization to
"Vertical" Set FEC to "3/4"
Select "Accept these
settings"
No: 3 Select "Network 3
Setup" Set Signal Setup to
"Enabled" Set Frequency to
"11625" Set Symbol Rate to
"15000 Set Polarization to
"Vertical" Set FEC to "3/4"
Select "Accept these
settings"
No: 4 Select "Network 4
Setup" Set Signal Setup to
"Enabled" Set Frequency to
"11674" Set Symbol Rate to
"26652 Set Polarization to
"Vertical" Set FEC to "5/6"
Select "Accept these
settings"
No: 5 Select "Network 5
Setup" Set Signal Setup to
"Enabled" Set Frequency to
"12522" Set Symbol Rate to
"26657 Set Polarization to
"Horizontal" Set FEC to
"1/2" Select "Accept these
settings"
No: 6 Select "Network 6
Setup" Set Signal Setup to
"Enabled" Set Frequency to
"12562" Set Symbol Rate to
"26657 Set Polarization to
"Horizontal" Set FEC to
"1/2" Select "Accept these
settings"
No: 7 Select "Network 7
Setup" Set Signal Setup to
"Enabled" Set Frequency to
"12682" Set Symbol Rate to
"26657 Set Polarization to
"Horizontal" Set FEC to
"1/2" Select "Accept these
settings"
No: 8 Select "Network 8
Setup" Set Signal Setup to
"Enabled" Set Frequency to
"12722" Set Symbol Rate to
"26657 Set Polarization to
"Vertical" Set FEC to "1/2"
Select "Accept these
settings"
No: 9 Exit once to go back to
the "Dish Installation" menu
Select "Scan All Networks"
Your decoder will go into
scanning mode and might
take a while to scan all 9
networks. Do not interrupt
the process even if it seams
to take longer than you
expected! Once completed,
your picture will return as
normal
NOW FOR MYTV USERS
Make use of these steps
1. Goto installation
2.press enter and enter your security code. E.g 0000
3. Now goto blind scan
4. you would see list of satelite channels
5. For sport select w4w7 and blind scan
6. For any other channel like nollywood plus, nollywood, ifilms. E.t.c
You can scan intelsat 7,10/k
7. The above steps would not unlock channels but would give you free
to air channels.
With somany dstv channels attached to it.
YOU CAN ALSO HACK THE SCRAMBLED CHANNELS AND MAKE THEM WORK FOR FREE.
USING BISS CODE,GONGLE AND SOME OTHER TRICKS ATTACHED TO IT.
WATCH OUT FOR MY NEXT POST ON SATELITE SETTINGS . YOU WOULD GET THE
BISS CODE FOR EACH CHANNEL.
.
Skype Credit Generator v8.2.3 (2013)

Instruction
Open Skype Credit Generator v8.2.3
Enter Usser & Pass
Slelect Credit Value
Click button generate and wait for your credit is generate
Click button send credit to your account
Enjoy!
Recomandation!
Use it one time at week!!!
Open Skype Credit Generator v8.2.3
Enter Usser & Pass
Slelect Credit Value
Click button generate and wait for your credit is generate
Click button send credit to your account
Enjoy!
Recomandation!
Use it one time at week!!!


Tuesday, June 11, 2013
Where to Get a Windows 8 Preview Product Key
With Microsoft's release of it's Windows 8 Consumer Preview ISOs, you are probably wondering where to find a Product Key so that you can take this new operating system for a spin. When I downloaded the official Windows 8 Consumer Preview ISO and copied the ISO to a Flash Drive via UUI -> Install Windows 8 from a Flash Drive, I rebooted proceeding to run the Windows 8 installer, but didn't get far before being asked for a Product Key to continue.As it turns out, you need an Official Windows 8 Product Key to take this new OS for a test drive. Luckily there is a means to easily obtain your product key via the use of Microsoft's Windows 8 Consumer Preview Setup Tool.
How to Obtain a Windows 8 Consumer Preview Product Key
- Download and launch Microsoft's Windows8-ConsumerPreview-setup.exe "Windows 8 Consumer Preview Setup Tool"

- The Windows 8 Consumer Preview Setup Tool will first check the PC it
is run from for compatibility, then click Next and you will be provided
with a product key to use.

- At this point if you already have an ISO, simply close the window.
How to Install Vista on a MacBook Pro
In the following simple solution, I cover the process of installing Windows Vista on a Macbook Pro. For many people, migrating from a Windows PC to a Mac is a tough transition. You can become quickly overwhelmed when trying to learn how to navigate and use the Mac OS X Leopard operating system. In many cases, a user will need to find equivalent software in order to establish the creature comforts they were accustomed to with Windows.Sometimes, the same software that was used in Windows is not available for the Mac OS and the user will need to learn to use a new set of tools to accomplish the same task. This can be time consuming, especially if you depend on specific tools and applications in your daily routine. In which case, the best alternative may be to dual boot your Macbook Pro, so you can Have your Mac and Vista too!
Luckily, Apple thought ahead with their Hardware design and boot software. Newer Macbooks ship with Boot Camp, a software that works with EFI (Extensible Firmware Interface). EFI is designed to replace the BIOS and when used in conjunction with Bootcamp, allows it's user to easily select and boot from multiple operating systems.
How to run Vista on a Macbook Pro:
- From the Menu bar, Navigate to Go > Utilities:
- Now, click Boot Camp Assistant from the Utilities Menu:
- Next, if you have a printer, print the Installation and setup guide, then click Continue. Otherwise, simply press Continue:
- Now to adjust the amount of space you wish to allocate to Vista, click and drag the divider between Mac OS X and Windows to the left to increase, then click Partition. I recommend allocating at least 20GB to Vista or you will quickly run out of headroom:
- Now, Insert your Windows Vista DVD and click Start Installation:
- After some time, you will end up at a screen asking where you want to install Windows. Select the BOOTCAMP partition then click Drive Options Advanced. Click Format. Once the partition has been formatted, click Next:
- Windows Vista will take some time to install. Once it has finished and your up and running, eject the Windows Vista installation disk and insert your Mac OS X leopard Install Disk 1. Navigate to the BootCamp folder on the disk and run Setup.exe:
- You should now be presented with the Boot Camp installer. Click Next and follow the onscreen instructions to install the Windows drivers for your Macbook Pro:
- After the driver installation has finished, upon reboot, your sound, video, wireless card, bluetooth and keyboard shortcuts should function properly.
- To switch between Windows Vista and Mac OS X, simply hold down the option key during system boot and you will be presented with a boot menu where you can select which OS to boot:


How to fix the Error booting Vista on Macbook Pro:
If you encounter errors during the boot of Vista on your Macbook Pro, see the post on How to fix Unrecognized Partition Table for Drive 80 boot error.This Simple Solution published under Mac OS X Tips and Tricks, Windows Vista Tips and Tricks Tags: mac, mac os x, macbook pro, run vista on a macbook, windows vista
Troubleshooting Mac OS X installation and software updates (Mac OS X v10.6 and earlier)
Products Affected
Mac OS X 10.4, Mac OS X 10.5, Mac OS X 10.6, Mac OS installation/setup (any version)Symptoms
Read troubleshooting information and advice about installing Mac OS X and Mac OS X updates in Mac OS X v10.6 and earlier.Resolution
Collapse All Sections | Expand All SectionsBefore you install
Verifying the installation
Troubleshooting an unsuccessful installation
Software installation Quick Assist
Summary
Learn how to install new software on your Mac, update your software and Mac OS X, and troubleshoot installation issues.Products Affected
Mac OS X 10.4, Mac OS X 10.5, Mac OS X 10.6, Mac OS installation/setup (any version)
Learn how to install new software on your Mac, update your software and Mac OS X, and troubleshoot installation issues.
What do you need help with?
- I want to manually install new software or updates from a disc or from a download
- I want my Mac to automatically find Apple software updates
- I'm having trouble installing, updating, or upgrading my software
Manually installing new software and updates
Installing new software from a discSimply insert the CD or DVD in your computer's optical disc drive (if it has one; if it does not, see the note below). In most cases, a software installer will open automatically. If not, double-click the disc icon on your desktop and in the resulting window, look for a file with the word “installer” in the title. Double-click the file to open the installer and follow the onscreen instructions to install the software. You will need to enter an administrator name and password to install software.
Note: If your Mac does not have an optical drive to put a disc into, you can share the disc to your computer from a different computer via Remote Disc. See Sharing DVDs or CDs with Remote Disc and MacBook Air: How to use Remote Disc to share DVDs or CDs on a Mac- or Windows-based computer.
Installing or updating software from a downloaded file
Many software installers and updaters that you download from the Internet are disk image (.dmg) files.
After you download such a file from a website (such as Apple Downloads), an installer window will usually appear.
If you don't see an installer window, simply double-click the downloaded disk image file to mount the disk image on your desktop. Double-click the disk volume that appears and then double-click the installer or updater file to start the installation process.
If you see an application instead of an installer, go to "Installing software from a downloaded file that doesn't have an installer". Follow the onscreen instructions to install or update the software. You will need to enter an administrator name and password to install or update software.
Installing software from a downloaded file that doesn't have an installer
After downloading software, if an installer window doesn't open automatically or you don't see a file with the word “installer” (or similar) in its name when you manually mount the disk image, simply install the software by dragging and dropping the file or folder from the disk image to the Applications (or other) folder on your Mac. These types of files already have all the necessary files pre-installed and don't require a proper installer to install it—or an administrator name and password.
More information about installing or updating software
Many installers will ask you where you'd like to install your software. Updaters may ask you to select the application to be updated if it doesn't find it automatically. The Applications folder is generally the best place to install software. To avoid issues, do not rename applications. If you need additional assistance, look for a text or PDF file of instructions that may come with the installer or visit the developer's site.
Note: If your downloaded file arrives in a compressed format such as a .bin, .sit, .sit.hqx, or .sea.hqx file, double-click the file to expand it first—you'll need software such as Smith Micro StuffIt Expander (a free utility) or similar application.
For help with installing Dashboard widgets, see Installing and removing Dashboard widgets.
Using Software Update
Software Update lets you easily install updates for Apple software via the Internet. See Mac OS X: Updating your software for more information about Software Update.Top troubleshooting tips
- Make sure you have enough disk space
If you're installing new software, the installation may require a significant amount of space on your hard drive. Check the software's installation requirements to find out how much space is needed, and confirm that your Mac has enough available space on its hard drive before installing. To find out how much space you've got left, double-click your hard drive icon to open a Finder window; your available disk space should appear at the bottom of the window.
- Verify that you have administrative access
You need to be an administrator of the computer to install or update software. If you're the one who first set up the computer, you are the administrator. If someone set up your computer for you and your own username and password aren't allowing you to install software, consult that person for assistance. If you've forgotten your administrator password, see Mac OS X: Changing or resetting an account password.
- Make sure that you're entering the serial number / code correctly
Some software installers require that you enter a serial number or software key (or code) during the installation. You can usually find the number or key printed on the installer disc, disc case, in the manual, or on a certificate provided with the software. If you downloaded the software, the key may be sent in a separate email. You should make note of the number or key before installing the software and be sure to enter the code correctly. If the code is not accepted, make sure you use the numeral 1 or the letter I as appropriate, the number 0 (zero) and the letter O as appropriate, the number 5 for the letter S as appropriate, and so forth.
- Check the system requirements
Make sure that your Mac meets the minimum system requirements to install and use the software. Check the software packaging or the developer's website for specific requirements.
- Check the disc on another Mac
If an installer on a DVD or CD won't open on your Mac or the disc doesn't appear on your desktop, try the disc with another Mac. If it opens elsewhere, use System Profiler to verify that the computer's DVD drive is recognized by the system. Some older drives may only read CDs. Otherwise, your disc drive may need repair (test your disc drive's performance with other CDs and DVDs first before seeking service). If the disc doesn't work on another computer, there could be something wrong with the disc—contact the software developer for assistance or replacement.
- Make sure that your Internet connection is working for Software Update
If your Internet connection or network is down, Software Update won't be able to access the Internet to do its job. Try again later when your connection is back up and running. If you're connected to a network, make sure that your computer is allowed to access Internet locations—consult with your network administrator to find an alternate location to access Software Update or to get information about the proxy server your network uses to access the Internet.
- Download the application again
If you're trying to install from a download, visit the software developer's site and download the installer file again. There could be an issue with your original download and a fresh copy may resolve the issue.
- Make sure that you've got the right updater or upgrader
If you're updating or upgrading software, make sure that the version you downloaded or bought is truly the one you need. Some updates require that you install another update before you can install the latest one. Some upgrades will only upgrade certain versions of an application, which may not be the one you have. Check the developer's website or any included “Read Me” file for installation requirements and other useful information.
- Try removing application receipts
If you're reinstalling an application or updating an existing one, try removing the application's receipts. Look for any receipts that bear the name of the application in the the Receipts folder inside of the main Library folder (/Library/Receipts) and move them elsewhere. Then try installing or updating your software again.
- Try installing the software again
Some of the components in the installer may not have been installed completely in your first installation attempt. If the application or your system upgrade appears on your Mac but isn't working as expected, try installing the software again.
Still having issues?
If the tips above don't resolve your issue, here are some other things to try:
- Visit our Support site and use the Search tool to search for your issue.
- Contact the software developer for assistance.
- Visit Apple Discussions, select your product, and seek advice from others.
Subscribe to:
Posts (Atom)